Как сделать трассировку маршрута до сайта, сервера
Содержание:
- Summary
- Traceroute on Linux
- How Does Traceroute Works?
- Traceroute IPv4 and IPv6
- What is Traceroute?
- Как установить проблему при помощи трассировки?
- Как работает команда Tracert или Traceroute
- Проверка пинга
- Как сделать трассировку маршрута до сервера, сайта в oc windows
- Links and Reference Material
- Why perform a traceroute?
- Understanding MTR (MyTraceRoute)
- Using PathPing
- Как работает
- VisualRoute
- A little bit more about the TTL
- Как сделать трассировку?
- Traceroute on Windows
- Common Traceroute Error Messages
- Screenshots of traceroute and tracert
- Ipswitch Free Visual Traceroute
- Примеры
Summary
Although it is underestimated, Traceroute is one of the best OS-native network analytics tools. It is not only capable of testing connectivity, as Ping does, but it also finds all hops in between source and destination, including names, and delay times.
And all of this is done with the same protocol that Ping uses, ICMP. Also, by altering a field in the IP packet, the TTL.
Some software developers are even creating a front-end version of traceroute and including things such as GUIs, Geographical maps, graphs, etc. All to make a simple tool even more powerful.
But if you understand the basics and some of the tricks shown in this article, you probably won’t need fancy software.
Traceroute comes in all OS out there, from Linux, Windows, UNIX-based, to macOS.
The underlying functionality is the same, but remember that there are few command syntax and output distinctions.
Traceroute on Linux
On Linux, you really do use traceroute because the command to launch it is the same as the utility’s name. There are a lot more options with the Linux version than with the Windows tracert. To get a list of options for the command, use traceroute –help. Here are the parameters for the command:
Here’s what those options mean:
| Paramater | Variable | Description |
|---|---|---|
| -4 | Force IPv4 | |
| -6 | Force IPv6 | |
| -I | Use ICMP ECHO | |
| —icmp | As above | |
| -T | Use TCP SYN for probes | |
| —tcp | As above | |
| -d | Enable socket level debugging (when the Linux kernel supports it) | |
| —debug | As above | |
| -F | Do not fragment probe packets | |
| —dont-fragment | As above | |
| -f | first_ttl | Time to live starting point. The default is 1 |
| —first= | first_ttl | As above |
| -g | gateway | Route through the specified gateway (disabled on most routers for security) |
| —gateway= | gateway | As above |
| -i | interface | The interface through which traceroute should send packets |
| —interface= | interface | As above |
| -m | max_ttl | The maximum number of hops (time-to-live value). The default is 30 |
| —max-hops= | max_ttl | As above |
| -N | squeries | The number of packets sent out simultaneously. The Default is 16. |
| —sim-queries= | squeries | As above |
| -n | Don’t map IP addresses to host names | |
| -p | port | The destination port base. Increments for each probe (except for TCP) |
| —port= | port | As above |
| -t | tos | Set Type of Service (TOS) and Precedence in IPv4. Set Traffic Control in IPv6 |
| —tos= | tos | As above |
| -l | flow_label | Use specified flow_label for IPv6 packets |
| —flowlabel= | flow_label | As above |
| -w | max | Determines how long to wait for a response to a probe |
| —wait= | max | As above |
| -q | nqueries | The number of probe packets per hop. The default is 3 |
| —queries= | nqueries | As above |
| -r | Bypass the routing tables, send straight to a host on an attached network | |
| -s | source_addr | An alternative source address. Must be the address of one of the interfaces |
| —source= | source_addr | As above |
| -z | sendwait | Minimal time interval between probes The default is 0, max is 10 |
| —sendwait= | sendwait | As above |
| -e | Show ICMP extensions (rfc4884) | |
| —extensions | As above | |
| -A | Perform AS path lookups in routing registries and print results | |
| —as-path-lookups | As above | |
| -V | Print the version and exit | |
| —version | As above | |
| —sport= | port | The source port to use |
| —fwmark= | mark | Set the firewall mark for outgoing packets |
| -M | method | Use specified method for traceroute: default (UDP), tcp, or icmp |
| —module= | name | As above |
| -O | option | Method-specific options, separated by commas. List options with -O help. |
| —options= | options | As above |
| -U | Use UDP to static destination port. Default is 53 (DNS) | |
| —udp | As above | |
| -UL | Use UDPLITE port for tracerouting. Default is 53 | |
| -D | Use DCCP requests for probes | |
| —dccp | As above | |
| -P | protocol | Use raw packet of specified protocol. Default protocol is 253 |
| —protocol= | protocol | As above |
| —mtu | Discover maximum transmission unit on the path. Implies -F -N 1 | |
| —back | Print the number of backward hops when different to the forward direction |
Traceroute is also available on Unix. The parameters on that version are not the same as with the Linux implementation.
How Does Traceroute Works?
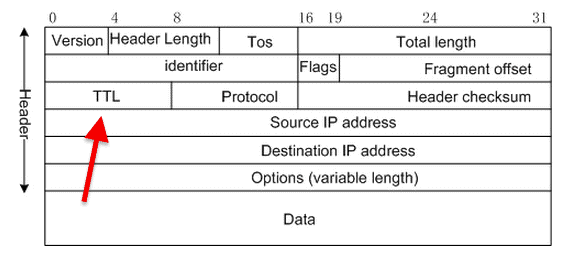
Each IP packet sent on the Internet has a field known as Time-To-Live (TTL). But this field is not explicitly related to the time measured by the number of hops. It is instead, the maximum number of hops that a packet can travel across the Internet before it gets discarded.
The TTL field in an IP packet is so essential because if there wasn’t one, the packet would keep flowing from one router to another forever searching for its destination, in a never-ending loop.
The TTL value helps in route poisoning, and most importantly, it can help Distance Vector protocols to avoid routing loops.
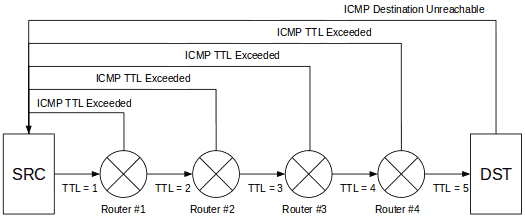
Traceroute depends on TTL to measure the distance between source and destination and to find the hops in between.
In a traceroute, the source re-defines the TTL value every time it gets a response and sends the packet with TTL= +1 until it reaches its destination.
When a packet reaches its maximum TTL, the last hop in line will send back an “ICMP TTL Exceeded” packet back to the source.
This communication is what traceroute is looking for. The “ICMP TTL Exceeded” contains valuable information, such as the time it took to reach that particular hop and the name of the server that is replying.
Traceroute IPv4 and IPv6
By default, tracert and traceroute will test the path only for IPv4 addresses. But that doesn’t mean you can’t test IPv6. All modern OSs come with full support for IPv6 addresses, including all commands, such as ping, traceroute, netstat, etc., to support IPv6.
But IPv4 is the preferred addressing method, so you might not have IPv6 routes in your router ready to send the ICMP packet towards the IPv4 destination. If you do have IPv6 routes support in your OS and your router, you can perform a test.
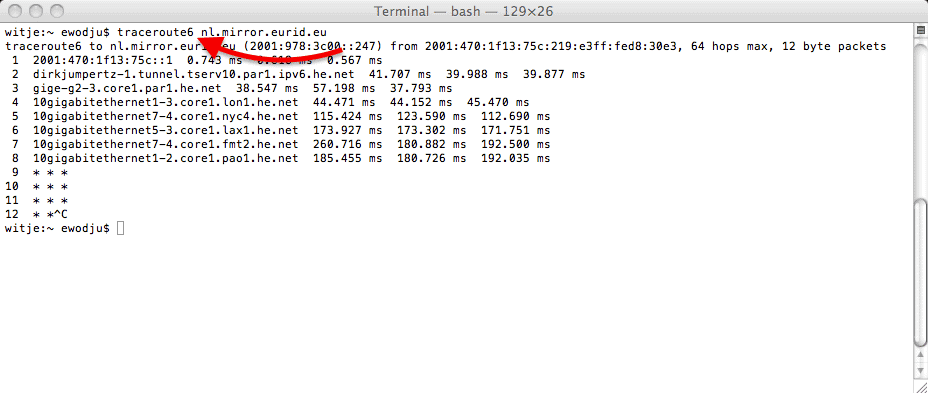
To test a route for an IPv6 address, use the “tracert6” or “traceroute6” for Linux OS. The tracert6 command sends a sequence of User Datagram Protocol (UDP) to the destination host. While in the case of Windows, you can traceroute to IPv6 addresses using “tracert -6”.
- For macOS and Linux: traceroute6 2a00:1450:400a:804::2004
- For Windows: tracert -6 2a00:1450:400a:804::2004
What is Traceroute?
A traceroute is a network testing term that shows a network connection’s real-time path taken by a packet to reach a network resource. It examines the hops that communication will follow across the IP network.
Traceroute, also referred to as tracert on Windows operating systems and traceroute on Linux-based systems, is a utility that uses ICMP packets to record the route from one network resource to another through the internet. It measures the time taken for each hop as the packet is routed to the destination. For accuracy, each hop is queried multiple times to better measure the response of that particular hop.
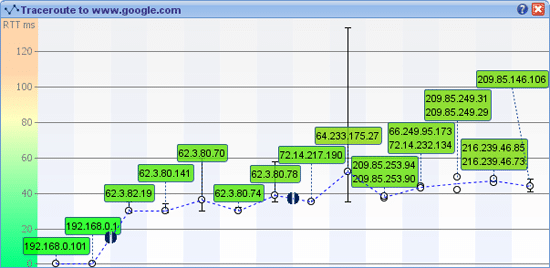
Как установить проблему при помощи трассировки?
Одна из основных вещей, на которую следует обратить внимание при выполнении трассировки – это постоянное время прохождение пакета туда-обратно. На скриншотах выше указано нормальное время – оно стабильно и имеет небольшое постепенное увеличение без значительных отклонений в пределах одного узла
Проблема есть, но на каком именно этапе прохождения пакетов данных она возникает команда Ping не показывает.
Утилита Tracert поможет определить корень проблемы. Проанализируем отчет трассировки:
Сбой, как мы видим, возникает на пятом хопе, и данный маршрутизатор негативно влияет на оставшийся путь данных к месту назначения. Таким образом мы быстро обнаружили, что причина задержки передачи данных не связана с нашей локальной сетью или сервером. Проблема в удаленном роутере сети Интернет.
Как работает команда Tracert или Traceroute
Диагностическая команда Tracert определяет маршрут до пункта назначения, введенного путем отправки пакетов «эхо-сигнала ICMP», используя протокол управляющих сообщений Интернета, известный как «ICMP», к месту назначения хоста. Эти отправляемые пакеты используют значения времени жизни по умолчанию (TTL), которые мы указываем с помощью параметров команды Tracert.
Когда мы отправляем пакет данных, маршрутизаторы уменьшают этот TTL пакета на одну единицу, прежде чем переслать пакет в следующую точку пути. Таким образом, благодаря TTL мы можем узнать количество «прыжков», которые пакет передал из источника в пункт назначения. Однако, когда TTL пакета достигает нуля, не достигая своего конечного пункта назначения, маршрутизатор возвращает сообщение ICMP «Timeout» на устройство-источник.
Команда Tracert сначала отправляет пакет «ICMP echo» с TTL, равным 1, и увеличивает TTL на 1 при каждой последующей передаче, пока не достигнет конечного пункта назначения или пока не будет достигнут максимальный TTL. Благодаря промежуточным маршрутизаторам, которые возвращают сообщение ICMP «Timeout», мы можем знать маршрут, по которому идет пакет данных, отправленный с нашего компьютера на хост назначения. Однако может случиться так, что некоторые маршрутизаторы отправляют пакеты TTL «Timeout» без предупреждения, и эти пакеты невидимы для команды Tracert.
Как только мы это узнаем, мы можем понять, что команда Tracert работает, отображая на экране упорядоченный список промежуточных маршрутизаторов, которые возвращают сообщение ICMP об истечении времени ожидания. Давайте рассмотрим пример, введя команду Tracert www.redeszone.net в консоли командной строки:
На изображении выше команды Tracert на нашем веб-сайте www.redeszone.net мы видим, что для того, чтобы добраться до конечного веб-сервера, вам нужно сделать восемь прыжков. Кроме того, в каждом прыжке он показывает нам минимальное, среднее и максимальное время каждого скачка пакета данных. В этом конкретном случае мы можем видеть, как некоторые из этих данных не предоставляют их, и именно поэтому он показывает звездочку.
Проверка пинга
Для проверки пинга используется одноименная команда ping, которую необходимо вводить в командной строке. Запустить командную строку можно следующими способами:
Windows:
1) Пуск -> Все программы -> Стандартные -> Командная строка
2) Пуск -> Выполнить -> cmd
Linux:
В данной ОС существует множество терминалов, поэтому для этих целей можно использовать любой из установленных на ПК. Обычно стандартный терминал можно запустить сочетанием клавиш CTRL+ALT+T.
Итак, чтобы пропинговать определенный сервер, необходимо выполнить команду:
ping <IP или домен>
Например, для пинга адреса 11.222.33.44 необходимо выполнить команду:
ping 11.222.33.44
Ниже приведён пример результатов выполнения пинга одного из IP адресов.
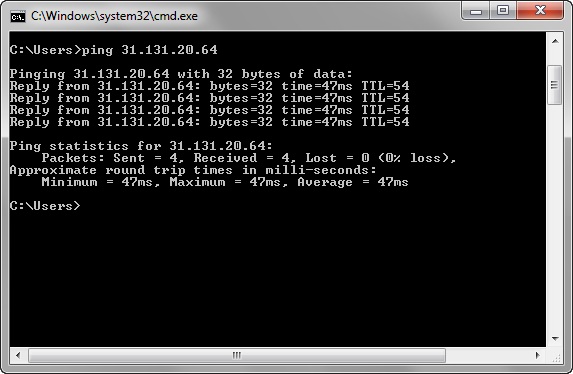
Как видно из результатов, было передано и получено 4 пакета размером 32 байта. Время обмена одним пакетом составило 47 милисекунд.
Стоит отметить, что в Windows по умолчанию выполняется отправка только 4 пакетов. В Linux обмен пакетами продолжается до тех пор, пока пользователь самостоятельно не остановит процесс сочетанием клавиш CTRL+C. Чтобы запустить ping аналогичным образом в Windows, необходимо использовать параметр -t. Например:
ping -t 11.222.33.44
Остановка обмена пакетами выполняется тем же сочетанием клавиш – CTRL+C.
Установка количества отправляемых пакетов
Чтобы задать максимальное количество отправляемых пакетов, необходимо использовать команду следующего вида:
Windows:
ping -n <число_пакетов> <IP или домен>
например:
ping -n 5 11.22.33.44
Linux:
ping -c <число_пакетов> <IP или домен>
например:
ping -c 5 11.22.33.44
Изменение размера отправляемых пакетов
Чтобы выполнить ping с использованием пакетов определенного размера (в байтах), необходимо использовать следующую команду:
Windows:
ping -l <размер_пакетов> <IP или домен>
например:
ping -l 64 11.22.33.44
Linux:
ping -s <размер_пакетов> <IP или домен>
например:
ping -s 64 11.22.33.44
В данном случае производилась отправка пакетов размером в 64 байта.
Как сделать трассировку маршрута до сервера, сайта в oc windows
Запускаем командную строку через меню «Пуск – Все программы – Стандартные». Или нажимаем сочетание клавиш «Win R», появляется окно системной утилиты «Запуск программы», вводим: «cmd» и нажимаем «ок».
В командной строке вводим: «tracert» и адрес ресурса, который нужно проверить. Нажимаем «ввод». В результате трассировки мы узнаем, какие промежуточные узлы проходит пакет и время отклика. На основе этой информации можно понять, где проблема: у Вас, у интернет-провайдера, на одном из промежуточных узлов или на сервере сайта. Звездочки означают, что один из маршрутизаторов не хочет отвечать.
Звездочки не всегда означают проблему — на сервере может стоять файрволл, который блокирует «лишние» пакеты, а «реальные» пропускает и в браузере страница корректно открывается.
Links and Reference Material
Internet Control Message Protocol (ICMP) Basicshttp://support.microsoft.com/kb/170292/EN-US/
Covers the following;
- Echo Request & Echo Reply
- Destination Unreachable
- Source Quench
- Redirect Message
- Time Exceeded
- Parameter Problem
- Timestamp Request & Timestamp Reply
- Information Request & Information Reply
- Address Mask Request & Address Mask Reply
Using TRACERT with the Loose Source Routing Optionhttp://support.microsoft.com/default.aspx?scid=kb;en-us;169206
IPv6 Tracert Infohttp://www.microsoft.com/technet/prodtechnol/windowsserver2003/library/ServerHelp/7707957f-68a9-45b8-a3a7-abae340bd179.mspx
Tracert on MSDNhttp://msdn.microsoft.com/library/default.asp?url=/library/en-us/wcecomm5/html/wce50lrfTracert.asp
RFC 792 (ICMP)http://www.faqs.org/rfcs/rfc792.html
Please visit my author section to learn more about pathping and other tools.
Post Views:
21,222
Why perform a traceroute?
The objective of a graphical traceroute is to discover each server relaying your IP packet from point to another, and to measure the return-trip delay between the probing host (here G Suite.Tools) and each relay on the packet path.
G Suite.Tools’ visual traceroute online app makes it easy to precisely pinpoint weak nodes impacting your global network performance. In addition to determining the response time of each hop the packet is travelling through, you’re now able to visualize in full screen the path of each probe ping between our server and the tested IP address within Google Maps in a instant.
By tracing the actual route between G Suite.Tools’ server and yours, you can decide in which way to optimize your network setup to lower response times in your application, service or website.
Understanding MTR (MyTraceRoute)
MTR (MyTraceRoute, originally called Matt’sTraceRoute) is a computer program that combines the functionality of the Traceroute and Ping programs in a single network diagnostic tool.
MTR probes routers on the route path by limiting the number of hops that individual packets may traverse, and listening to responses of their expiry. It will regularly repeat this process, usually once per second, and keep track of the response times of the hops along the path.
An MTR test result as shown here would point to issues with DNS resolution:
‘Ping request could not find host google.com. Please check the name and try again.’
If the end user is able to ping an IP address, but can’t ping a domain name, such as bbc.co.uk, then there is likely an issue with their DNS setting.
Using PathPing
This network utility is a more advanced version of the Ping tool, which performs a ping to each hop along the route to the destination (unlike Ping, which just pings from the originating device to the destination device). It is extremely useful in diagnosing packet loss, and can help with diagnosing slow speed faults.
To PathPing a device, proceed as follows.
- Open a Windows Command Prompt window.
- At the command prompt, type, pathping <IP address>, as shown below.
Note:
You can interrupt PathPing at any time by holding down the CTRL key, and pressing C on your keyboard.
Understanding PathPing results
The advantages of PathPing over Ping and Traceroute are that each node is pinged as the result of a single command, and that the behaviour of nodes is studied over an extended time period, rather than the default ping sample of four messages, or default traceroute single route trace. The disadvantage is that it takes a total of 25 seconds per hop to show the PathPing statistics.
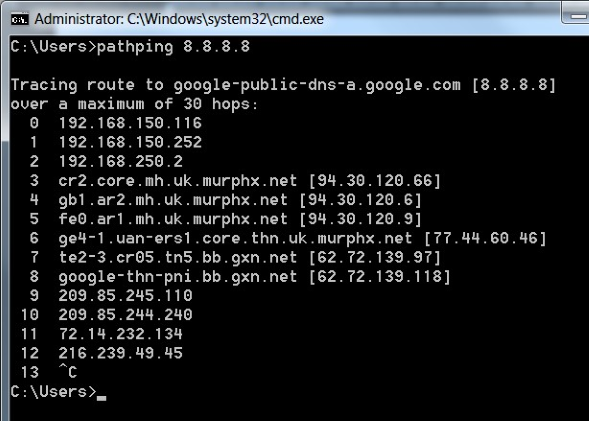
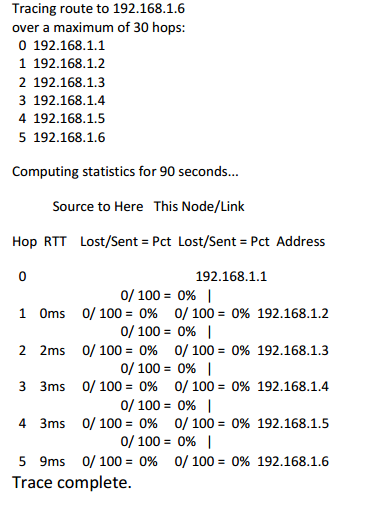
In the following examples, the PathPing command was used to check the connection to device 192.168.1.6, over a maximum of 30 hops.
Example: successful pathping
In the example, there were five hops along the route from the origin, 192.168.1.1, to the destination, 192.168.1.6. At each hop, 100 packets were sent and no packets lost.
Example: failed pathping
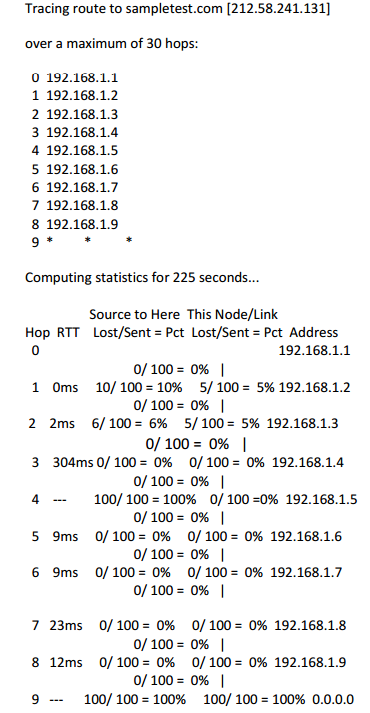
The example illustrates some of the different results you might encounter. Look at each of the hop results, and what they signify. In the example, we will focus on hops 1, 3, 4, and 9.
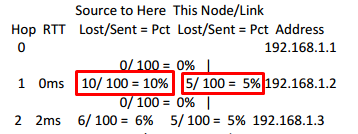
The 10/100 = 10% shows that there were 10 dropped packets out of 100 which were sent directly to that hop. The 5/100 = 5% shows it dropped 5 packets that passed through the hop.
Note:
On the second hop, the 6/100 = 6% indicates the packet loss is continuing, however this is likely due to packets being dropped by the first hop when testing, and not an issue with the second hop.
A result showing loss from the first hop indicates the likely cause to be the originating end user’s router, and would be reflected with the IP address of the router (such as 192.168.0.1). In this instance, check, and if necessary replace, the router, then retest. If the loss is evident from a hop after the originating router (most likely hop 2 onwards), then the issue should be raised to the service provider.
Looking at hop 3,

No packets have been dropped on hop 3, but it does have an abnormally high ping response time of 304ms. This could indicate that the hardware on that hop is not performing correctly, and this may be causing high response times and slow speeds. If the hardware on that hop is not performing correctly, you would see high ping times on all subsequent hops, in which case, investigate the hardware on that hop.
Looking at hop 4,

As you can see this hop has not responded to any pings sent to it, but has not dropped any pings sent through it. As mentioned in, , this is due to the server not responding to ICMP ping requests for security or service reasons and does not indicate a problem.
Looking at hop 9,
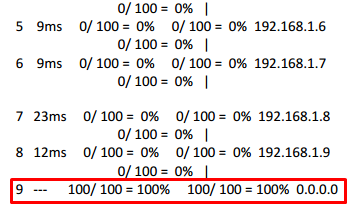
Everything on hop 5 to 8 is fine and everything looks normal, but hop 9 does not.
When you see the 0 hop repeated, followed by 0.0.0.0, this means the hop is not responding to the ping correctly. Unfortunately, this is a limitation of the PathPing tool and the way it handles ping responses.
Как работает
Предположим, что сетевой пакет — это посылка, отправленная по почте. Пока она попадет к адресату, сделает остановки, где ее регистрируют и отправляют дальше. Зная ее номер можно отселить перемещение, используя для этого специальные сайты. Подобным образом работает команда TRACERT. Рассмотрим, как происходит команда трассировки маршрутов TCP/IP. Время существования первого отправленного пакета (TTL) принимается за «1». IP протокол маршрутизатора его принимает. При помощи работы специального алгоритма уменьшает на 1. Маршрутизатор отбрасывает нулевой пакет и отсылает ICMP-сообщение (протокол, применяющийся для отправки сообщений про ошибки). В нем содержится имя маршрутизатора и его IP. Когда ICMP приходит к отправителю он обрабатывается и отправляется, но уже со значением TTL равным «2». Пакет приходит на второй узел где обнуляются и посылается узлу отправителю. Так происходит пока пакет не дойдет до конечного узла. Такая последовательная отправка поможет получить маршрут прохождения информации от ПК к узлу в интернет.
VisualRoute
VisualRoute has a very nice interface that displays several different panels of graphical data on routes all at the same time. These graphs enable instant condition recognition, so you won’t have to wade through difficult-to-read data records in order to spot a problem.
This tool installs on Windows 7 and 8 and also on Mac OS. There are several editions of the package, which include VisualRoute LITE. That version is free to use for personal usage, but businesses have to pay for it. With the regular plans, you have to buy a license that covers a number of users and you can also opt to add in a one-year maintenance contract. Traceroute lies at the heart of the VisualRoute data collection procedures. It also integrates Ping. The dashboard enables you to see the performance of a connection and then drill-down to details on individual links. The dashboard is also available as an Internet Explorer or Firefox add-on.
The combination of Traceroute, Ping, and DNS lookups gives you a complete picture of the statuses of your connections. You can store data for analysis and also adjust the settings of each data representation to get larger views of each graph.
A reverse trace feature, which requires the installation of agents on destination servers will show your connections from the remote server’s perspective. Information gathered by the tool shows packet loss and return trip times both end-to-end and link-by-link for any nominated connection. Traceroute can be set to run constantly to your most important connection destinations; that will give you live updates on the states of all the routers in the paths that you need to keep working efficiently.
VisualRoute has a lot of nice features to explore and you can get it on a 15-day free trial.
A little bit more about the TTL
The TTL value determines the number of intermediate routers or other connecting devices that are going to be traversed as the packet travels towards the destination host. The traceroute/tracert command launches packets with TTL values starting at 1 and gradually increasing with each subsequent outgoing packet.
The TTL values decrease every time the packet hops to a device. Any packet whose TTL value reaches zero, is discarded and a “Time Exceeded” ICMP error message is generated and sent back to the original host.
Proceeding in this way, the networking tool uses the packets and reply messages to build a list of routers that data has to traverse through, until the destination is reached and returns an “ICMP Echo Reply” message.
Как сделать трассировку?
Для этого вам понадобится служебная программа (утилита) traceroute. Принцип ее действия прост: программа посылает в проблемном направлении информационный сигнал – пакет данных, получая ответ от каждого из узлов – своеобразное информационное эхо. Таким образом, можно замерить время прохождения сигнала от одного узла к другому, без труда выявив «слабое звено».
Не нужно бросаться искать, где бы скачать такую полезную вещь: утилита traceroute уже встроена в вашу операционную систему. Для ее запуска служит команда tracert. Итак, что вам необходимо сделать:
- Вызываем командную строку. Для этого:
- Нажимаем кнопку пуск на экране либо клавишу win на клавиатуре (клавиша win на стандартной клавиатуре находится между Alt и Control, на ней изображен всемирно известный логотип всеми любимой операционной системы Windows);
- В появившемся меню (стартовом меню) выбираем пункт «выполнить». Команда «выполнить» позволяет задействовать служебные программы системы Windows, спрятанные подальше от рук любопытных пользователей, так как неумелое пользование некоторыми программами может нанести вред работе операционной системе и хранящимся на компьютере данным. Своего рода «защита от дурака». Но мы уж точно не дураки, поэтому продолжаем;
- В появившейся после выбора «выполнить» строке вводим вручную латинским шрифтом cmd и нажимаем Ok. Командная строка вызвана.
Справка: быстро вызвать строку «выполнить» можно нажав на клавиатуре комбинацию win+r. После чего можно ввести cmd.
- В командную строку вводим команду tracert имя или IP сайта (с подсоединением к которому возникли проблемы). Например, tracert ru.
- Ожидаем результат. В результате мы увидим несколько строк (до 30), каждая из которых – узел, через который проходит информация. В строке будет написано имя или IP узла и время прохождения сигнала в миллисекундах (ms – тысячная доля секунды).
Выше описанное актуально для операционной системы Windows, а как выполняется трассировка маршрута под Linux? В общих чертах аналогично, только терминал (аналог командной строки) вместо cmd вызывается сочетанием клавиш Ctrl+Alt+t, а вместо tracert вводим traceroute. Стоит также отметить, что трассировка в Linux будет продолжаться, пока пользователь не прервет ее сам, нажав ctrl+c.
Что нам даст результат? Чем больше время прохождения пакета, тем больше сайт «тормозит», таким образом, мы выявим узел, виновный в «тормозах». Непроходимый же узел будет обозначен надписью «Превышен интервал ожидания маршрута». Чем выше в списке проблемная строка, тем более локальна проблема. «Непроходимость» внизу списка указывает на проблемы с сайтом или доменом, а вверху – у вашего провайдера либо в локальной сети.
Traceroute on Windows
On Windows, you need to open a Command Prompt window in order to use the command line tracert utility. On Windows 10, type cmd into the search box next to the Start button and select the top entry in the results list.
Here is the schema for the tracert command:
Here is what those parameters mean:
| Paramater | Variable | Description |
|---|---|---|
| -d | Do not resolve addresses to hostnames. | |
| -h | maximum_hops | Maximum number of hops to search for target |
| -j | host-list | Loose source route along host-list (IPv4-only) |
| -w | timeout | Wait timeout (milliseconds) for each reply |
| -R | Trace round-trip path (IPv6-only) | |
| -S | srcaddr | Source address to use (IPv6-only) |
| -4 | Force using IPv4 | |
| -6 | Force using IPv6 |
So, just using the basic command, you only need to enter a destination address. You don’t need to look up the IP address of the destination because tracert will resolve a domain name if you type that in. If you just enter the command without any destination, tracert will give you the guide on the usage of the command.
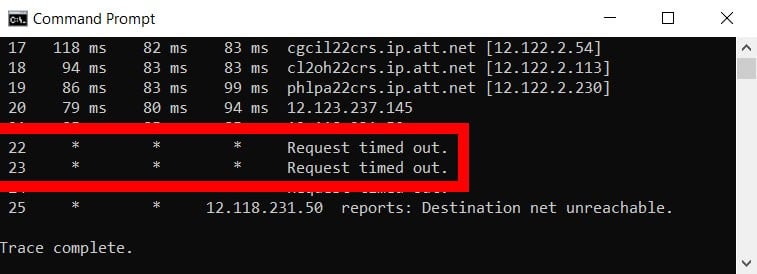
Common Traceroute Error Messages
If there is an issue within the network, the traceroute results will also show error commands, which include Request timed out, Destination unreachable, * in RTT columns, and more.
- Request timed out: Seeing this error at the end of the traceroute means that a firewall or a security device might be blocking your request, or there was a problem in the return route. If you see this at the beginning, it’s nothing to worry about as it is a common hop.
- Destination net unreachable: This means that the data packets have stopped traveling within the network. Most of the time, this is because there is a problem with the router or that the website or IP address you are trying to reach is down.
- * in RTT columns: It means the router did not respond to the request within the maximum allotted time of two seconds. It could also mean that the router in the hop was not set up to provide a response to a traceroute request. However, it does not necessarily mean that the packet was dropped. To verify if there was a packet loss, you can ping the IP address of the router where you see the asterisk.
Traceroute Command Variations
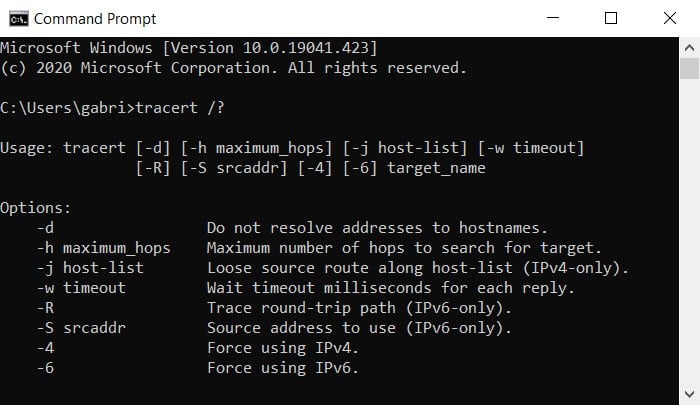
If you are looking for ways to run a traceroute, you can open the Command Prompt app and type tracert /? to see variations you can use.
Now that you know how to run a traceroute on your Windows 10 computer, check out our article on how to boost your WiFi signal.

HelloTech editors choose the products and services we write about. When you buy through our links, we may earn a commission.
Screenshots of traceroute and tracert
In the image below, the tracert command is running on a Windows machine and traces the path data packets would need to traverse if it had to reach the www.yahoo.com domain.
 On a Linux machine the same CLI command using the traceroute keyword syntax to trace the path to google.com would look like:
 As we can see from the two images, once the command is executed, the program sends out a query across the network. This is to see which routes can be used to transport data packets between the origin machine’s network and the destination’s network.
Trivia: A tracert command from a Windows operating system machine sends out an ICMP (Internet Control Message Protocol) echo request, while a traceroute command from a Linux (or Mac) machine uses the UDP (User Datagram Protocol). The response, however, is always sent back in ICMP, regardless of what the sending host’s operating system is.
Ipswitch Free Visual Traceroute

Ipswitch produces a network monitoring tool, called WhatsUp Gold. You don’t need to have that system installed in order to use the Free Visual Traceroute, because it is a standalone system.
This utility runs Traceroute queries on demand through a graphical interface. You can choose to run the Traceroute probe with ICMP, UDP, or TCP. Other query features allow you to specify the source and destination ports for the probe and you can also set the probe packet length and the response timeout tolerance.
The dashboard displays Traceroute results as a table and also as a graph. That graph shows the round-trip time of each router in the path, so you can quickly identify which node is causing delays. As well as running on demand, you can set the Free Visual Traceroute probe to run constantly, providing updated live data.
This is an attractive and efficient network monitoring tool that installs on Windows.
Примеры
Чтобы выполнить трассировку пути к узлу corp7.microsoft.com, введите команду:
tracert corp7.microsoft.com
Чтобы выполнить трассировку пути к узлу corp7.microsoft.com и предотвратить разрешение каждого IP-адреса в имя, введите:
tracert -d corp7.microsoft.com
Чтобы выполнить трассировку пути к узлу corp7.microsoft.com и использовать узлы 10.12.0.1-10.29.3.1-10.1.44.1 для свободной маршрутизации, введите следующую команду:
tracert -j 10.12.0.1 10.29.3.1 10.1.44.1 corp7.microsoft.com
Для вопросов, обсуждений, замечаний, предложений и т. п. можете использовать раздел форума этого сайта (требуется регистрация).
Новый раздел о средствах командной строки в рамках этого же проекта расположен здесь