Поднятие tftpd32 сервера на windows
Содержание:
- Setting up TFTP Recovery/Install
- [edit] Mac OS X
- Filename Remapping
- Summary of the extensions
- TFTP Server Configuration
- Установите программное обеспечение сервера TFTP и сопутствующие пакеты
- Continuing existing transfer
- TFTP Download/Upload File
- Что такое TFTP?
- Установка и настройка TFTP сервера
- What is TFTP Recovery over Ethernet?
- Handling time-outs
- Handling large files
- Настроить TFTPD
- Install TFTP Client
- Как передавать файлы в сети TFTP
- Is TFTP recovery over Ethernet Supported by my Device?
- Что такое FTP?
- WhatsUp TFTP Server
- ⚡ What is TFTP used for?
- Комментарии
- SolarWinds TFTP Server.exe безопасный, или это вирус или вредоносное ПО?
- Authentication
- 💻 How does TFTP Work?
- PC Functioning as an FTP Server
- Install TFTP Client on Windows 10
- Как проверить работу сервера tftpd32?
Setting up TFTP Recovery/Install
The following procedure only describes how to set up a TFTP server over Ethernet for the TFTP recovery/install preparation process, it does not describe the device-specific flash recovery/install process. For the actual flash process you have to consult the vendor provided documentation, the Internet, the OpenWrt Forum or the OpenWrt device pages.
- Download the desired OpenWrt (or stock) firmware image to the designated TFTP directory on your computer (and rename it if needed).
- Set the IP address of your computer’s Ethernet interface as described in the Device Page for your model.
- Start the TFTP server on your computer.
- Connect your computer and your device with Ethewnet cable.
- Power up the router and press a device-specific button to start firmware recovery over TFTP,
- or access boot loader recovery options and install recovery firmware over TFTP.
[edit] Mac OS X
OS X ships with a command-line TFTP client.
First, download the firmware file and put it in your user folder (/Users/yourusername/).
Then connect your computer directly to your router via ethernet. Go to System Preferences > Network. Click on «Ethernet» in the left panel and change «Configure IPv4» to «Manually». Then change «IP address» to 192.168.1.x (where x is any number between 2 & 255).
Then copy & paste the following text into a text editor:
 connect 192.168.1.1
 binary
 rexmt 1
 timeout 60
 put dd-wrt.vXX_XXX.XXX
Change the last line to the filename of the firmware file, which you just moved to your user folder. Copy the whole thing, including the line break after the last line.
Now open Applications > Utilities > Terminal. Enter:
tftp
A «tftp>» command prompt will appear. Now press the reset button on your router. On the tftp command line in Terminal, paste (Cmd+v) the text you copied. Since you copied the line break at the end, tftp will execute the command at the moment you paste it. Depending on your router, you may have to paste it multiple times to get the timing right.
If it works, you’ll see something like this:
 tftp> connect 192.168.1.1
 tftp> binary
 tftp> rexmt 1
 tftp> timeout 60
 tftp> put dd-wrt.vXX_XXX.XXX
 Sent 1769472 bytes in 9.0 seconds
Filename Remapping
The —mapfile option specifies a file which contains filename remapping rules. Each non-comment line (comments begin with hash marks, #)
contains an operation, specified below; a regex, a regular expression in the style of egrep; and optionally a replacement pattern.
The operation indicated by operation is performed if the regex matches all or part of the filename. Rules are processed from the top down, and by
default, all rules are processed even if there is a match.
The operation can be any combination of the following letters:
- r
Replace the substring matched by regex by the replacement pattern. The replacement pattern may contain escape sequences; see below.
g
Repeat this rule until it no longer matches. This is always used with r.
i
Match the regex case-insensitively. By default it is case sensitive.
e
If this rule matches, end rule processing after executing the rule.
s
If this rule matches, start rule processing over from the very first rule after executing this rule.
a
If this rule matches, refuse the request and send an access denied error to the client.
G
This rule applies to GET (RRQ) requests only.
P
This rule applies to PUT (WRQ) requests only.
~
Inverse the sense of this rule, i.e. execute the operation only if the regex doesn’t match. Cannot used together with r.
The following escape sequences are recognized as part of the replacement pattern:
\0
The entire string matched by the regex.
\1 to \9
The strings matched by each of the first nine parenthesized subexpressions, \( … \), of the regex pattern.
\i
The IP address of the requesting host, in dotted-quad notation (e.g. 192.0.2.169).
\x
The IP address of the requesting host, in hexadecimal notation (e.g. C00002A9).
\\
Literal backslash.
\whitespace
Literal whitespace.
\#
Literal hash mark.
\U
Turns all subsequent letters to upper case.
\L
Turns all subsequent letters to lower case.
\E
Cancels the effect of \U or \L.
If the mapping file is changed, you need to send SIGHUP to any outstanding tftpd process.
Summary of the extensions
The table below list the options that are standardized in various RFCs, in use
is diverse TFTP implementations, or proposed in this article.
| Option | Parameter | Notes |
|---|---|---|
| blksize | 8 .. 65464 | Block size, excluding protocol headers. The default block size is 512. Defined in RFC 2348. |
| blksize2 | 8 .. 32768 | Block size restricted to powers of 2, excluding protocol headers. Non-standard, but common. |
| multicast | addr, port, master | Multicast, defined in RFC 2090. |
| password | text | Password or a combined string of the user name and the password. Non-standard. |
| rollover | 0 or 1 | Block counter roll-over (roll back to zero or to one). Non-standard. |
| timeout | 1 .. 255 | Time-out in seconds. Defined in RFC 2349. |
| toffset | numeric | Transfer offset in bytes, for partial transfers. Non-standard. |
| tsize | numeric | Transfer size in bytes (size of the file being transferred). Defined in RFC 2349. |
| window | 1 .. 255 | Window size, in blocks of «blksize» (or «blksize2») bytes. Non-standard. |
TFTP Server Configuration
Once you install the TFTP server, it will start running as a daemon and ready to receive and send files. By default the TFTP uses port 69. tftpd-hpa uses the directory “/srv/tftp” for uploading and downloading. To change that, you must edit the following configuration file:
netbeez.net$ cat /etc/default/tftpd-hpa
# /etc/default/tftpd-hpa
TFTP_USERNAME=»tftp»
TFTP_DIRECTORY=»/srv/tftp»
TFTP_ADDRESS=»0.0.0.0:69″
TFTP_OPTIONS=»—secure»
|
1 2 3 4 5 6 7 |
netbeez.net$catetcdefaulttftpd-hpa # /etc/default/tftpd-hpa TFTP_USERNAME=»tftp» TFTP_DIRECTORY=»/srv/tftp» TFTP_ADDRESS=»0.0.0.0:69″ TFTP_OPTIONS=»—secure» |
The “- -secure” option adds security to TFTP by limiting all transactions in the TFTP_DIRECTORY. In addition, files can be uploaded in “/srv/tftp” only if they already exist in that directory and are publicly writable. If you want to allow TFTP clients to upload new files in “/srv/tftp” then you need to add the “- -create” option like this: TFTP_OPTIONS=”- -secure – -create”. After you edit “/etc/default/tftpd-hpa”, restart the tftp server with “service tftpd-hpa restart”.
Установите программное обеспечение сервера TFTP и сопутствующие пакеты
Настройка TFTP-сервера в Ubuntu начинается с установки всех соответствующих пакетов, которые необходимы для правильной работы. Эти пакеты можно установить через Квартира менеджер пакетов из командной строки.
Чтобы запустить его на вашем сервере Ubuntu или настольном компьютере, запустите окно терминала, нажав Ctrl + Alt + T или Ctrl + Shift + T на клавиатуре. Затем введите команды ниже.
Примечание: используете Debian Linux? Руководство и процесс установки для Tftpd на нем идентичны Ubuntu Linux. Чтобы заставить его работать, следуйте этому руководству, но замените все экземпляры Квартира с Apt-get.
sudo apt install xinetd tftpd tftp
Если вы используете Ubuntu Desktop, также можно запустить Центр программного обеспечения Ubuntu, найти каждый из этих пакетов и установить таким образом, если вы не являетесь поклонником установки программ с помощью Квартира.
Continuing existing transfer
First we check if client exists in our pool. If not, he has no business sending acks so we respond with a error pack. If he does exists we check if block numbers match and if not, we resend the last package up to a resend quota, which upon reaching we send an error pack and remove the client from the pool.
If the block numbers do match, we check if the package size was not full which would mark the end of this transfer and the removal of this client from our pool. If we sent a full package we reset the ressend counter variable to 0, increment the block number (if at max value, set to 1), read the next 512 bytes from file and send them.
TFTP Download/Upload File
I created the following text file in “/srv/tftp”:
Linux-based network monitoring for your network.
Try it Now
netbeez.net$ cat hello_server.txt
Hello world from TFTP server!
|
1 2 |
netbeez.net$cat hello_server.txt Hello world from TFTP server! |
On the client side I start a tftp interactive session and I download it as follows:
netbeez.net$ tftp
tftp> connect 172.31.0.154
tftp> get hello_server.txt
Received 31 bytes in 0.0 seconds
tftp> quit
netbeez.net$ cat hello_server.txt
Hello world from TFTP server!
|
1 2 3 4 5 6 7 |
netbeez.net$tftp tftp>connect172.31.0.154 tftp>get hello_server.txt Received31bytes in0.0seconds tftp>quit netbeez.net$cat hello_server.txt Hello world from TFTP server! |
On the client side, I can upload a file with the following commands:
netbeez.net$ tftp
tftp> connect 172.31.0.154
tftp> put hello_client.txt
Sent 31 bytes in 0.0 seconds
tftp> quit
|
1 2 3 4 5 |
netbeez.net$tftp tftp>connect172.31.0.154 tftp>put hello_client.txt Sent31bytes in0.0seconds tftp>quit |
If you get the following error when uploading:
tftp> put hello_client.txt
Error code 1: File not found
|
1 2 |
tftp>put hello_client.txt Error code1File notfound |
It can mean one of the following:
- The file “hello_client.txt” doesn’t exist on the servers “/srv/tftp” directory
- The “- -create” option is not enabled on the server (see above)
- The file “hello_client.txt” exists on the server but it’s not publicly writable
TFTP is a handy and lightweight server which is useful to upload and download files, but it comes with some important limitations that you have to keep in mind. You may have used TFTP if you’ve ever remotely booted a machine with PXE or BOOTP.
Что такое TFTP?
Текущие сессии FTP поддерживают много различных команд. При входе на FTP-сервер пользователи обычно могут просматривать, удалять, переименовывать, загружать или загружать файлы и изменять каталоги. Напротив, TFTP предлагает только возможность загружать или скачивать файл и использует UDP поверх IP вместо более стандартного стека TCP / IP. Протокол не способен предоставить более продвинутые функциональные возможности, но компенсирует это с помощью метода отказоустойчивости, который делает его чрезвычайно надежным. Из-за этой ограниченной функциональности серверы TFTP могут занимать очень мало места на диске и в памяти, что делает его идеальным для использования во встроенных устройствах.
Внимание: TFTP имеет нулевую безопасность. Учетных записей пользователей не существует, поэтому любой сможет подключиться к вашему TFTP-серверу
Убедитесь, что ваш сервер защищен каким-либо другим способом, например, с помощью брандмауэра или путем ограничения сетевых интерфейсов, на которых сервер слушает.
Linux, безусловно, является самой распространенной операционной системой на тех устройствах, где вы можете встретить TFTP-сервер. Но есть также богатая экосистема устройств Windows и macOS, которые работают с микропрограммой (например, Apple TV и Microsoft Surface).
Установка и настройка TFTP сервера
В данной статье рассматривается:
TFTP (англ. Trivial File Transfer Protocol — простой протокол передачи файлов) используется главным образом для первоначальной загрузки бездисковых рабочих станций. TFTP, в отличие от FTP, не содержит возможностей аутентификации (хотя возможна фильтрация по IP-адресу) и основан на транспортном протоколе UDP.
Основное назначение TFTP — обеспечение простоты реализации клиента. В связи с этим он используется для загрузки бездисковых рабочих станций, загрузки обновлений и конфигураций в «умные» сетевые устройства, записи статистики с мини-АТС (CDR) и аппаратных маршрутизаторов/файрволов.
Программа работает на порту 69 протоколы UDP и TCP.
Настраивать TFTP сервер мы будем для использования в процедуре обновления устройств.
Установка
В качестве программы, которая будет выполнять роль TFTP сервера будет небольшая программа, которую можно СКАЧАТЬ
Качаем portable edition версию т.к. лишняя возня с установкой нам не нужна. Выбираем исходя из ОС которая у вас установлена.
Распаковываем в удобное для нас место и запускаем tftpd64.exe или же tftpd32.exe если мы скачали 32 битную версию.
В принципе данных действий нам достаточно, чтоб начать работать с данным TFTP сервером. Данные загружаются и скачиваются из корневого каталога, который указан в пункте 1.
Дополнительные настройки
Функционал данной программы не ограничивается только TFTP сервером, но так же имеет дополнительный функционал. Мы рассмотрим лишь малую часть, что часто используется.
DHCP Server – необходим для выдачи динамических IP адресов для наших устройств.
Переходим на вкладку DHCP и вносим минимальные настройки
Настройки самого DHCP сервера
Настройки для клиентов, что будут получать адреса
DHCP сервер работает в границах одного широковещательного домена т.е. если сервер находиться за маршрутизатором, то адреса мы не сможем получать. Возможность получать адреса находясь за маршрутизатором в данной статье не рассматривается.
What is TFTP Recovery over Ethernet?
On most devices, the vendor provided boot loader is a partition separated from the actual firmware. In case of a failed flash process or in case of a misconfiguration, the device’s boot loader usually is still untouched and fully working. It the boot loader has a built-in “TFTP recovery mode”, it enables to regain control of a device with a broken firmware partition, by allowing a recovery flash process (which will also reset your configuration to the device defaults).
For many routers the recovery works by starting a TFTP server on your computer. Then device with the broken firmware has to be started up in TFTP recovery mode. Some devices then will pull the network-provided firmware file over TFTP network protocol to the OpenWrt and hopefully recover with a successful emergency flash process.
Some devices do not have automatic pull function and they need manual TFTP copy commands in recovery mode to get firmware from TFTP and firmware install.
NOTE: Some other routers, e.g. many Netgear routers, have TFTP server on themselves, and the PC needs to act as TFTP client. The “TFTP recovery mode” can also mean that, so look carefully at info about your router to find out which method your router possibly supports.
The below article mainly advises on the “TFTP client at router” recovery.
Handling time-outs
According to RFC 1350,
both the client and the server should check for time-outs for the packets that
they transmit. The packets can be data packets or acknowledgements. For the
protocol, it is sufficient that only one side uses a time-out. A common
simplification is only data blocks time out. Acknowledgements are simply transmitted
once, and never re-transmitted.
In this scheme, if a data packet gets lost, it will be re-transmitted. If an
acknowledgement packet gets lost, the transmitter will not see an acknowledgement
for the data packet and it will re-transmit the data packet. The receiver receives
a duplicate packet, which it acknowledges again. In conformance with RFC 1350, a
transmitter must be prepared to receive a duplicate ACK.
This is purely an implementation issue. In addition, the two hosts do not need
to agree on how to handle time-outs: one host that re-transmits only data packets
can interoperate with another host that re-transmits both data and acknowledgement
packets.
Handling large files
The basic TFTP protocol works with packets with 512 bytes of data —with an exception
for the final block of the transfer. Each packet contains a 16-bit block counter and
this counter starts at 1 (one) for the first block. As long as the data to transfer
is less than 65535 blocks (the highest value for a 16-bit counter), all is well.
This sums up to (nearly) 32 MiB.
For bigger files, there are three options: larger TFTP data blocks, allowing the
block counter to roll over and concatenation of separate transfers to a single file.
-
Larger data blocks
RFC 2348
defines an extension for larger block sizes. Even though the RFC allows blocks of up to
65464 bytes, in practice the limit is set to 1468 bytes: the size of an Ethernet
MTU minus the headers of TFTP (4 bytes), UDP (8 bytes) and IP (20 bytes). Larger
packets run a high risk of being fragmented at the IP level, and this is generally
considered a bad thing. With a block size of 1468 bytes, the maximum
transfer size is over 91 MiB. Increasing the block size improves the transfer
performance at the same time as allowing larger files to be transferred.Next to the standard «blksize» option, there is also a non-standard «blksize2»
option. The latter has the restriction that the block size must be a power of
two (512, 1024, 2048, …). The server should not use a block size below 512
bytes unless a client has explicitly requested it. -
Block counter roll-over
RFC 1350 does not mention block counter roll-over, but several TFTP hosts implement
the roll-over be able to accept transfers of unlimited size. There is no consensus,
however, whether the counter should wrap around to zero or to one. Many implementations
wrap to zero, because this is the simplest to implement. The
«ARINC 615A
Data Load Protocol» mandates a roll-over to 1.Although the block counter roll-over does not need a change in (or extension of)
the TFTP protocol per se, it does require that both host agree on the
method of rolling over. While many TFTP hosts use block counter roll-over implicitly,
it should be an option in the TFTP option negotiation. I propose the option name
«rollover» for this purpose. The client sets this option if it supports block counter
roll-over, and it indicates whether it wants to wrap to zero or wrap to one. The
server acknowledges this option if it supports roll-over and the method. -
Collect separate TFTP transfers into a single file
Instead of requesting full files, a client could ask the server to transfer
part of a file. The client sets the offset from the beginning of the file through
an option. The server acknowledges the option if it supports it. The «toffset»
option would normally be combined with the «tsize» option to set both the start
offset and the amount of data to transfer. The «toffset» option is my proposal;
«tsize» is a standard option defined in
RFC 2349.
Настроить TFTPD
Теперь, когда пакеты TFTPD настроены на сервере Ubuntu (или на рабочем столе), следующим шагом будет настройка сервера для правильной работы. Первым шагом в процессе настройки является создание папки в /так далее/ каталог.
sudo mkdir -p /etc/xinetd.d/
Позаботившись о папке, создайте новый текстовый файл с трогать команда. В этом файле будут храниться все конфигурации сервера.
sudo touch /etc/xinetd.d/tftp
Не могу использовать sudo touch? Попробуйте поднять терминальную оболочку до Root с помощью sudo -s заранее.
sudo -s
touch /etc/xinetd.d/tftp
Теперь, когда файл существует в /etc/xinetd.d/, откройте его в текстовом редакторе Nano.
sudo nano -w /etc/xinetd.d/tftp
Возьмите приведенный ниже код и вставьте его в окно текстового редактора Nano.
Сохраните изменения в tftp-файле в Nano, нажав кнопку Ctrl + O комбинация клавиш. Затем нажмите Ctrl + X выйти.
Следуя файлу конфигурации TFTP, вы должны создать папку «tftpboot» в корневом каталоге (/) на вашем сервере Ubuntu или рабочем столе Ubuntu.
С использованием mkdir команда, создайте каталог.
sudo mkdir /tftpboot
Затем обновите разрешения для папки «tftpboot», используя chmod команда.
sudo chmod -R 777 /tftpboot
После того, как вы обновили информацию о разрешениях для каталога «tftpboot», пришло время использовать Chown инструмент для изменения информации о правах пользователя.
Примечание. Мы используем «никто» в Chown команда ниже по какой-то причине. Это позволит получить доступ к одинаковым разрешениям всем, кто пытается получить доступ к TFTP, а не устанавливать их для отдельных пользователей.
sudo chown -R nobody /tftpboot
Наконец, вы должны перезапустить программное обеспечение сервера TFTP, чтобы принять изменения. В Ubuntu 16.04 и новее это делается с помощью systemctl команда.
sudo systemctl restart xinetd.service
Предполагая, что указанная выше команда systemctl выполнена успешно, сервер должен быть запущен и работать. Перейдите к следующему разделу, чтобы узнать, как передавать файлы с помощью TFTP.
Install TFTP Client
At this point, the TFTP server is installed and configured.
Now, you will need to install a TFTP Client on the Client computer.
You can install the TFTP Client on the client computer by following the below steps:
1. Click on the Start Menu and click on Control Panel.
2. Click on the Programs and Features => Turn Windows features on or off. This will open the Windows Features dialog box.
3. Scroll down until you see the TFTP Client check box and CHECK it as shown below:
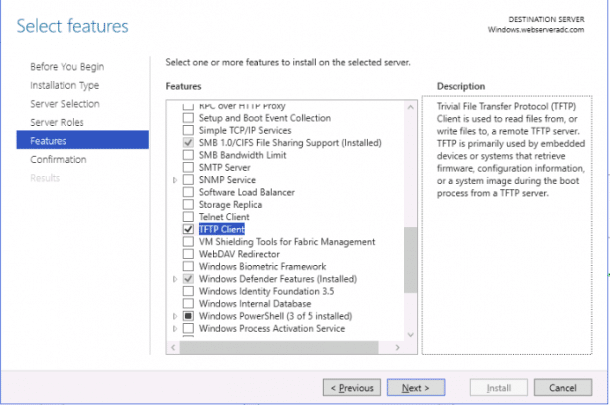
4. Click on the OK button to start the installation process of the TFTP client.
This process will take some time to finish the installation. Once you are finished, you can proceed to the next step.
Как передавать файлы в сети TFTP
После установки клиента и перенаправления порта перейдем к передаче файлов. Убедитесь, что сервер запущен, затем следуйте инструкциям:
Нажмите Win + R, в диалоговом окне наберите cmd для вызова командной строки. Перенесите или скопируйте файлы, которые хотите передать, в корневой каталог сервера.
Для отправки файлов нужно использовать параметр PUT, при получении GET. Синтаксис команды выглядит следующим образом:
Например, для передачи используйте команду:
Если хотите получить файл, то команда будет выглядеть:
Если хотите переслать на удаленное устройство за пределами сети, нужно указать публичный IP-адрес в командной строке, а затем порт. Примером может быть:
Is TFTP recovery over Ethernet Supported by my Device?
TFTP recovery over Ethernet is not supported by every router model. TFTP recovery is based on a device- and vendor-specific boot loader that may or may not be present on your device. Check the OpenWrt device page for your precise model to find out, if your device has a boot loader supporting TFTP recovery. If your device supports it, then this recovery function will still be present in your device boot loader, after OpenWrt firmware has been flashed onto the device.
Note:
- Your device boot loader could alternatively have implemented TFTP recovery over serial cable, which is not covered on this page.
- Your device could also have other means of recovery.
Что такое FTP?
FTP означает Протокол пересылки файлов и он используется для отправки и получения файлов с удаленного компьютера.
FTP устанавливает два соединения между клиентской системой и серверной системой, одно для управляющей информации, а другое для передачи данных. Одна безопасная версия этого протокола называется FTPS, которая использует SSL для шифрования данных при передаче. Управляющая информация несет в себе команды и ответ. Первоначально аутентификация должна выполняться путем проверки имени пользователя и пароля, а после завершения файлы могут передаваться между двумя системами. FTP обрабатывает файлы как в двоичном, так и в текстовом формате.
Когда FTP-клиент запрашивает подключение к FTP-серверу, TCP (протокол управления передачей) соединение устанавливается с портом 21 сервера FTP, который зарезервирован для FTP. После аутентификации устанавливается другое TCP-соединение для фактической передачи данных через другой временный порт, обычно выше 1024.
WhatsUp TFTP Server
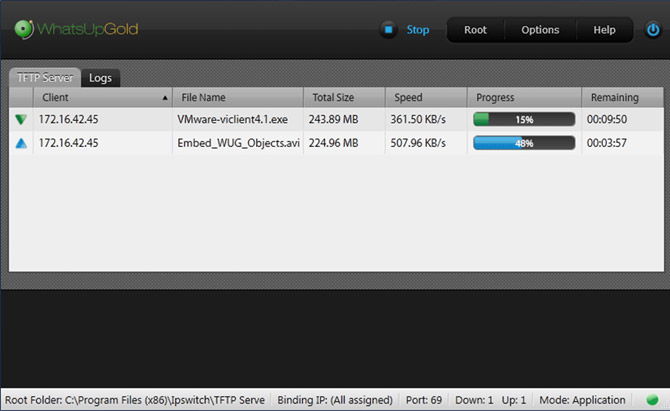
Ipswitch is a software company that specializes in file transfer and network management tools. Their WhatsUp Gold TFTP Server is a free utility they offer for network engineers to add to their toolbox.
It allows automated file transfers to be set up for multiple computers and devices on an intranet with a dedicated schedule.
Whether you need a tool to reinstall a software configuration weekly or a way to push out firmware and application patches to dozens of devices, WhatsUp Gold can make your life easier.
Like other TFTP servers, it runs as an always-on service and can even schedule file transfers during low traffic hours.
⚡ What is TFTP used for?
TFTP is widely used to transfer small files across LAN networks using UDP. It does not require much in the network resources. It is relatively easy to send files or firmware updates to devices throughout the network. Moreover, for conserving network resources, it makes it much easier to update device and firmware.
When you update the firmware of thousands of different devices on regularly it is not very efficient. A TFTP server also helps you to push firmware updates straight to these devices from a centralized location which means that you don’t require spending hours carrying out one task because you can use TFTP to automate the entire process.
Комментарии
Отлично и все так просто. Как раз хочу сохранить конфиг с маршрутизатора.
Распишите пожалуйста подробно, как с помощью этого ПО прошить голосовой шлюз. Где какие адреса вписывать и директории.
Возможно, в будущем обязательно напишу. Пока нет под рукой голосового шлюза от Cisco.
Разобрался. Утилита бородатая и просто не хочет правильно работать на семёрке. На хрюшке нормально заработала, правда пришлось правило фаэрвола ручками подправить – открыть 69 порт.
Не в чем там разбираться. Бородатость утилиты тут не причем, тем более последняя версия от 06.05.2015, тут семёрка даже с первым сервиспаком бородастей будет. Утилита прекрасно работает на всех версиях 32/64 рабочих станций и серверов. По умолчанию при запуске привязывается к первому интерфейсу по списку, если адрес 127.0.0.1 в списке первый, то к нему и привяжется. В утилите надо в настройках включить Bind TFTP to this address и выбрать нужный адрес из списка, чтобы он записался в файл tftp32.ini
Игорь, дружище, спасибо огромное, просто и быстро всё заработало, solarwinds ваще не хотел коннектить.
Отличие Chrome от Chromium
Как импортировать большую базу в MySQL
Какой пароль выбрать?
This table does not contain a unique column. Grid edit, checkbox, Edit, Copy and Delete features are not available.
Как узнать кто провайдер по IP-адресу?
Сброс конфигурации на заводские настройки Cisco 2960
Драйвер для Cisco USB Console для 64 битной операционной системы
Проброс портов 4G-модема Yota на Mikrotik с подключенной услугой «Статический IP»
Защита со стороны DNS: реально или нет? Или сервис SkyDNS!
Как изменить пароль root`а на phpmyadmin?
Создаем шаблоны писем в Thunderbird или делаем нашу жизнь проще
Почему FTP может портить файлы?
Если Вы используете материал моего блога, то будьте добры поставьте ссылку.
SolarWinds TFTP Server.exe безопасный, или это вирус или вредоносное ПО?
Первое, что поможет вам определить, является ли тот или иной файл законным процессом Windows или вирусом, это местоположение самого исполняемого файла. Например, такой процесс, как SolarWinds TFTP Server.exe, должен запускаться из C: \ Program Files \ SolarWinds \ TFTP Server \ SolarWinds TFTP Server.exe и нигде в другом месте.
Если статус процесса «Проверенная подписывающая сторона» указан как «Невозможно проверить», вам следует взглянуть на процесс. Не все хорошие процессы Windows имеют метку проверенной подписи, но ни один из плохих.
Наиболее важные факты о SolarWinds TFTP Server.exe:
Если у вас возникли какие-либо трудности с этим исполняемым файлом, перед удалением SolarWinds TFTP Server.exe вы должны определить, заслуживает ли он доверия. Для этого найдите этот процесс в диспетчере задач.
Найдите его местоположение (оно должно быть в C: \ Program Files \ SolarWinds \ TFTP Server \) и сравните размер и т. Д. С приведенными выше фактами.
Если вы подозреваете, что можете быть заражены вирусом, вы должны немедленно попытаться это исправить
Чтобы удалить вирус SolarWinds TFTP Server.exe, необходимо Загрузите и установите приложение полной безопасности, например Malwarebytes., Обратите внимание, что не все инструменты могут обнаружить все типы вредоносных программ, поэтому вам может потребоваться попробовать несколько вариантов, прежде чем вы добьетесь успеха
Authentication
TFTP has no session control and you cannot «log in» onto a TFTP server. Traditionally,
files on a TFTP server can be accessed without password. Several Linksys routers
(e.g. WAG54G) use TFTP for updating firmware. To make sure that not anyone can do this,
Linksys made a minor adjustment to the protocol in which the initial transfer request
holds a password (in addition to the filename and the file mode).
Simply adding a password string to the TFTP read or write request has two problems.
Since the password is sent in clear-text it can easily be sniffed. A worse problem
is that this choice breaks option negotiation
(RFC 2347).
I feel that the password should be added to the request as an option, so that it
does not break option negotiation. There is no easy solution to avoid sniffing
the password, since the option negotiation must be initiated by the client and
it is just a two-way handshake. A full challenge-handshake protocol cannot be
built with TFTP option negotiation.
I propose the option «password» with a zero-terminated string as the parameter.
In case a user name and a password must be sent, these can be combined in the
string with a colon (or another «special» character) separating the user name
and the password. For example, in the parameter «thiadmer:secret», «thiadmer»
would be the user name and «secret» the password.
💻 How does TFTP Work?
TFT severs works in following method:
- The client requires to open server socket on server’s IP address on UDP port 69 as the server depend upon port 69 which helps to establish a UDP connection with the client.
- So, when the connection gets established, the client can send the message request to the server. There are various types of message requests can be sent to the server.
- For Example, the client send a Read Request (RRQ) if any file requires to be fetched from the server or Write Request (WRQ) to transfer any file over the network.
- Then TFTP server divides the message into blocks of 512 bytes. Here, the noticeable part is the last block of every file is lesser than 512 bytes. This helps the receiver to interpret the last block from the sender.
- After that, every block should be transferred as a TFTP data message, and all the remaining blocks are assigned with a TFTP number. However, each block should be kept separately inside a UDP message.
- So each time when the size of the last block would not always be less (except if it is multiple of 512), so the sending user sends another block of zero bytes that give message to the receiver that the transfer part is over.
- TFTP also follows check and pause protocol, therefore it sends each block one after one.
- When it sends the first block, it starts a present block timer. For the sent block, when the response from the server comes it received with the block timer.
- After that, the second block of the file is sent. However, in case of response is found by the server, then the first block of the file is sent. This is method that helps TFTP to achieves flow control.
PC Functioning as an FTP Server
Figure 5-13 Networking diagram
- Run the FTP server software on the FTP server and configure the FTP service.
As shown in , run an FTP server program on the PC, for example, wftpd32. Choose Security > Users/rights. In the dialog box that is displayed, click New User. In the dialog box that is displayed, set the user name to user and password to huawei. Set Home Directory to D:\FTP. Click Done to close the dialog box. Set the IP address of the PC to 192.168.0.2 and mask to 255.255.255.0.
Figure 5-14 Configure the FTP server
- Connect the switch and the FTP server.
- Connect the FTP server to Ethernet0/0/0 of the switch using a network cable.
- Configure the IP address 192.168.0.1/24 for Ethernet0/0/0.
<HUAWEI> system-view
 interface ethernet 0/0/0
[HUAWEI-Ethernet0/0/0] ip address 192.168.0.1 24
If a fixed switch uses VLANIF 10 to connect to the FTP server through GE0/0/1, the configurations are as follows:
<HUAWEI> system-view
 vlan 10
 quit
 interface gigabitethernet 0/0/1
[HUAWEI-GigabitEthernet0/0/1] port link-type hybrid
[HUAWEI-GigabitEthernet0/0/1] port hybrid untagged vlan 10
 interface vlanif 10
 ip address 192.168.0.1 24
- Check whether the switch and FTP server are connected.
[HUAWEI-Ethernet0/0/0] ping 192.168.0.2
  PING 192.168.0.2: 56 data bytes, press CTRL_C to break
    Reply from 192.168.0.2: bytes=56 Sequence=1 ttl=128 time=4 ms
    Reply from 192.168.0.2: bytes=56 Sequence=2 ttl=128 time=3 ms
    Reply from 192.168.0.2: bytes=56 Sequence=3 ttl=128 time=18 ms
    Reply from 192.168.0.2: bytes=56 Sequence=4 ttl=128 time=3 ms
    Reply from 192.168.0.2: bytes=56 Sequence=5 ttl=128 time=3 ms

  --- 192.168.0.2 ping statistics ---
    5 packet(s) transmitted
    5 packet(s) received
    0.00% packet loss
    round-trip min/avg/max = 3/6/18 ms
The preceding information indicates that the switch and FTP server can communicate properly with each other.
The direct connection mode is used as an example here. For an indirectly connected network, ensure that there are reachable routes between the FTP server and client.
- Log in to the server (PC) from the switch using FTP.
[HUAWEI-Ethernet0/0/0] return
<HUAWEI> ftp 192.168.0.2
Trying 192.168.0.2 ...
Press CTRL+K to abort
Connected to 192.168.0.2.
220 FTP Server ready.
User(192.168.0.2:(none)):user     //Enter the FTP user name user.
331 Password required for ftpuser.
Enter password:    //Enter the FTP password huawei.
230 User logged in.
- Run the put command to upload the required file to the FTP server (PC) or run the get
# Upload the configuration file to the FTP server (PC).
command to download the required file from the FTP server to the switch. Examples are as follows:
 put vrpcfg.zip
200 Port command okay.
150 Opening ASCII mode data connection for vrpcfg.zip.
226 Transfer complete.
FTP: 8174 byte(s) sent in 0.099 second(s) 82.56Kbyte(s)/sec.
You can find the vrpcfg.zip file in D:\FTP on the PC.
# Download the latest version of the system software to the switch. binary //Set the file transfer mode to binary.
200 Type set to I.
get devicesoft.cc
200 Port command okay.
150 Opening ASCII mode data connection for devicesoft.cc.
226 Transfer complete.
FTP: 93832832 byte(s) received in 722 second(s) 560.70byte(s)/sec.
It is recommended that the transfer mode should be changed to binary when the program files such as system software are transferred to ensure transmission reliability.
After the transfer is complete, run the dir command in the user view of the switch. You can find the file in the storage device.
Install TFTP Client on Windows 10
Fortunately, most Windows versions (servers and workstations) come with the TFTP client feature built-in, you only have to enable it.
- Go to Windows Start and search for “Control Panel” then click on “Programs”
- Open Turn Windows features on or off.
- From the Windows Features list, find the TFTP Client feature and turn it on. Wait for the installation to complete and click “Ok”.
TFTP is considered an unsafe protocol, so Windows does not allow it by default. You will have to either turn off the Windows firewall (which is not recommended) or add an exception on the Firewall for the TFTP Client.
Let’s open the Windows Firewall and configure the rules and exceptions to allow TFTP.
- Open the Windows Start menu and type “Firewall” > open the “Windows Defender Firewall with Advanced Security,” and run it as an Administrator.
- Make sure that the firewall is enabled, and click on “Allow an app or feature through Windows Defender Firewall”.
- Click on “Change Settings,” then “Allow another app”.
- Click on “Browse” and find the TFTP.exe from the System32 folder and click on Open. Then click on “Add”.
- You can now, find the application on the Windows Defender Firewall, enable both Private and Public.
Как проверить работу сервера tftpd32?
Для того, чтобы передать файл необходимо открыть cmd.exe и выполнить команду:
Для того, чтобы получить файл с tftp-сервера, есть команда:
Использовать tftpd32/tftpd64 для каких-то постоянных задач не рекомендуется, так как у него практически нет никакой защиты от несанкционированного подключений к серверу. Да, можно ограничить доступ к нему только определенным IP-адресам, но та легкость, с которой можно подменить IP-адрес, позволяет сказать, что это не относится к сетевой безопасности вообще.
Включать сервер tftp с таким «уровнем безопасности» можно только на короткое время, для выполнения каких-то сервисных работ, а лучше вообще делать это в изолированной сети.