Gamemaker: studio 1.4 features
Содержание:
- Возможности
- Расширения
- Где я могу получить GameMaker: Studio?
- UPDATED EXTENSIONS
- Возможности
- FUNCTIONS, SCRIPTS AND METHOD VARIABLES
- Auto Tiling
- Преимущества и недостатки
- Что в нем хорошего
- EXCEPTIONS, TRY, CATCH AND FINALLY
- Плюсы и минусы
- CHAINED ACCESSORS
- GML Usage
- Становимся профессионалом
- STRUCTS
- ANIMATION CURVES
- Системные требования
- SUMMARY
- GML
- Что в нем плохого
- Обучение GameMaker: Studio
- Заключение
- Заключение
Возможности
Изначально автор приложения – Марк Овермарс – хотел создать обучающую программу, которая объясняла бы студентам принципы программирования. Однако постепенно разработка превратилась в игровой редактор. Он развивается уже более 15 лет, обрастая функционалом, что позволяет:
- придумывать 2D-игры;
- создавать презентации;
- рисовать анимацию;
- использовать программу в учебных целях.
Интерфейс приложения интуитивно понятен, окно содержит привычные для обычных пользователей строки меню и панели кнопок. В меню находится раздел справки, где можно увидеть обучающий ролик, объясняющий всю суть программы.
Расширения
Если вам не хватает встроенных функций движка GameMaker, не волнуйтесь; он расширяемый! Бесплатная версия не позволяет использовать расширения, но в платной версии это возможно.
Что могут делать расширения?
Расширения добавляют новую функциональность, изначально не предусмотренную YoYo games. Вот некоторые примеры:
GiiMote — позволяет разработчику интегрировать WiiMote элементы управления в свою игру, добавляя функции, которые опрашивают состояние WiiMote (положение и нажатие кнопок).
FX Creator Extension — упрощает создание таких эффектов, как погода, лучи и брызги воды.
Взаимодействие с базами данных с помощью SQL — позволяет вашей игре подключиться к базе данных SQL, получить данные в виде строки, а затем использовать их в игре. Расширение
добавляет такие функции, как и так, что вы можете получить данные обратно в виде двух строк кода.
Одно серьезное ограничение — некоторые расширения несовместимы с мобильными платформами.
Как их установить
- Необходимо загрузить расширение — это должен быть файл .
- Щелкните правой кнопкой мыши папку Extensions в GM:S и выберите Add Existing Extension.
- Это должно вызвать диалоговое окно, и в правом нижнем углу вы увидите кнопку с надписью Install. Нажмите ее.
- Откроется другое диалоговое окно со списком установленных пакетов (возможно, пустым). Справа от этого окна есть кнопка, которая снова с надписью Install. Нажмите ее.
- Это открывает еще одно диалоговое окно; перейдите в папку, в которой сохранен файл , щелкните его и нажмите кнопку Open.
Где я могу получить GameMaker: Studio?
Основной сайт движка GM:S — это http://www.yoyogames.com/. Вы можете загрузить бесплатную версию или приобрести одну из лицензионных версий.
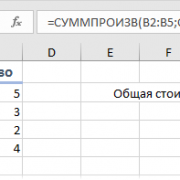
Ниже приведено сравнение различных версий GameMaker, взятых с веб-сайта YoYo Games:
Как вы видите, бесплатная версия (Studio) довольно ограничена, но это отличный способ увидеть рабочий процесс и расположение инструментов, а также потратить некоторое время на изучение языка.
Обновление: Бесплатная версия GameMaker: Studio теперь та же, что и стандартная версия! Для получения дополнительной информации см. GameMaker: Studio будет бесплатной.
Стандартная версия отлично подходит для разработчиков одиночек, которые только планируют разработку компьютерных игр; Профессиональная версия идеально подходит для небольшой команды разработчиков планирующих переходить в конечном итоге на кроссплатформенную разработку, поскольку они могут добавлять различные модули с течением времени после получения некоторого дохода; и Master Collection отлично подойдет для небольших команд, которые являются частью созданных студий, и хотели бы использовать кроссплатформенную разработку с самого начала.
GM:S также
доступен в Steam, но я бы рекомендовал не покупать его там, так как
YoYo Games не знает, что вы его приобрели, и,
следовательно обладателям их продукта будет больше хлопот в отделе обслуживания клиентов. Кроме
того, они иногда предлагают дешевые апгрейды для тех, у кого уже есть определенная версия GM:S, и они не могут дать то же обновление пользователям купившим в Steam. Кроме того, если вы покупаете у Steam, то необходимо войти в Steam, чтобы запустить GM:S, а это может раздражать.
UPDATED EXTENSIONS
The extension system has also been upgraded in 1.4 — in part for the Marketplace, but also to make the incorporation of external SDKs and Frameworks for iOS and Android easier and more intuitive. This means that writing your own native code extensions and using third party SDKs on those platforms (you will need to know Java for Android and Objective C for iOS) is a lot less complex, and you can also upload them to the Marketplace for sharing now.
Most of these changes are internal or related to the UI, which has new options for adding files to extensions as well as new tabs in the extension properties dialogue. You can find further deatils on these changes from the GMS Manual and from the YoYo Games Helpdesk.
Возможности
Разработчики (YoYo Games) заявляют, что в GMS 2 огромное количество изменений и улучшений по сравнению с первой версией программы. И это так, но основные возможности остались теми же:
- Возможность создания полноценных игрушек с 2D графикой.
- Встроенный графический редактор.
- Обучающие материалы и демо-приложения (только на английском языке).
- Специальный режим для использования на ноутбуках.
- Полная настройка интерфейса для нужд конкретного пользователя.
- Полноценный редактор скриптов.
- Возможность визуального создания игровых приложений (без использования кода).
- Продвинутый инструменты для создания анимации.
- Возможность командной работы над проектом.
- Продвинутая поддержка сетевых игрушек.
- Язык программирования на базе С (для продвинутых пользователей).
Отличная платформа для создания качественных продуктов любого жанра. Крякнутый GMS 2 ничем не отличается от приобретенного. Функционал остается точно таким же. Только не будет доступен командный режим работы над проектом
Но это не так важно
Еще одна особенность – возможность создания простых приложений сразу «со старта». Даже неподготовленный пользователь может сделать собственную простенькую игрушку через пару часов после начала работы с GMS 2.
FUNCTIONS, SCRIPTS AND METHOD VARIABLES
Above we outline some changes to the GameMaker Language, but now it’s time to talk about the good stuff… what’s been added! To start with we want to talk about in-line functions and scripts. Previously, a script was a single resource that was created on a global scope and used to create a single custom function which would then be called using the script name as the function name. This is no longer the case and scripts, while still global in scope, are now a type of «container» for one or more functions.
What this means is that when you compile your project, scripts are no longer called individually, but are actually all run at the start of the game in the global scope, so all variables that are defined in the script (outside of function definitions) will be considered global. That said, you should still use the identifier to explicitly define and identify global variables in your code.
The reason for this change is that scripts can now contain multiple functions. If you’ve only used GML to code projects then the idea of functions may be something new to you, but think of them as being the same as scripts, only explicitly assigned to a variable. This variable is called a method and is used to call the code that is in the function, the same as you would have previously called the script name. This is easier to visualise with an example, so let’s look at one. Consider this simple script :
Now, however, this would be defined as a function like this:
or like this:
You would call this function just as you would have called the script:
So, as we mentioned above, scripts can now contain multiple functions and these should be defined with the format shown above where you have the JS doc comment to identify the function, then the function definition below, and then the next JS Doc comment, and then the function, etc…

Above, we briefly mentioned that functions as variables were called method variables, but it should be explained in a bit more detail. Basically, when you create a function with a variable like this, you are creating a method variable, and they can have different scopes. Consider this function:
-
In the case of a script a variable called «foo» is declared at global scope
-
If the function is declared in an event then the variable «foo» is on the instance that ran that event
-
If the function is declared in an event using the keyword then the variable «foo» is local to the event only
-
If «foo» is declared inside a then it is declared on the that is active at that time
This means that if you have some code that you need to use only within a loop in an alarm event (for example), then you can define it as a local scope method variable at the start of the event and then use it within the loop without the need to clutter up the script assets with it.
It is worth noting that while the variable will be in the chosen scope, the actual function will be bound to the scope that it was initially defined in. Going back to script functions, these are all global scope and are considered «unbound» (ie: they are not associated with any instances), but if you have a script function that creates another function within it and then you call this script from an instance, the function used within the script will be bound to the instance. In general this is not something you ever need to think about but for more complex operations with method variables it’s worth taking into consideration. This also applies when using other constructs like — when you create a method variable inside a , the function will be bound to the instance that is currently in scope.
The following new functions have also been added to deal with methods:
Check the manual for details fo how these functions should be used.
Auto Tiling
Any Tile Sets that have different types of
terrain (like grass and dirt etc.) or walls/platforms can make use of Auto
Tiling to speed up the level designing process.
If you open the Auto Tiling menu from the Tile
Set Editor, you will see that it allows for two kinds of Auto Tile Sets: one
with 47 tiles, and another with 16 tiles:
You can click on the plus button next to
either of them to add a new Auto Tile Set.
16 Tile Set
The 16 Tile Set allows you to place two kinds
of terrains, as indicated by the light and dark areas in the template shown
above. These could be grass and dirt, grass or water, etc.
You can assign tiles from your Tile Set to
each template tile, and enable the overlay to make sure you’re selecting the
correct tiles:
The tiles are used when the corners of two
different tile blocks meet.
You can also make a Tile Set where the grey
parts are transparent, such as land tiles for a platformer game:
47 Tile Set
This is the lesser used Auto Tile Set,
particularly because it is more complicated and requires a larger amount of
tiles. If used correctly, it allows for narrower tiles and supports more tile
combinations. Here is an example of a Tile Set that can be used with the 47
Set:
Such a Tile Set can be used to create
intricate levels that use less tile space, as seen below:
Преимущества и недостатки
Стоит учесть, что эта программа – уникальный продукт. Обычно для создания качественной игры требуется целый набор дорогих и профессиональных программ. А здесь все инструменты объединены в одном приложении. И это первое преимущество, но есть и другие:
- Простой и понятный процесс установки.
- Для создания полноценных игр не обязательно изучать язык программирования.
- Интуитивно понятный и полностью настраиваемый интерфейс.
- Беспроблемная работа на ноутбуках.
- Оптимизированная работа с Windows 10.
- Есть обучающий материал.
- Отличная поддержка от разработчиков.
- Универсальность продукта (нет нужды использовать дополнительные программы).
- Кроссплатформенность (имеются версии приложения для Windows и MacOS).
Русификатора для этой программы нету, и вряд ли предвидится. Это единственный недостаток Game Maker Studio 2
Если не брать во внимание высокую стоимость лицензии. Однако в руках пользователя оказывается уникальный инструмент для создания игр
За это многое можно простить.
GMS 2 требует некоторых навыков в создании компьютерной графики. Но встроенный графический редактор программного продукта настолько прост, что с ним в считанные часы разберется даже новичок. Простота в создании игр – еще одно преимущество продукта перед профессиональными (и очень сложными) программами.
Что в нем хорошего
GM:S очень хорош в управлении ресурсами, включением ресурсов в код, обеспечивает легкий способ изменения логики игровых объектов и событийное программирование.
Управление ресурсами
Как только разработчик создал спрайт, добавить его в GM:S можно за несколько кликов. После импорта спрайта, модификации могут быть сделаны уже в GM:S.
Создание спрайта.
Изменение спрайта.
Интеграция ресурсов в код
После импорта ресурса его свойства (размеры изображения, громкость звукового эффекта и т. д.) могут быть доступны из кода и могут быть назначены игровому объекту. Это делает создание игровых объектов очень простым и отлично подходит для быстрой подготовки и быстрого запуска.
Изменение логики игровых объектов и событийное программирование.
Редактор игровых объектов — это отличное средство обучения, для новичков в разработке игр, и предоставляет удобный способ изменения логики игрового объекта. Как вы можете видеть на этом скриншоте, GM:S позволяет вам писать код для конкретных событий:
Модификация событий игрового объекта.
EXCEPTIONS, TRY, CATCH AND FINALLY
The final new language feature that has been added in the 2.3 update that we want to discuss here is the ability to control to a much greater degree how errors are handled when they are encountered in your code as well as the ability to generate your own error messages.
To start with we have the new operator, which — as the name implies — can be used to «throw» a runtime error message. This has the following syntax:
The expression used can be a value or a string or any other data type, and this will then generate an exception error which is — by default — shown on the screen, and on closing the error message the game will end. For example calling this:
will cause the following unhandled exception error to be shown:

This is the default way the error can be handled, but you can «take over» this error message and use your own handler code by calling the new function . This runtime function permits you to supply a custom method to use that will be called whenever any unhandled exceptions occur in your game.
Apart from the ability to throw your own errors and handle them using functions, we also have the new , , and operators. These can be used in your game for error checking and permit you to test out blocks of code and control what happens if any runtime exceptions occur. Using these will prevent the exception ending the game and will also prevent showing the standard error message to the user, but this means that you will have to handle what happens next in this case, like — for example — saving out log files and ending the game gracefully (note that if you choose to do nothing, your game may become unstable and not perform correctly).
At it’s most basic the syntax is as follows:
However, having a without anything to actually handle any exceptions the code may produce will not be very helpful, so we usually pair it with a , with the following syntax:
What does is permit you to run extra code supplied in the following block when an exception from the previous has been caught. If this is a runtime exception, then the supplied variable can be used to access a struct which will contain the following information:
A simple example of use is shown below:
It may be that you want to run some code regardless of whether an exception was thrown or not, and so for that you can add in a block. The syntax is:
It is worth noting that you can have any combination of these together, ie: / , / or / / , and that within the block you cannot use , , or statements as they have no meaning in this context and the compiler will generate an error if they are used.
Плюсы и минусы
Основные достоинства:
- простой и дружественный интерфейс;
- интеграция с различными платформами;
- поддержка русского языка;
- возможность работать даже без знания языков программирования;
- встроенный редактор объектов;
- привычный синтаксис для тех, кто владеет языками программирования (PHP, JavaScript и Pascal);
- собственный скриптовый язык GML;
- возможность создавать как простые 2D, так и более сложные 3D игры;
- простые системные требования.

Особых недостатков нет. Разработчики перестали развивать 3D режим и Game Maker плохо справляется с «тяжелыми» задачами, но его главное предназначение – создание простых двухмерных игр.
CHAINED ACCESSORS
Another change to GML is the ability to chain accessors. Much like you can now chain arrays together, you can chain the different Data Structure accessors together too, making accessing the data from nested structures much easier.
A simple example of this would be a DS grid, where each grid entry is a ds list. Previously you’d have to first retrieve the index of the list from the grid, and then access the data in the list, but now it’s as simple as doing something like this:
This would retrieve the data from the 6th position in the DS list that is being held in the grid (0, 0) position. Other examples of use are:
GML Usage
Finally, let’s talk about how tiles can be
used in GML. We’ll first need to understand the concept of Tile Maps.
Tile Maps
Each Tile Layer has a Tile Map attached to it,
and placing tiles on a layer puts them into its Tile Map. The Tile Map is what
you see in the Room Editor and in the game as well. It functions as a grid,
where each cell can hold a tile.
The Tile Map ID for a layer can be retrieved
using layer_tilemap_get_id():
There are many that you can run on the
returned Tile Map ID, to get a tile on the layer or to change a tile. For
example, you can run tilemap_get() to get the tile data at the given cell coordinates, or tilemap_get_at_pixel() to get the tile data at
the given room coordinates. There are similar “set” functions that can be used
to change tiles.
Tile Data
The tile data returned by tilemap_get() is usually the tile index, which is assigned to each
tile in a Tile Set starting from 0:
However, the returned tile data is only equal
to the tile index when it has no extra data. For example, you can apply rotation or mirroring to the tile data, and apply the
modified tile back to the Tile Map. Such a modified tile will not be equal to
the tile index anymore as it has extra data now.
To avoid such issues and get the correct tile
index from a cell, use tile_get_index() on the tile data returned by tilemap_get(). For example, let’s say
you want to check whether the player is standing on a water tile, and let’s
assume that the index for that tile is 4. You could do a check like this:
You could also create an enum to store your
tile indices!
Становимся профессионалом
Несколько GameMaker игр стали коммерчески успешными, и есть много других великолепных GameMaker игр, которые являются прекрасными примерами того, что возможно создать используя GM:S.
Отточеные игры
Spelunky — оригинальная версия Spelunky была создана в GameMaker; более новая XBLA версия и новая ПК-версия игры, нет. Это коммерческий успех, версия, созданная в GameMaker, бесплатная.
Spelunky Trailer

A Nation of Wind — эта игра скрытый драгоценный камень и в нее стоит определенно поиграть.
A Nation of Wind — Trailer

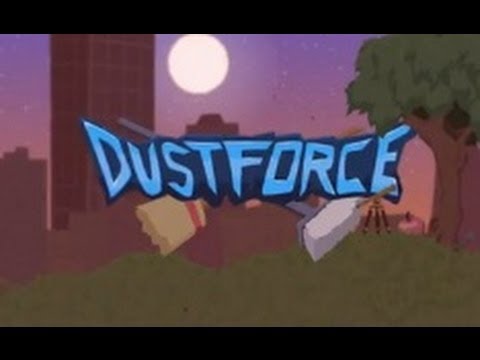
Dustforce — вышла в Steam, это не был огромный коммерческий успех, но тем не менее, это отличная игра!
Dustforce — Debut Trailer
Коммерческие хиты
Hotline Miami gameplay

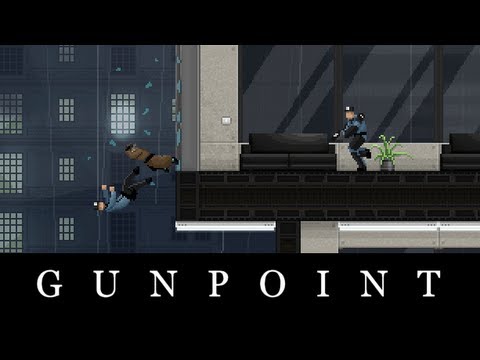
Gunpoint Launch Trailer — A 2D stealth game about rewiring things and punching people
Stealth Bastard Deluxe — Launch Trailer

Aces of the Luftwaffe — Universal — HD Gameplay Trailer

STRUCTS
The next new feature that we want to discuss in GameMaker Studio 2.3 is the creation of structs. A struct is — to put it simply — a variable that holds a collection of other variables — you can think of it as a kind of «light-weight object». The variables that a struct holds can be of any data type and these variables can be read from and written to after the initial struct declaration, and you can also add more variables to a struct after it has been declared. It should also be noted that the contents of a struct are independent of the instance or script that created it, and as such you can — if you wish — use the built-in variable names like or and . One of the benefits of using structs is that (unlike instances), after the initial creation, structs have no processing overhead while they exist, although they will take up space in memory. The struct syntax is as follows:
So, an example of this in practice would be:
The above creates an instance scope struct in the variable «mystruct» and populates it with some values (structs can be created at local, instance and global scope, just like any other variable). Note that you don’t have to populate the contents of a struct when it is created initially and you can create an empty struct by simply doing this:
This struct can then be added to at a later point in the game code. Here is an example of a struct with various variables and data types:
You’ll notice in the above code that you can also define methods and use runtime functions in structs, and that you can use expressions consisting of any variable previously defined within the context of the struct itself, as well as any variable defined within the scope of the struct itself.
Once a struct has been defined, you can access the data within using the «point» notation, like this:
You can also perform operations on the variables within a structure or use them in functions, just as you would any other variable. For example:
Finally, structs can have other structs nested inside of them, like this:
To access such nested structs you would still use the point notation, like this:
When a struct is no longer required it can be removed from memory using the operator, which is another new GML feature added in the 2.3 update. This de-references the struct and hints to the garbage collector that it may be available for collection. This is not strictly required as the garbage collector may do this automatically in the following game steps if the struct is no longer referenced in your code, but it is good practice to do so and we recommend it (for example, call delete in the Clean Up event of an instance to explicitly tell the garbage collector that an instance scope struct is to be deleted).
Also note that structs can be created using functions, which requires the use of the operator and the keyword (two more new features to GML), as shown in the following example:
Here we are creating the function and telling GameMaker Studio 2 that this is a function for making a struct by adding the keyword after the definition. You can then call this function like this:
Now the variable v1 will reference a struct with the variables x and y and the static method variable .
Note that there are other additional functions for structs, specifically:
Check the manual for details of how these functions should be used.
ANIMATION CURVES
The next new feature we want to discuss here is a new top-level resource called Animation Curves. An animation curve is an asset that contains one or more curves that represent how a value changes over time, and can use linear interpolation or smooth interpolation to go between different points in the curve. The values you set can be between -1 and 1 (by default) on the vertical axis and the duration along the horizontal axis is always normalised form 0 to 1, making it easy to target different time ranges using multipliers in your game code.

Animation curves are comprised of «channels» and each channel can have its own curve settings, which permits you to — for example — describe a spacial position with two channels for the x/y position, or a colour gradient with 4 channels to represent a colour format. Animation curve assets can be used when working with sequences and can also be accessed using code, making them a powerful tool when creating your games.
Системные требования
Версия 8.0 совершенно нетребовательна. Она запустится даже на слабых компьютерах. Достаточно любого процессора, 128 Мб оперативной памяти и поддержки DirectX 8.
Минимальная конфигурация для Game Maker Studio: двухъядерный процессор с 64-битной архитектурой, 2 Гб оперативной памяти, видеокарта с поддержкой DirectX 11, 64-битная операционная система и 3 Гб свободного пространства на жестком диске.
Перед тем как скачать Game Maker бесплатно на русском языке, прочитайте характеристики софта и требования к вашему устройству.
| Название: | Game Maker 2.0.6.146 |
| Размер: | 169.08 Мб |
| Обновлено: | 05.07.2019 |
| Требования: | Windows 7, 10 |
| Статус: | Бесплатная |
| Загрузок: | 957 |
SUMMARY
As you may imagine, this is a rather important update to GameMaker Studio 2 with a lot of new features and a lot of changes «under the hood» to make life easier and to make the product easier to use and more compatible with things like source control. We’ve said it already during in this blog post, but it’s worth repeating… read the manual! This is especially important when starting to use the new Sequences asset, as the editor has a lot to it and — especially if you are not an artist or have never used any kind of animation or video editing software — it can be a bit overwhelming to start with. However, we think this is an incredibly powerful tool and opens up GameMaker Studio 2 in a big way to people who are less experienced with code and who prefer a more visual approach to making games.
One final thing should be said about importing pre-2.3 projects. On importing a project made with a version of GameMaker Studio 2 prior to this update, you will be prompted to save the project again using a new name before continuing. This is absolutely essential as the changes made to the project file format are not backwards compatible and once you update a project to 2.3 it can’t be loaded into previous versions, so it’s a good idea to keep separate folders for pre and post 2.3 versions of any game you are working on.
Thanks for reading and we can’t wait to see what you all do with the new features!
Happy GameMaking!
GML
The GameMaker Language has also seen a few changes to it, with the addition of new data types, namely pointers and enmums. The texture functions and a few of the other functions that create dynamic resources will now return a pointer for the resource, while enums can now be created for use in your games. For more details of these features, please see the GameMaker: Studio Manual.
There have also been some new functions added to get information from Spine sprites, extra functions for local push notifications, some new buffer functions that permit the saving of groups of files (mainly for Console support), and SWF format sprites now have some dedicated functions that can get and set their AA level.
Что в нем плохого
GML не является объектно-ориентированным языком в прямом смысле этого слова. Существуют игровые объекты, у них есть свойства, и можно даже создавать отношения типа родитель-потомок. Однако объекты не имеют методов. Для выполнения операции над объектом, вам нужно будет использовать его идентификатор экземпляра внутри скрипта. Вначале это может вызвать путаницу для тех кто пришел из объектно-ориентированных языков.
GM:S поддерживает 3D, но это не главное. Нет 3D-редактора, отсутствует программа импорта 3D моделей, а код для работы с трехмерной графикой довольно запутан. Если вас интересуют 3D-игры, я рекомендую вам использовать другой инструмент. В будущем 3D может стать более приоритетным для YoYo Games (компании, владеющей GM:S), но на данный момент это явно последнее в списке.
Обучение GameMaker: Studio
GM:S предлагает два различных способа создавать игры. Первый это так называемый интерфейс Drag and Drop (сокращённо DnD). Он довольно мощный и позволяет создавать сложную логику. Однако, он не такой мощный, как второй вариант: использование языка программирования GameMaker Language (сокращённо GML). GML — это прекрасный язык сценариев, который может делать все, что может делать DND, и многое другое.
Начало работы
После того, как
вы загрузили версию движка GM:S которая соответствует вашим потребностям, вам следует ознакомиться с учебными материалами,
которые поставляются вместе с GM:S. Их можно найти во вкладке Tutorials после того, как вы откроете GM:S.
В начале уроков будет показано, как использовать drag and drop интерфейс, а более поздние руководства начинают охватывать язык программирования GML. Самое приятное в предложенных уроках — это то, что они фактически добавляют окно к
интерфейсу, в котором вы узнаете, как создавать каждую игру, поэтому вам
не нужно обращаться к веб-странице — все доступно изложено для вас в GM:S!
Я рекомендую
проработать столько, сколько вам нужно, до тех пор, пока вы не
почувствуете, что у вас есть четкое представление об общем процессе
работы и инструментах, которые предлагает движок GM:S. Дополнительные уроки вы можете найти на вики сайте YoYo games по адресу http://wiki.yoyogames.com/index.php/GameMaker:Studio_Tutorials включая некоторые более продвинутые руководства.
Для самого продвинутого обучения можно посмотреть демки на вкладке Demos после запуска GM:S. Они не откроют окно обучения, но они предоставляют доступ ко всему используемому исходному коду, чтобы можно было просматривать его, запускать отладчик и наблюдать за тем, что происходит, так что вы получите хорошее представление как использовать их методы в своих играх.
Руководство
Руководство по GM:S можно найти в меню Help в разделе Contents…. Это должно быть первым местом, где вы будете искать ответы на свои вопросы, если сразу перейти на форумы, люди по всей вероятности огорчат вас за то, что вы просто не проверили справку. Существует также онлайн-руководство, которое можно найти по адресу docs.yoyogames.com
Руководство в программе GM:S
Если вы выполняете поиск как в прилагаемом руководстве, так и в онлайн-руководстве и не можете найти ответы, не бойтесь! На reddit существует большое сообщество /r/gamemaker и есть официальные форумы. Кроме того, имеется отличный сайт полон инди-разработчиков, некоторые из них часто используют GM:S на форумах TIG. Эти сообщества полны полезных людей, поэтому не бойтесь задавать свои вопросы!
Заключение
Пришло время подвести итог для всех трёх материалов цикла. Чек-лист из шести пунктов, представленных ниже, поможет вам определиться с выбором движка для будущей игры.
Временные рамки
Обозначьте для себя сроки разработки. Если это игра вашей мечты, возможно, на её разработку уйдут годы. В этом случае стоит задуматься о движках, поддерживающих масштабные проекты (Unity, UE4, CryEngine). Но если в вашем распоряжении несколько месяцев, можно присмотреться к GameMaker или Construct 3 и сделать головоломку или платформер.
Бюджет
Некоторые игры предполагают финансовые затраты уже на старте, когда нужно приобрести движок (RPG Maker, GameMaker, Construct). В других случаях предстоит вложиться в покупку ассетов (Unity, UE4) и быть готовым выплачивать роялти. Что касается бесплатного контента, то здесь нужно быть особенно внимательным: иногда для использования требуется разрешение автора.
Личные навыки
Многие мечтают сделать собственную игру, но их останавливает отсутствие навыков программирования
В этом случае стоит обратить внимание на движки с визуальными скриптами и упрощённым подходом к коду (Clickteam Fusion, Ren’Py, Construct 3, UE4, GameMaker Studio)
Команда
Здесь всё зависит от масштаба. С какими-то технологиями проще работать в одиночку (GameMaker Studio, Construct 3, RPG Maker), в то время как для работы в других движках может потребоваться несколько человек (Unity, UE4, CryEngine).
Жанр
Существуют движки, которые специализируются на конкретных жанрах. Чтобы определиться с выбором, необходимо проанализировать, какие хиты сделаны с помощью той или иной технологии. Например, RPG Maker славится удобством в построении JRPG с пиксель-артом, на Construct сделано много платформеров, а на Unity и Unreal немало проектов с впечатляющей 3D-графикой.
Выбор платформы
Как правило, начинающих разработчиков волнует только процесс создания будущей игры, но мало кто задумывается о дальнейшей оптимизации, балансе и исправлении багов. Большую роль в этом играет масштаб проекта. Такие движки, как UE4, Unity и CryEngine, подходят для крупных проектов, но оптимизировать игру на них будет сложнее.
Выбор платформы не менее важен. Если для релиза на PC можно использовать практически любой движок, то поддержкой сторонних платформ могут похвастаться не все технологии. Для браузерных проектов подойдут Phaser 3 и Construct 3. Для мобильных приложений AppGameKit, Solar 2D и Cocos. Стоит учесть, что многие движки мультиплатформенные.
Не бойтесь экспериментировать. Даже если о каком-то движке, упомянутом в этом материале, вы слышите в первый раз, не стоит его игнорировать. При правильном подходе, достаточном опыте и целеустремлённости любой из них может стать мощным инструментом для достижения вашей цели.
Заключение
GameMaker: Studio отлично подходит для новичков и профессионалов. Его великолепный код и функции управления ресурсами, в сочетании с относительно низкой ценой, делают его великолепным игровым движком для небольших команд и независимых разработчиков, обладающих приличным опытом программирования, и его доступность, и событийность, и также система drag-and-drop на основе действий, делает его отличным движком для тех, кто практически не имеет опыта программирования.
Если вы хотите попробовать самостоятельно, зайдите на сайт http://www.yoyogames.com/studio/download и приступайте!