Дополнения гостевой ос virtualbox debian
Содержание:
- Установка гостевых дополнений из Virtual Box Manager
- Download Virtualbox Guest Additions
- Установите гостевые дополнения VirtualBox в Ubuntu / Debian Linux
- Using VirtualBox Guest Addition features
- Download Page for virtualbox-guest-additions-iso_5.2.11-122181-1_all.deb
- Whonix-Custom-Workstation ™[edit]
- Download Virtualbox Guest Additions
- Перетаскивание в VirtualBox
- Initializing the Device
- Dmitry Tishkin
- Download Page for virtualbox-guest-additions-iso_5.2.11-122181-1_all.deb
- Установка гостевых дополнений VirtualBox
- Uninstall virtualbox-guest-additions-iso[edit]
- Install VirtualBox Guest Additions
- Seamless Desktop
- Kali Linux & VirtualBox Guest Addition (Legacy)
- Preparing
- Installing
- Creating Shared Folders with the Host System
- Description
- How to Install VirtualBox’s Guest Additions
- Поддерживаемые операционный системы:
Установка гостевых дополнений из Virtual Box Manager
В случае, если гостевые дополнения не будут собраны, нам, возможно, придется установить заголовки ядра Linux (см. Как установить файлы заголовков ядра?) Или build-essential инструменты в дополнение. Также рекомендуется иметь ДКМС установлен (см. ниже — Примечание 4). Вы можете запустить эту команду в терминале, чтобы установить оба:
При выборе Устройства -> Установить гостевые дополнения (или нажмите Host + D в диспетчере виртуальных ящиков) компакт-диск гостевых дополнений.iso будет загружен, но не установлен в гостевой ОС. Для установки нам нужно запустить скрипт установщика как пользователь root или из запроса автозапуска (см. ниже).
GNOME Shell
Для установки гостевых дополнений у нас будет значок компакт-диска на рабочем столе, как только будет смонтирован виртуальный привод:
Следующий шаг — запустить скрипт autorun.sh (с правами root) на этом смонтированном компакт-диске, открыв диск и нажав кнопку «Запустить программное обеспечение». Это соберет и установит необходимые модули ядра vbox.
Единство
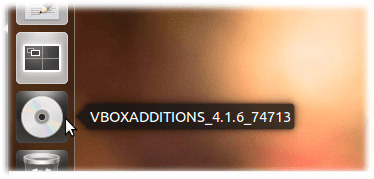
Гостевые дополнения монтируются как виртуальный компакт-диск, видимый на панели запуска:
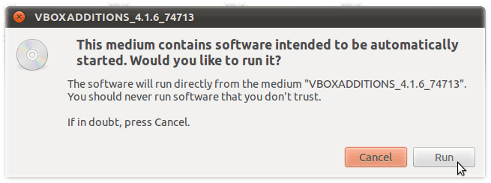
Если система настроена на автозапуск компакт-диска, она должна просто открыть следующее диалоговое окно автозапуска (если не выбрать символ компакт-диска, выберите «Открыть», затем выберите » Открыть запрос автозапуска»).
После ввода ваших учетных данных для root-доступа гостевые дополнения будут создаваться, как видно из вывода терминала:
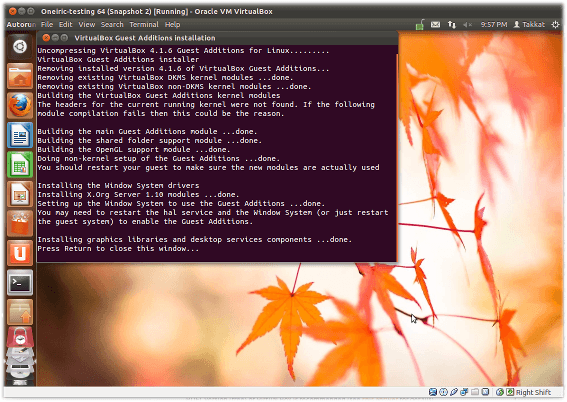
Нажмите Return, чтобы закрыть терминал.
Download Virtualbox Guest Additions
We have never realized how difficult it is to find the VirtualBox Guest additions download page. It is not accessible from the wiki. But, at this time… After some time spent on Google, we collect some vBoxGuestAdditions installation file with many version. This link will directly download the offline installer .iso from the official website. So, it’s secure and free from malware. Here is the answer:
| File Name | Version | Last Update | File Size |
| (Open the link to download) | |||
| VBoxGuestAdditions_6.0.4.iso | 6.0 | 28-Jan-2019 | 82 MB |
| VBoxGuestAdditions_5.2.26.iso | 5.2 | 28-Jan-2019 | 56 MB |
| VBoxGuestAdditions_5.1.38.iso | 5.1 | 09-May-2018 | 57 MB |
| VBoxGuestAdditions_5.0.40.iso | 5.0 | 28-Apr-2017 | 56 MB |
| VBoxGuestAdditions_4.3.40.iso | 4.3 | 22-Aug-2016 | 55 MB |
| VBoxGuestAdditions_4.2.38.iso | 4.2 | 14-Sep-2016 | 59 MB |
| VBoxGuestAdditions_4.1.44.iso | 4.1 | 11-Nov-2015 | 52 MB |
| VBoxGuestAdditions_4.0.36.iso | 4.0 | 11-Nov-2015 | 46 MB |
Установите гостевые дополнения VirtualBox в Ubuntu / Debian Linux
Следует иметь в виду, что гостевые дополнения, как следует из названия, являются дополнениями гостевой ОС, а не хост-ОС. Следовательно, в этом случае гостевой ОС, работающей на виртуальной машине, является Ubuntu, производные Ubuntu (включая сервер Ubuntu), производные Debian или Debian (включая сервер Debian). Операционная система, на которой установлен VirtualBox, может быть любой.
Способ установки VirtualBox Guest Additions незначительно зависит от дистрибутива. В некоторых случаях, как только вы монтируете образ компакт-диска VBox Guest Additions ISO, вам будет предложено выполнить скрипт автозапуска. На других вы должны будете вручную настроить VirtualBox Guest Additions. Ручной метод установки гостевых дополнений VirtualBox в Debian и Ubuntu Linux показан здесь, так как он должен работать в большинстве случаев.
Сначала нам нужно установить пакет с именем . Это необходимо, чтобы Virtual Box продолжала работать с любыми обновленными ядрами в будущем. Возможно, вы уже установили его, но при попытке повторить попытку и запустить команду, приведенную ниже, нет никаких проблем
Далее вам не нужно скачивать компакт-диск VirtualBox Guest Additions. Все, что вам нужно сделать, это, когда запущено виртуальное устройство Ubuntu или Debian, перейти к ->, как показано на рисунке ниже. Это установит диск VBox Guest Additions для установки.

Загрузить образ компакт-диска VBox Guest Additions
В некоторых дистрибутивах Linux скрипт автозапуска открывается автоматически. В других случаях образ компакт-диска открывается и содержимое отображается в проводнике. Это то, что случилось с Xubuntu, который используется в этой демонстрации.
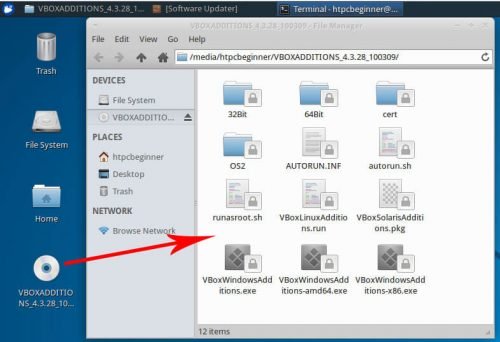
Открыть VBox Guest Additions CD
Теперь вы можете щелкнуть правой кнопкой мыши в пустом месте в проводнике и выбрать «Открыть терминал здесь». В некоторых других ничего не происходит после того, как вы вставите образ компакт-диска, и вам придется вручную открыть терминал и перемещаться по содержимому. Образ компакт-диска, как правило, монтируется под , где указано ваше имя пользователя и имя образа компакт-диска. В этой демонстрации путь:
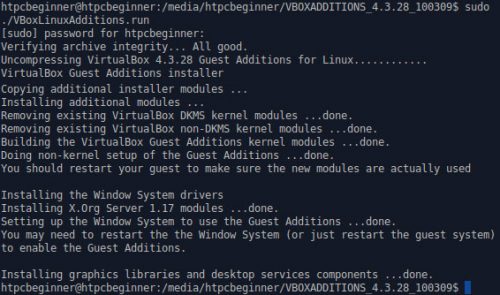
Как только у вас откроется окно терминала и вы окажетесь в папке образа компакт-диска, вы готовы установить гостевые дополнения VirtualBox на гостевую ОС Ubuntu или Debian. Наконец, запустите установщик гостевых дополнений VBox, используя следующую команду:
Вот и все, просто сидеть и смотреть. Сценарий автоматически подготовит и установит гостевые дополнения VBox в Ubuntu / Debian.
Установите гостевые дополнения VirtualBox в Ubuntu / Debian
После завершения установки перезагрузите гостевую ОС, и все готово. Теперь вы сможете запускать гостевую ОС в полноэкранном режиме, перетаскивать объекты между гостевой и хост-ОС, делиться буфером обмена и делать многое другое. На мой взгляд, если вы используете VirtualBox, то гостевые дополнения обязательно. VirtualBox также предлагает так называемый , который добавляет некоторые расширенные функции. Но большинству пользователей не нужен пакет расширений. Установите гостевые дополнения VirtualBox на гостевые ОС Ubuntu и Debian и наслаждайтесь повышенной производительностью и возможностями.
Источник записи: https://www.smarthomebeginner.com

Using VirtualBox Guest Addition features
Here are some screenshots for enabling/using helpful features of VirtualBox Guest Additions in use:
Configure Drag And Drop (any files)
You can enable drag and drop from the top menu -> Devices ->Drag and Drop -> Bidirectional.
With Bidirectional, you can drag and drop from guest to host and from host to guest, both.

Drag and Drop
Configure Shared Clipboard (for copy-pasting)
Similarly, you can enable shared clipboard from the top menu -> Devices -> Shared Clipboard -> Bidirectional.

Shared Clipboard
Uninstalling VirtualBox Guest Additions (if you don’t want to use it anymore)
Navigate to the CD image and open it in terminal (Right Click inside directory > Open in Terminal):

Open in Terminal
Now enter:
However, in some cases you might have to do some more cleanup. Use the command:
Note: Replace VBoxGuestAdditions-version with the right version (you can hit tab to autocomplete; in my case it is VBoxGuestAdditions-6.0.4).
Download Page for virtualbox-guest-additions-iso_5.2.11-122181-1_all.deb
If you are running Ubuntu, it is strongly suggested to use a package manager like aptitude or synaptic to download and install packages, instead of doing so manually via this website.
You should be able to use any of the listed mirrors by adding a line to your /etc/apt/sources.list like this:
deb http://cz.archive.ubuntu.com/ubuntu bionic main multiverse
Replacing cz.archive.ubuntu.com/ubuntu with the mirror in question.
You can download the requested file from the pool/multiverse/v/virtualbox-guest-additions-iso/ subdirectory at any of these sites:
North America
- mirrors.kernel.org/ubuntu
- ftp.osuosl.org/pub/ubuntu
- lug.mtu.edu/ubuntu
- ubuntu.mirrors.tds.net/ubuntu
- ubuntu.secs.oakland.edu
- mirror.mcs.anl.gov/pub/ubuntu
- mirrors.cat.pdx.edu/ubuntu
- ubuntu.cs.utah.edu/ubuntu
- ftp.ussg.iu.edu/linux/ubuntu
- mirrors.xmission.com/ubuntu
- mirrors.cs.wmich.edu/ubuntu
- gulus.USherbrooke.ca/pub/distro/ubuntu
Asia
- kr.archive.ubuntu.com/ubuntu
- th.archive.ubuntu.com/ubuntu
- mirror.lupaworld.com/ubuntu
- kambing.vlsm.org/ubuntu
- ubuntu.mithril-linux.org/archives
- mirror.in.th/ubuntu
- mirror.rootguide.org/ubuntu
Africa
za.archive.ubuntu.com/ubuntu
Europe
- cz.archive.ubuntu.com/ubuntu
- de.archive.ubuntu.com/ubuntu
- dk.archive.ubuntu.com/ubuntu
- es.archive.ubuntu.com/ubuntu
- fr.archive.ubuntu.com/ubuntu
- ge.archive.ubuntu.com/ubuntu
- gr.archive.ubuntu.com/ubuntu
- hr.archive.ubuntu.com/ubuntu
- mt.archive.ubuntu.com/ubuntu
- nl.archive.ubuntu.com/ubuntu
- no.archive.ubuntu.com/ubuntu
- se.archive.ubuntu.com/ubuntu
- yu.archive.ubuntu.com/ubuntu
- nz.archive.ubuntu.com/ubuntu
- nz2.archive.ubuntu.com/ubuntu
- ftp.iinet.net.au/pub/ubuntu
- mirror.optus.net/ubuntu
- ftp.filearena.net/pub/ubuntu
- mirror.pacific.net.au/linux/ubuntu
If none of the above sites are fast enough for you, please see our complete mirror list.
Note that in some browsers you will need to tell your browser you want the file saved to a file. For example, in Firefox or Mozilla, you should hold the Shift key when you click on the URL.
More information on virtualbox-guest-additions-iso_5.2.11-122181-1_all.deb:
| Exact Size | 38955904 Byte (37.2 MByte) |
|---|---|
| MD5 checksum | a6094fffc58ec6cef78661cce40c99ba |
| SHA1 checksum | 7172992d808c8fa7d0f2eca3dcbf55be579483ad |
| SHA256 checksum | 515f4e2105fa593ddbfb43340553d24c1cbe855641377819e8c51d5e1f68388a |
Whonix-Custom-Workstation ™[edit]
If you are using a Whonix-Custom-Workstation additional steps are required. Please click on expand on the right.
Two options exist: automatic mounting or manual mounting. The automatic mounting method is described below. For additional information on shared folders refer to the . Any additional questions are unspecific to Whonix and should be addressed as per the Free Support Principle.
- Install VirtualBox guest additions inside the VM.
-
Add the user that will utilize shared folders from inside the VM to group :
sudo addgroup user vboxsf
sudo addgroup user vboxsf
- A reboot is required to make group changes take effect.
- Follow the instructions above.
Download Virtualbox Guest Additions
We have never realized how difficult it is to find the VirtualBox Guest additions download page. It is not accessible from the wiki. But, at this time… After some time spent on Google, we collect some vBoxGuestAdditions installation file with many version. This link will directly download the offline installer .iso from the official website. So, it’s secure and free from malware. Here is the answer:
| File Name | Version | Last Update | File Size |
| (Open the link to download) | |||
| VBoxGuestAdditions_6.0.4.iso | 6.0 | 28-Jan-2019 | 82 MB |
| VBoxGuestAdditions_5.2.26.iso | 5.2 | 28-Jan-2019 | 56 MB |
| VBoxGuestAdditions_5.1.38.iso | 5.1 | 09-May-2018 | 57 MB |
| VBoxGuestAdditions_5.0.40.iso | 5.0 | 28-Apr-2017 | 56 MB |
| VBoxGuestAdditions_4.3.40.iso | 4.3 | 22-Aug-2016 | 55 MB |
| VBoxGuestAdditions_4.2.38.iso | 4.2 | 14-Sep-2016 | 59 MB |
| VBoxGuestAdditions_4.1.44.iso | 4.1 | 11-Nov-2015 | 52 MB |
| VBoxGuestAdditions_4.0.36.iso | 4.0 | 11-Nov-2015 | 46 MB |
Перетаскивание в VirtualBox
Начиная с версии 5.0, VirtualBox поддерживает перетаскивание содержимого с хоста на гостя и наоборот. Для этого на госте должны быть установлены последние гостевые дополнения.
По соображениям безопасности перетаскивание можно настроить во время выполнения на основе каждой виртуальной машины либо с помощью пункта меню «Функция Drag and Drop» в меню «Устройства» виртуальной машины или в VBoxManage. Доступны следующие четыре режима:
- «Выключено»: полностью отключает перетаскивание. Это значение по умолчанию при создании новых виртуальных машин.
- «Из основной в гостевую»: позволяет выполнять операции перетаскивания только с хоста на гостя.
- «Из гостевой в основную»: позволяет выполнять операции перетаскивания только от гостя к хосту.
- «Двунаправленный»: этот режим позволяет выполнять операции перетаскивания в обоих направлениях, например,. от хоста до гостя и наоборот.
Известные ограничения
Известны следующие ограничения:
Теперь на хостах Windows не разрешено перетаскивание содержимого из UAC-повышенных (контроль учетных записей пользователей) программ в не-UAC-повышенные программы и наоборот. Таким образом, при запуске VirtualBox с правами администратора, перетаскивание не будет работать с проводником Windows, который по умолчанию работает с обычными пользовательскими привилегиями.
Продолжение «Руководство по VirtualBox (часть 6): Подсказки, советы и дополнительные материалы по использованию VirtualBox».
Initializing the Device
Before we can do anything with the guest device, we need to tell it about ourselves. There are two protocols that current versions of VirtualBox support: 1.03 and 1.04. We will use 1.03, the so-called «Legacy Protocol», as it is slightly simpler.
#define VBOX_VENDOR_ID 0x80EE
#define VBOX_DEVICE_ID 0xCAFE
#define VBOX_VMMDEV_VERSION 0x00010003
#define VBOX_REQUEST_HEADER_VERSION 0x10001

#define VBOX_REQUEST_GUEST_INFO 50

/* VBox Guest packet header */
struct vbox_header {
        uint32_t size; /* Size of the entire packet (including this header) */
        uint32_t version; /* Version; always VBOX_REQUEST_HEADER_VERSION */
        uint32_t requestType; /* Request code */
        int32_t  rc; /* This will get filled with the return code from the requset */
        uint32_t reserved1; /* These are unused */
        uint32_t reserved2;
};

/* VBox Guest Info packet (legacy) */
struct vbox_guest_info {
        struct vbox_header header;
        uint32_t version;
        uint32_t ostype;
};

static pci_device_t vbox_pci;
static int vbox_port;
static uint32_t * vbox_vmmdev;

static void vbox_guest_init(void) {
    /* Find the guest device */
    pci_device_t vbox_pci = pci_find(VBOX_VENDOR_ID, VBOX_DEVICE_ID);

    /* BAR0 is the IO port. */
    vbox_port = pci_read_field(vbox_pci, PCI_BAR0, 4) & 0xFFFFFFFC;

    /* BAR1 is the memory-mapped "vmmdevmem" area. */
    vbox_vmmdev = map_physical_page(pci_read_field(vbox_pci, PCI_BAR1, 4) & 0xFFFFFFF0);

    /* Allocate some space for our Guest Info packet */
    uint32_t guest_info_phys;
    struct vbox_guest_info * guest_info = allocate_physical_page(&guest_info_phys);

    /* Populate the packet */
    guest_info->header.size = sizeof(struct vbox_guest_info);
    guest_info->header.version = VBOX_REQUEST_HEADER_VERSION;
    guest_info->header.requestType = VBOX_REQUEST_GUEST_INFO;
    guest_info->header.rc = ;
    guest_info->header.reserved1 = ;
    guest_info->header.reserved2 = ;
    guest_info->version = VBOX_VMMDEV_VERSION;
    guest_info->ostype = ; /* 0 = Unknown (32-bit); we don't need to lie about being another OS here */

    /* And send it to the VM */
    outportl(vbox_port, guest_info_phys);

    /* (We could check the return value here as well) */
}
Dmitry Tishkin
Read more posts by this author.
Dmitry Tishkin
Гостевые дополнения VirtualBox состоят из драйверов устройств и системных приложений, которые оптимизируют операционную систему для повышения производительности и удобства использования. Эти драйверы обеспечивают более тесную интеграцию между гостевой и хост-системами.
Независимо от того, как вы используете свою виртуальную машину, гостевые дополнения могут оказаться очень полезными для Вас. Например, я тестирую множество установок и приложений внутри виртуальной машины и делаю много скриншотов. Очень удобно иметь возможность свободно перемещать эти скриншоты между хост-системой и гостевой ОС.
Гость? Хост? Что это такое?
Если вы еще не знаете, вот немного терминологии. Хост-система – это ваша фактическая операционная система, установленная в вашей физической системе. Гостевая система – это виртуальная машина, установленная в операционной системе вашей хост-системы.
Прежде чем вы предпримите шаги по установке гостевых дополнений VirtualBox в Ubuntu, давайте сначала поговорим о его функциях.
Download Page for virtualbox-guest-additions-iso_5.2.11-122181-1_all.deb
If you are running Ubuntu, it is strongly suggested to use a package manager like aptitude or synaptic to download and install packages, instead of doing so manually via this website.
You should be able to use any of the listed mirrors by adding a line to your /etc/apt/sources.list like this:
deb http://cz.archive.ubuntu.com/ubuntu bionic main multiverse
Replacing cz.archive.ubuntu.com/ubuntu with the mirror in question.
You can download the requested file from the pool/multiverse/v/virtualbox-guest-additions-iso/ subdirectory at any of these sites:
North America
- mirrors.kernel.org/ubuntu
- ftp.osuosl.org/pub/ubuntu
- lug.mtu.edu/ubuntu
- ubuntu.mirrors.tds.net/ubuntu
- ubuntu.secs.oakland.edu
- mirror.mcs.anl.gov/pub/ubuntu
- mirrors.cat.pdx.edu/ubuntu
- ubuntu.cs.utah.edu/ubuntu
- ftp.ussg.iu.edu/linux/ubuntu
- mirrors.xmission.com/ubuntu
- mirrors.cs.wmich.edu/ubuntu
- gulus.USherbrooke.ca/pub/distro/ubuntu
Asia
- kr.archive.ubuntu.com/ubuntu
- th.archive.ubuntu.com/ubuntu
- mirror.lupaworld.com/ubuntu
- kambing.vlsm.org/ubuntu
- ubuntu.mithril-linux.org/archives
- mirror.in.th/ubuntu
- mirror.rootguide.org/ubuntu
Africa
za.archive.ubuntu.com/ubuntu
Europe
- cz.archive.ubuntu.com/ubuntu
- de.archive.ubuntu.com/ubuntu
- dk.archive.ubuntu.com/ubuntu
- es.archive.ubuntu.com/ubuntu
- fr.archive.ubuntu.com/ubuntu
- ge.archive.ubuntu.com/ubuntu
- gr.archive.ubuntu.com/ubuntu
- hr.archive.ubuntu.com/ubuntu
- mt.archive.ubuntu.com/ubuntu
- nl.archive.ubuntu.com/ubuntu
- no.archive.ubuntu.com/ubuntu
- se.archive.ubuntu.com/ubuntu
- yu.archive.ubuntu.com/ubuntu
- nz.archive.ubuntu.com/ubuntu
- nz2.archive.ubuntu.com/ubuntu
- ftp.iinet.net.au/pub/ubuntu
- mirror.optus.net/ubuntu
- ftp.filearena.net/pub/ubuntu
- mirror.pacific.net.au/linux/ubuntu
If none of the above sites are fast enough for you, please see our complete mirror list.
Note that in some browsers you will need to tell your browser you want the file saved to a file. For example, in Firefox or Mozilla, you should hold the Shift key when you click on the URL.
More information on virtualbox-guest-additions-iso_5.2.11-122181-1_all.deb:
| Exact Size | 38955904 Byte (37.2 MByte) |
|---|---|
| MD5 checksum | a6094fffc58ec6cef78661cce40c99ba |
| SHA1 checksum | 7172992d808c8fa7d0f2eca3dcbf55be579483ad |
| SHA256 checksum | 515f4e2105fa593ddbfb43340553d24c1cbe855641377819e8c51d5e1f68388a |
Установка гостевых дополнений VirtualBox
Для улучшения работы с виртуальной машиной, и взаимодействия с ней, в виртуально установленной операционной системе нужно установить специальный набор инструментов, который называется «Гостевые дополнения» («Guest Additions»). Данный набор инструментов выпускается для следующих операционных систем:
- Windows (начиная с Windows NT 4.0, и заканчивая Windows 10);
- Linux (официально поддерживаются Oracle Linux, Fedora, Red Hat Enterprise Linux, SUSE (в том числе openSUSE), Ubuntu);
- Oracle Solaris;
- OS/2.
Для установки гостевых дополнений VirtualBox необходимо выполнить следующие действия:
- Включаем виртуальную машину и ждем загрузки ОС.
- В верхнем меню VirtualBox выбираем пункт «Устройства — Подключить образ диска Дополнений гостевой ОС…».
Дальнейшие действия зависят от того, какая операционная система установлена в VirtualBox:
Windows
- Если в системе не отключен автозапуск, то должен запуститься установщик дополнений гостевой ОС. Если же в системе выключен автозапуск, нужно запустить установщик вручную, найдя его на подключившемся диске в виртуальной машине, под именем VBoxWindowsAdditions.exe.
- Как и установка самого VirtualBox, установка гостевых дополнений максимально упрощена, и по сути представляет из себя нажатие кнопок «Next». С первым окном именно так и следует поступить.
- На следующем будет предложено выбрать место для установки гостевых дополнений. По умолчанию, рассматривается обычная для всех программ директория Program Files.
- Последним шагом, перед непосредственно самой установкой, будет выбор устанавливаемых компонентов:
- VirtualBox Guest Additions — собственно, сами гостевые дополнения VirtualBox;
- Start menu entries — ярлыки в меню «Пуск».
- Direct3D Support — третий компонент, который не выбран по умолчанию, является экспериментальной функцией по включению полноценного 3D ускорения в виртуальной машине. Для «простой» работы он не нужен.
- После нажатия на кнопку «Next» начнется установка гостевых дополнений, во время которой может появится окно с запросом на разрешения установки программного обеспечения для устройства (драйвер), которую необходимо одобрить.
- После установки дополнений потребуется перезагрузка компьютера, которую можно выполнить сразу (оставив отмеченным пункт «Reboot now»), или выполнив её позже самостоятельно (для этого нужно отметить пункт «I want to manually reboot later»).
- После перезагрузки произойдет множество полезных изменений — появится поддержка двухстороннего буфера обмена (о том, как его включить можно прочитать здесь), функция drag-n-drop между основной операционной системой и операционной системой в виртуальной машине, автоматический выбор разрешения экрана на основе размера окна VirtualBox и т. д.
Linux
В операционных системах семейства Linux, графический установщик гостевых дополнений отсутствует, вся установка происходит через терминал. Современные дистрибутивы прекрасно сами распознают файл автозапуска на образе с гостевыми дополнениями, и предлагают его запустить автоматически.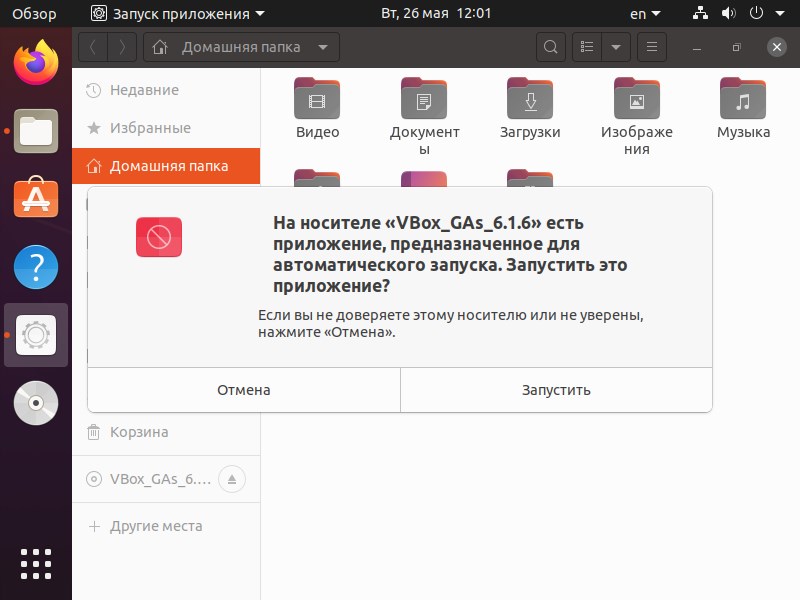
Можно так же запустить файл установки гостевых дополнений вручную. Для этого, нужно открыть терминал, и перейти в каталог, куда смонтирован виртуальный образ с файлами установки дополнений. Там же, нужно выполнить команду запуска файла установки:
После выполнения данной команды, начнется установка гостевых дополнений Linux, по завершению которой, понадобится перезагрузка системы.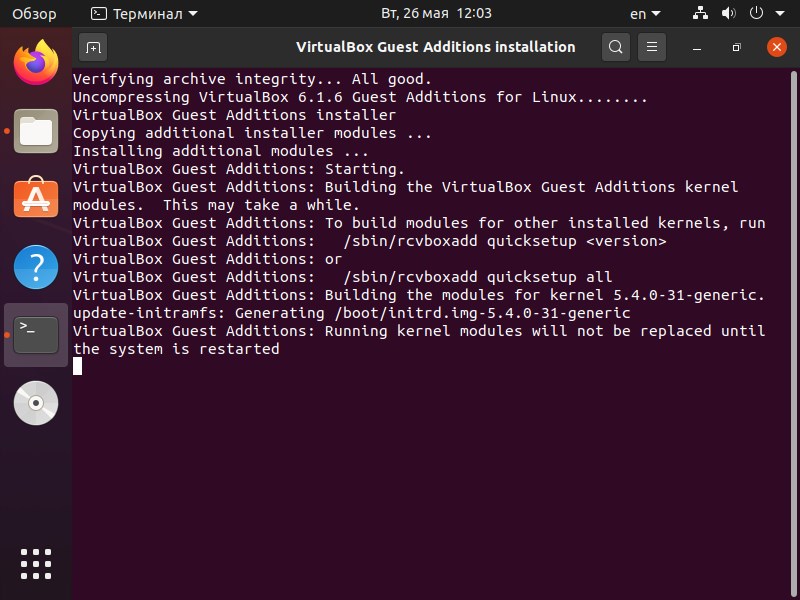
Uninstall virtualbox-guest-additions-iso[edit]
This is discouraged and should not be required. However, if you wish to uninstall VirtualBox guest additions as installed by by Whonix developers, follow the steps below.
1.
-
Whonix 15: Purge package . This will result in by Whonix developers in future doing effectively nothing.
sudo apt purge virtualbox-guest-additions-iso
sudo apt purge virtualbox-guest-additions-iso
- Whonix 16: No purge of package required since effectively does nothing if VirtualBox guest additions packages are installed. If purging is desired this is OK too.
2. Remove VirtualBox guest additions (previously installed by Whonix from . Run VirtualBox guest additions uninstaller by VirtualBox developers.
sudo /usr/sbin/vbox-uninstall-guest-additions
sudo /usr/sbin/vbox-uninstall-guest-additions
Install VirtualBox Guest Additions
This guest additions installation step applies only on a GUI-less server. If you need to installing this features with the full GUI mode then jump to method 2
Method 1: Install from Terminal
- First, Start your VirtualBox.
- Then, start the host in question.
- Once the host has booted, click Devices | Insert Guest Additions CD Image.
- After that, Log in to your guest server.
- Mount the CD-ROM with the command
- Change into the mounted directory with the command
- Install the necessary dependencies with the command
- Change to the root user with the command
- Install the Guest Additions package with the command
- Please Allow the installation to complete.
- Now, You will see an error stating that the installer couldn’t find the X.Org or XFree86 Window System—that’s okay, because it doesn’t exist on this host.
- For the last, Reboot your machine, and the Guest Additions will be working.
You should see a bit of a performance increase, as well as the extra features (shared clipboard, shared folders, and more) awarded by this installation.
Method 2: Install from GUI Mode
- In the Window containing the running virtual machine, select Install Guest Additions from the Devices menu.
- When the AutoPlay window is displayed (prompting you to run the VBoxWindowsAdditions.exe program), close the window without installing the Guest Additions. Closing the window leaves the ISO image used to install the Guest Additions inserted in the virtual CD/DVD drive. You need to install the VirtualBox Guest Additions from the command line to get all the features we need.
- In the virtual machine, on the Windows Start menu, type run in the search field and press Return. The Run dialog is displayed. Enter in the Open field.
- Press the Return key. If you are preparing a Windows XP desktop template, you can omit the command line switch.
- When you are prompted, click Yes to install the Guest Additions. The VirtualBox Guest Additions Setup wizard is displayed in a new window.
- Click the Next button to move though the various steps of the wizard. Accept all the default
settings and then click Install to install the Guest Additions. If a Windows Security dialog is displayed that prompts you to install device software.(see the screenshoot for an example), click Install. - When the Guest Additions installation is complete, ensure Reboot now is selected and click Finish.
- The VirtualBox Guest Additions Setup wizard closes and the virtual machine is rebooted.
- When the virtual machine reboots, log in.
Next, for the last step you will need perform some additional configuration in the virtual machine. For the best setting please refer to this configuration that described on: “Additional Virtual Machine Preparation”.
Conclusions: VirtualBox: The Go-to Virtualization Option
As you can conclude, the VirtualBox Windows 10 download is very simple to implement. There is not much to it. The process itself only takes a few minutes to complete, as the download comes accompanied by instructions that are very simple to follow. Numerous people around the globe are currently taking advantage of VirtualBox. Go ahead and download it so that you can put it to good use and thus also benefit from it. It is a well-structured program that has caused a positive buzz thatseems to become muchlouder every day.
Term for this post:
Virtualbox Guest Additions Download • Virtualbox Guest Additions • Vboxwindowsadditions Download • Virtualbox Guest Additions Windows 10 Download • Vm Virtualbox Guest Additions Download • Guest Addition Download • Vboxwindowsaddition Download • Win10Repair Virtual Box Guest Additions Download • Virtualbox Guest Additions Download Windows 10 • Download Virtualbox Guest Additions • Virtualbox Guest Additions Windows Download • Virtualbox Drivers Guest Windows 10 • Virtualbox Guest Additions Iso File • Free Download Virtualbox Guest Additions • Guest Additions Exe
Advertisement
Seamless Desktop
The seamless desktop mode in VirtualBox works by sending the virtual machine a list of rectangles representing the non-background visible regions of the desktop. The host creates a borderless, maximized window and shapes it based on the rectangles provided by the guest, yielding the appearance of a seamless desktop. You can tie this into a driver that receives window bounds information from your GUI. Note that seamless works best with (and maybe requires?) Auto-Resize Guest Display support.
#define VBOX_REQUEST_SET_VISIBLE_REGION 71

struct vbox_rtrect {
    int32_t xLeft;
    int32_t yTop;
    int32_t xRight;
    int32_t yBottom;
}

struct vbox_visibleregion {
    struct vbox_header header;
    uint32_t count;
    struct vbox_rtrect rect;
}

static uint32_t vbox_visibleregion_phys;
static vbox_visibleregion * vbox_visibleregion;

...

static void vbox_set_visible_region(uint32_t count, ...) {
    vbox_visibleregion = allocate_physical_page(&vbox_visibleregion_phys);
    vbox_visibleregion->header.size = sizeof(struct vbox_visibleregion) + sizeof(vbox_rtrect) * count;
    vbox_visibleregion->header.version = VBOX_REQUEST_HEADER_VERSION;
    vbox_visibleregion->header.requestType = VBOX_REQUEST_SET_VISIBLE_REGION;
    vbox_visibleregion->header.rc = ;
    vbox_visibleregion->header.reserved1 = ;
    vbox_visibleregion->header.reserved2 = ;
    vbox_visibleregion->count = count;

    /* Set each of the rectangles... */
    vbox_visibleregion->recti.xLeft = ...;
    /* etc */

    outportl(vbox_port, vbox_visibleregion_phys);
}
There is an additional interface for the seamless mode using the (undocumented) host-guest communication interface. In the case of the seamless mode, this functionality only communicates whether the seamless mode has been requested and is not necessary for it to function.
There are also hints in the VirtualBox codebase that a direct guest-host window mapping feature was planned but has not been implemented. This would presumably allow the guest to provide separate textures for each window, possibly alongside window title and icon information…
Kali Linux & VirtualBox Guest Addition (Legacy)
This page is dated. You can find the latest version here: Install VirtualBox Guest Additions.
If you run Kali Linux as a “guest” within VirtualBox, this article will help you to successfully install the “Guest Addition” tools.
You must use VirtualBox 4.2.xx or higher in order to take advantage of the improvements, including compatibility updates, and enhanced stability of both the core application and the Guest Additions.
Preparing
Start up your Kali Linux virtual machine, open a terminal window and issue the following command to install the Linux kernel headers.
Once this is complete you can now attach the Guest Additions CD-ROM image. This can be done by selecting Devices from the VirtualBox menu and then select Install Guest Additions.
This will mount the Guest Additions ISO in the virtual CD drive in your Kali Linux virtual machine. When prompted to autorun the CD, click the Cancel button.

Installing
From a terminal window, copy the file from the Guest Additions CD-ROM to a path on your local system. Ensure it is executable and run the file to begin the installation.
Reboot the Kali Linux VM to complete the Guest Additions installation. You should now have full mouse and screen integration as well as the ability to share folders with the host system.
This section explains how to share folders on your host system with your Kali Linux VirtualBox “guest”.
From the VirtualBox Manager, select your Kali Linux VM instance and click on the Shared Folders link in the right window pane. This will launch a pop up window for adding shared folders. Within this window click the Add Folders icon.
In the Folder Path text box, provide the path to the folder you would like to share, or click the drop-down arrow to browse your host system for the path to the folder. Select the check boxes that allow for Auto-mount and Make Permanent and click the OK button both times when prompted.

Your shared folders will now be available in the media directory. You can create a bookmark or link for easier access to the directory.

Updated on: 2021-Nov-27
Author:
g0tmi1k
Description
virtualbox-guest-additions-iso — guest additions iso image for VirtualBox
| Property | Value |
|---|---|
| Operating system | Linux |
| Distribution | Debian 10 (Buster) |
| Repository |
Debian Nonfree amd64 Official |
| Package filename | virtualbox-guest-additions-iso_6.0.4-1_all.deb |
| Package name | virtualbox-guest-additions-iso |
| Package version | 6.0.4 |
| Package release | 1 |
| Package architecture | all |
| Package type | deb |
| Homepage | https://www.virtualbox.org |
| License | — |
| Maintainer | Debian Virtualbox Team <team+debian-virtualbox@tracker.debian.org> |
| Download size | 57.44 MB |
| Installed size | 81.96 MB |
| Category |
non-free/misc role::app-data |
VirtualBox is a free x86 virtualization solution allowing a wide range of
x86 operating systems such as Windows, DOS, BSD or Linux to run on a
Linux system.
This package provides an iso image which contains the guest additions
for Linux, Solaris and Windows to be installed on the host system. The guest
systems then can mount the iso and install the guest additions from there.
How to Install VirtualBox’s Guest Additions
It’s easy to install the Guest Additions on your VirtualBox system. In fact, every time VirtualBox receives an update, it includes a new version of the Guest Additions too. You don’t necessarily need to update the Guest Additions every time you update VirtualBox, but Oracle recommends it for best performance.
Keep in mind that the Guest Additions are available for Windows and Linux, but not macOS. You’ll need other workarounds if you’re running macOS in a virtual machine.
Install Guest Additions on Windows VMs
To install the Guest Additions for VirtualBox in a Windows VM, boot into your guest OS as normal. On the toolbar at the top, select Devices > Insert Guest Additions CD Image. This mounts a virtual disc to the VM.
When you do this, Windows will respond as if you’ve just inserted a physical disc. If it doesn’t prompt you to run it, open a File Explorer window and go to This PC. You should see a device in the CD Drive named something like VBox_GAs_x.
Double-click this to open the disc’s contents. Inside, run the VBxWindowsAdditions file (or VBxWindowsAdditions-x86 on a 32-bit VM).
From there, simply walk through the steps to install the Guest Additions like you would any other software. After it completes, you’ll be prompted to reboot the VM, which you should do as soon as possible.
Once you’re done, you can go to Devices > Optical Drives > Remove disk from virtual drive to «eject» the virtual Guest Additions disc.
Install Guest Additions on Linux VMs
The process to install VirtualBox’s Guest Additions into a Linux VM is quite similar. Once you’ve booted up, select Devices > Insert Guest Additions CD Image from VirtualBox’s menu bar. Depending on your flavor of Linux, you may see a message to automatically run the CD’s contents.
You can accept this, but if you don’t, you’ll find the CD available on the taskbar in many Linux distros. If it doesn’t appear there, open the file browser and look for VBox_GAs_x on the left sidebar.
On Ubuntu, a Run Software button appears at the top-right of the window. Click this to start the install process, then provide your admin password to continue. A Terminal window will open to keep you updated with its progress.
Once it’s done, reboot the VM and you’re all set. You can then eject the disk using the Devices > Optical Drives > Remove disk from virtual drive option, or by right-clicking it in your OS and choosing Eject.
Поддерживаемые операционный системы:
Windows:
- Windows XP SP3 (32-bit и 64-bit)
- Windows Vista SP1 и выше (32-bit и 64-bit).
- Windows Server 2008 (64-bit)
- Windows Server 2008 R2 (64-bit)
- Windows 7 (32-bit и 64-bit)
- Windows 8 (32-bit и 64-bit)
- Windows 8.1 (32-bit и 64-bit)
- Windows 10 RTM build 10240 (32-bit и 64-bit)
- Windows 10 RTM build 10586 (32-bit и 64-bit)
- Windows Server 2012 (64-bit)
- Windows Server 2012 R2 (64-bit)
Mac OS X (64-bit):
- 10.8 (Mountain Lion)
- 10.9 (Mavericks)
- 10.10 (Yosemite)
- 10.11 (El Capitan)
Linux (32-bit и 64-bit):
- Ubuntu 10.04 до 15.04
- Debian GNU/Linux 6.0 («Squeeze») и 8.0 («Jessie»)
- Oracle Enterprise Linux 5, Oracle Linux 6 и 7
- Redhat Enterprise Linux 5, 6 и 7
- Fedora Core / Fedora 6 до 22
- Gentoo Linux
- openSUSE 11.4, 12.1, 12.2, 13.1
- Mandriva 2011
Solaris hosts (64-bit):
- Solaris 11
- Solaris 10 (U10 и выше