Feature overview
Содержание:
- Dropping thumbnail icon
- Troubleshooting
- Team news
- What’s next
- End notes
- Step 4
- Crop an Image
- Tools, Filters & Plug-ins
- Changing the Size (Dimensions) of an Image (Scale)
- Paint Select tool
- The Gimp module
- Color Management Improvements
- Creating a drop-shadow
- Что такое GIMP? Бесплатный графический редактор
- GIMP for macOS
- babl minimum requirement in GEGL and GIMP
- Downloading GIMP 2.10.24
- What’s next
- Plug-ins
- Slider widget
- Linear color space workflow
- Работа с программой
- Font thumbnail adapted for Korean and Japanese
- New experimental Paint Select tool
Dropping thumbnail icon
After years of discussions and bug reports, we dropped the thumbnail icon
feature. Previously, when images were opened, the application icon in
the taskbar would combine a preview of the active image and the actual
application icon (Wilber). The icon would then change whenever the
active image changed. For many people, this complicated locating GIMP’s
window among windows of other running applications.
Moreover, due to recent changes in desktop environments’ behavior, this
feature was actually working on less and less platforms. So depending
on your OS and desktop environment, it either didn’t work at all or
actively worked against you. This is why we decided to do away with it.
Troubleshooting
Yes, GIMP does support graphic tablets and maps pressure, stroke speed, and
other events to its advanced brush engine properties. However, the version of
the user interface toolkit that GIMP currently relies on (GTK+ 2.x) is broken
beyond repair on Windows and Mac with regards to supporting some advanced input
devices such as Wacom’s.
To fix this, we need to port GIMP to GTK+3 where everything mostly works as
expected. This is a work in progress.
Under MacOS GIMP fonts are garbled
Most likely this is an issue with MacOS font cache and is unrelated to GIMP. See
Dealing with Garbled Fonts blog post about
dealing with it.
Team news
Developers
Daniel Novomeskỳ is now a core developer with git access, for their
continuous contributions to the HEIF/HEIC/AVIF plug-in as well
as the brand new JPEG XL plug-in.
Code contributors on GIMP 2.99.8: Andrzej Hunt, Daniel Novomesky, Des
McGuinness, Ian Martins, Jacob Boerema, Jehan, Jordi Mas, lloyd
konneker, Luca Bacci, Lukas Oberhuber, Marc Espie, Marie-P, Massimo
Valentini, Mayank Suman, Michael Bazzinotti, Michael McLaughlin, Michael
Schumacher, Niels De Graef, Øyvind Kolås, Pavel Artsishevsky,
programmer-ceds and Stanislav Grinkov.
Build contributors on GIMP 2.99.8: Andre Klapper, Christopher Davis,
Daniel Novomesky, Jehan, Jernej Simončič, lloyd konneker, Luca Bacci,
Marco Spiess, Niels De Graef, Ondřej Míchal, Øyvind Kolås, Stanislav
Grinkov and Trần Ngọc Quân.
Translators
Among the 84 languages for which GIMP 2.99.8 is available, 20
translations were updated: Basque, Brazilian Portuguese, Catalan,
Chinese (China), Finnish, German, Greek, Hungarian, Icelandic,
Indonesian, Italian, Lithuanian, Polish, Portuguese, Russian, Slovenian,
Spanish, Swedish, Ukrainian and Vietnamese.
The development Windows installer now contains Portuguese and Lithuanian
translations, making it available in 38 languages.
Translators on GIMP 2.99.8: Alexandre Prokoudine, Anders Jonsson,
Asier Sarasua Garmendia, Aurimas Černius, Balázs Úr, Boyuan Yang, Bruno
Lopes da Silva, dimspingos, Enrico Nicoletto, Hugo Carvalho, Jiri
Grönroos, Jordi Mas, Luna Jernberg, Marco Ciampa, Matej Urbančič, Ngọc
Quân Trần, Philipp Kiemle, Piotr Drąg, Rodrigo Lledó, rofiquzzaki,
Sveinn í Felli and Yuri Chornoivan.
What’s next
You might have noticed that a lot of effort has been done to improve the
infrastructure these last few months (whether for continuous
integration, testing, automating releases,
mirrors…)
and more has to be done as this was highly needed for the long run. As a
consequence of these infrastructure improvements, this release news was
published a single-day after actual source release, which is a new
record for us (it usually takes days to generate the Windows installer
then to have all mirrors synced)!
Apart from infrastructure, this version is nonetheless a big one with
more than 50 reports closed, 25 merge requests accepted and over 500
commits since 2.99.6.
We are still working hard to finalize the GTK3 port as well as the new
plug-in API. Taking care of technology changes (Wayland on Linux and
macOS in particular) these days is also taking quite a toll in our
development efficiency as we spend a lot of time fixing things which
just get broken because the underlining systems change. Nevertheless we
are quite happy of how things evolve as future GIMP 3 is looking more
and more awesome every day, right?
Don’t forget you can donate to the project and personally fund several
GIMP developers, as a way to give back
and accelerate the development of GIMP. As you know, the maintainers of
GEGL and GIMP are crowdfunding to be able to work full-time on free
software.
End notes
This tutorial has covered only a small part of the possibilities available to a script writer. In particular the following issues available to Gimp::Perl scripts have not been covered:
- The possibility of writing customized Gtk interfaces (see examples/example-no-fu in the Gimp-Perl distribution).
- Writing fully-fledged plug-ins that manipulate the tile data through the Perl Data Language (PDL) module (see examples/map_to_gradient in the Gimp-Perl distribution).
- Using Gimp-Perl in a CGI environment.
- How to fill with gradients in a plugin (see examples/randomblends in the Gimp-Perl distribution).
- How to do polygon selections (see examples/triangle in the Gimp-Perl distribution).
The Gimp-Perl distribution also has over 50 more example scripts supplied. Take a look through those for further inspiration!
Step 4
In the last step, we’ll use a very handy function for applying a filter to multiple layers. This function is provided by GAP, the GIMP Animation Package. Please go to the “Using GAP” tutorial to learn more about the tool.
Before we can apply this effect, we need to create a new image out of the third frame. This is as simple as dragging the layer preview from the layers window to the toolbar. Now duplicate the image four times. With a rectangular select tool, draw a selction around the text. Now we’re ready to apply a gaussian blur filter on every layer using varying parameters. Use the function and select plug-in-gauss-rle2 from the list and press the apply varying button. The blur dialog pops up. Now we need to specify parameters for the lowest layer in the stack, ie. our first frame.
We want to blur the text away in time, so for the first frame, let’s specify a lower value. We’ll blur in horizontal direction only, so let’s make it v:0 h:2. After you click OK another dialog shows up. Here, choose continue and specify parameters for the last frame. We’ll go for 20 px horizontal blur. You can backup the progress, but for now we will make the filter apply on all layers inbetween by clicking on continue in the next dialog. All we need to do now is to drag the layers back to the original image.
Crop an Image
There are numerous reasons you may want to crop an image. You may want to remove useless borders or information for aesthetic reasons, or you may want the focus of the final image to be of some particular detail for instance.
In a nutshell, cropping is just an operation to trim the image down to a smaller region than what you started with:
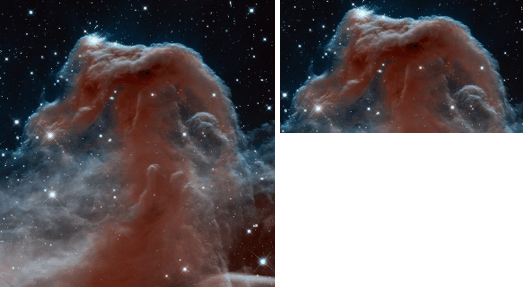
Original image (left), cropped image (right).
The procedure to crop an image is straightforward. You can either get to the Crop Tool through the tools palette:
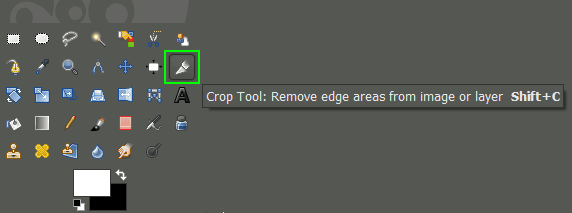
Crop Tool on the Tools Palette.
Or you can access the crop tool through the menus:
Tools → Transform Tools → Crop
Once the tool is activated, you’ll notice that your mouse cursor on the canvas will change to indicate the Crop Tool is being used.
Now you can Left-Click anywhere on your image canvas, and drag the mouse to a new location to highlight an initial selection to crop. You don’t have to worry about being exact at this point, as you will be able to modify the final selection before actually cropping.
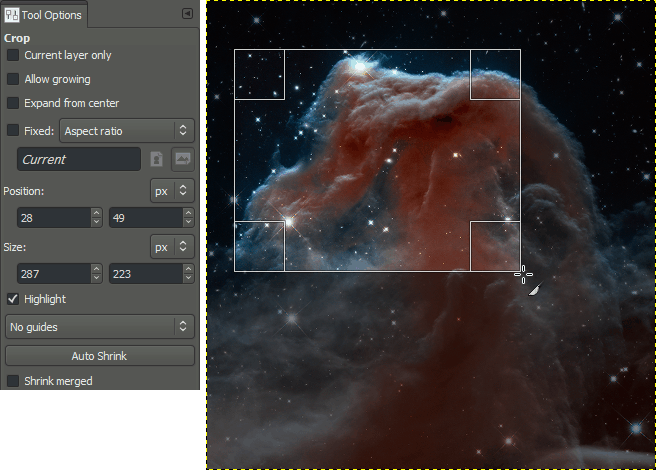
Initial pass with the Crop Tool.
Crop Tool options (left), cropping on the canvas (right).
Tools, Filters & Plug-ins
Improved Free Select Tool

The freehand select tool has been enhanced to support polygonal selections. It also allows mixing free hand segments with polygonal segments, editing of existing segments, applying angle-constraints to segments, and of course the normal selection tool operations like add and subtract. Altoghether this ends up making the Free Select Tool a very versatile, powerful and easy-to-use selection tool.
Brush Dynamics

Brush dynamics let you map different brush parameters, commonly at least size and opacity, to one or more of three input dynamics: pressure, velocity and random. Velocity and random are usable with a mouse. The Ink tool, that supported velocity before, has been overhauled and now handles velocity-dependent painting much better.
Brush dynamics have enabled a new feature in stroking paths. There is now a check box under the “paint tool” option, for emulating brush dynamics if you stroke using a paint tool. What this means is that when your stroke is being painted by GIMP, it tells the brush that its pressure and velocity are varying along the length of the stroke. Pressure starts with zero, ramps up to full pressure and then ramps down again to no pressure. Velocity starts from zero and ramps up to full speed by the end of the stroke.
Minor Changes

- Added a bounding box for the Text Tool that supports automatic wrapping of text within that bounding box.
- Move handles for rectangle based tools like Crop and Rectangle Select to the outside of the rectangle when the rectangle is narrow.
- Added motion constraints to the Move Tool.
- Improved event smoothing for paint tools.
- Mark the center of rectangles while they are moved, and snap the center to grid and rulers.
- Enable brush scaling for the Smudge tool.
- Added ability to save presets in all color tools for color adjustments you use frequently.
- Allow to transfer settings from Brightness-Contrast to Levels, and from Levels to Curves.
- Allow changing opacity on transform tool previews.
- The Screenshot plug-in has been given the ability to capture the mouse cursor (using Xfixes).
- Display aspect ratio of the Crop and Rectangle Select Tool rectangles in the status bar.
- Desaturate has been given an on-canvas preview.
- The Flame plug-in has been extended with 22 new variations.
- Data file folders like brush folders are searched recursively for files.
- Replaced the PSD import plug-in with a rewritten version that does what the old version did plus some other things, for example reading of ICC color profiles.
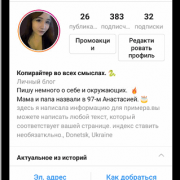
Changing the Size (Dimensions) of an Image (Scale)
This is a very simple task to accomplish in GIMP easily.
The image we’ll be using to illustrate this with is The Horsehead Nebula in Infrared.
When you first open your image in GIMP, chances are that the image will be zoomed so that the entire image fits in your canvas. The thing to notice for this example is that by default the window decoration at the top of GIMP will show you some information about the image.
![]()
View of the GIMP canvas, with information at the top of the window.
Notice that the information at the top of the window shows the current pixel dimensions of the image (in this case, the pixel size is 1225×1280).
To resize the image to new dimensions, we need only invoke the Scale Image dialog:
Image → Scale Image…
This will then open the Scale Image dialog:
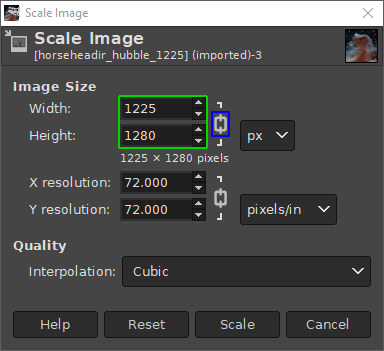
The Scale Image dialog.
In the Scale Image dialog, you’ll find a place to enter new values for Width and Height. If you know one of the new dimensions you’d like for the image, fill in the appropriate one here.
You’ll also notice a small chain just to the right of the Width and Height entry boxes. This icon shows that the Width and Height values are locked with respect to each other, meaning that changing one value will cause the other to change in order to keep the same aspect ratio (no strange compression or stretching in the image).
For example, if you knew that you wanted your image to have a new width of 600px, you can enter that value in the Width input, and the Height will automatically change to maintain the aspect ratio of the image:
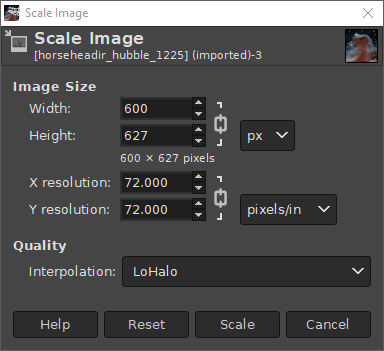
Changing the Width to 600px.
As you can see, entering 600px for the width automatically changes the height to 627px.
Also notice I have shown a different option under Quality → Interpolation. The default value for this is Cubic, but to retain the best quality it would better to use Sinc (Lanczos3).
If you want to specify a new size using a different type of value (other than Pixel size), you can change the type by clicking on the “px” spinner:
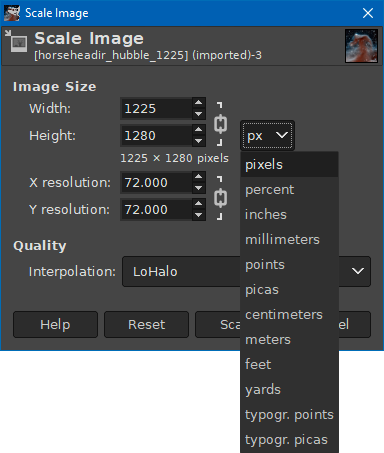
Changing input value types.
A common use for this could be if you wanted to specify a new size as a percentage of the old one. In this case you could change to “percent”, and then enter 50 in either field to scale the image in half.
Once you are done scaling the image, don’t forget to export the changes you’ve made:
File → Export…
to export as a new filename, or:
File → Overwrite {FILENAME}
to overwrite the original file (use caution).
For more detail about using Scale Image, you can see the documentation.
Paint Select tool
The tool is still listed as experimental as it is not yet deemed
finished by its contributor, Thomas Manni. Nevertheless it has already
improved quite a bit and starts getting really interesting.
Several bugs were fixed and selection is now viewport-based which allows
it to be much faster already depending on the zoom. Yet this is not even
the expected optimization which is planned to make the tool work really
fast. Expect more to come!
This work has been happening both on GIMP code base and on our graphics
engine library’s code base, GEGL.
Copy-pasting Wilber in a few seconds with the Paint Select tool (realtime GIF, faster as zoomed-in) — GIMP 2.99.6
As a side note, the Paint Select tool now has its own icons, original
design by Yash Arya, with collaborative work and design finalisation by Aryeom.
New Paint Select tool icon by Yash Arya and Aryeom — GIMP 2.99.6
The Gimp module
Most scripts make use of the simplified interface Gimp::Fu provided with the Gimp module. Gimp::Fu provides a framework for entering parameters to the script in a dialog-box interface, just like Script-Fu, but also allows running of the script in batch mode from the command line. This tutorial will go into detailed descriptions of the construction of a Gimp::Fu script, but before we do this, here is the general framework of such a script.
1 2 3 4 5 6 7 8 9 10 11 12 13 14 15 16 17 18 19 20 21 22 23 24 25 26 27 28 29 30 31 32 33 34 35 |
The key points to note in the script are:
- the use of the two modules and ,
- the podregister function, which will be described in detail below,
- the way the control is handed over to module on line 8, and
- the POD documentation below the line.
Color Management Improvements
The color management implementation got a complete overhaul in this version of GIMP. Instead of being a pluggable module, it is now a core feature. Moreover, we added an abstraction layer that makes GIMP less dependent on LittleCMS. This means that in the future GIMP could use native APIs on Windows and OS X, and/or use OCIO.
For now, it has helped us to clean up the code a lot and introduce a clean implementation of color management to various bits of GIMP such as: previews for color swatches and gradients, patterns, various color widgets (including the drag-and-drop color widget), the Color Picker tool, layer and image preview etc. The only unmanaged bit for now is the color widget in the Script-Fu and Python-Fu plug-ins. Moreover, GIMP will track which monitor the widget is currently on (different monitors would have different ICC profiles assigned to them) and color-correct it accordingly.
Grayscale images are first class citizens in GIMP once again: since v2.9.4, GIMP can color-manage them as well.
Since GIMP currently relies on sRGB (this is bound to change in future versions of GIMP), we decided to expose that in the user interface. So currently GIMP has an option called ‘Color-manage this image’ in two places: the New Image dialog and the submenu. What it means is that instead of taking into consideration the ICC profile embedded into an image (whichever profile it is) it will just treat everything as sRGB. Please note that we are likely to reword the option to make it even more explicit about what it does.
Additionally, there’s now a submenu where you can enable and control softproofing.
The Color Management section of the Preferences dialog has been reorganized to reflect recent changes and provide more consistent wording of options.
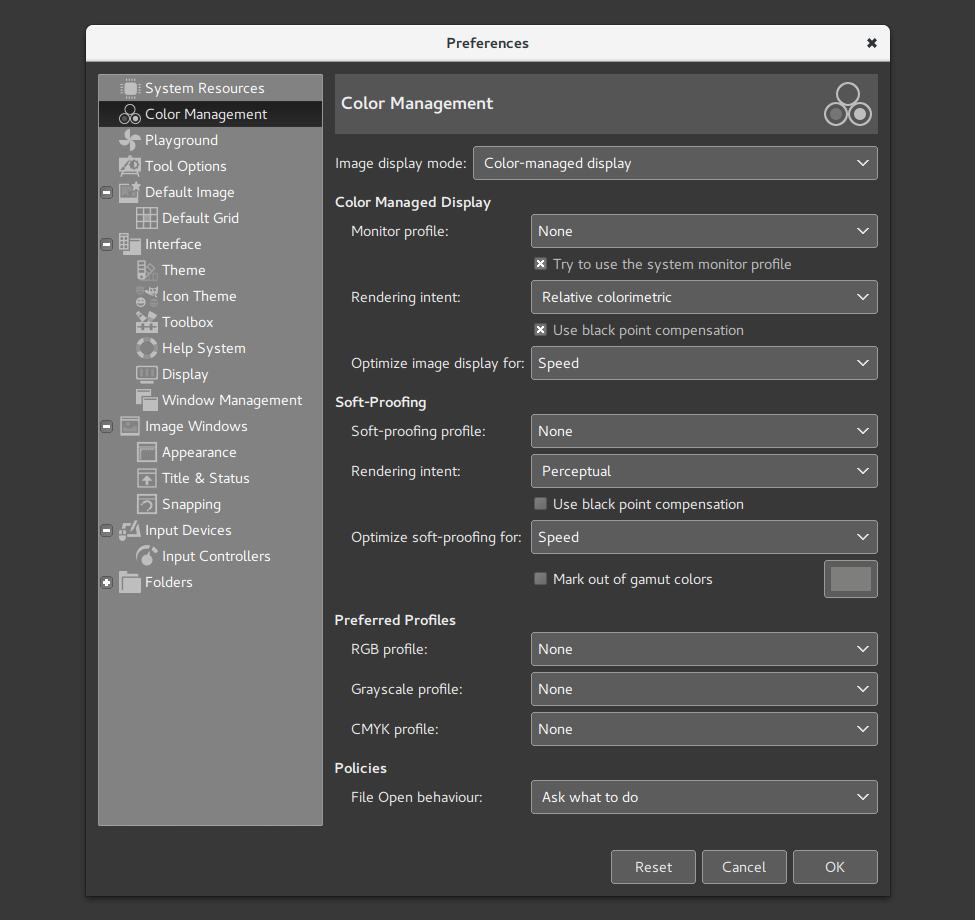
Since color management comes with a speed penalty (at least with LittleCMS), there’s a new option that enables you to choose either better color fidelity of faster processing depending on the kind of work you usually do.
Among smaller changes there’s a new command that does exactly what it says: it dumps an embedded ICC profile to disk as a file. Note that copyright restrictions on ICC profiles may apply, so please be careful.
Creating a drop-shadow
Using the layer menu you will have noticed the entry Duplicate Layer. Use this now. Then use Apply Layer Mask and Lower Layer which should leave you with something like this:
Make sure you check the Keep Transparency option (the little box next to the layer mode) and then fill that duplicated layer with black. You can paint over the text with a paint tool or simply drag a black color from the color selector and drop it over the image. You do not have to be careful: the Keep Transparency button will let you paint only on opaque parts of the image. This will give you:
Now make sure you uncheck the button again and move the layer some pixels to the right and downwards. You can move it with the Move tool while pressing Shift so that it moves the current layer instead of picking a new one. (Alternatively, can use and enter a small offset for both X and Y: this will offset the contents of the layer without moving the layer itself.) Then blur your layer and adjust the transparency with the slider so the background will shine through: You’ve just generated a so-called drop shadow, which greatly enhances the 3D effect and is used in very many places.
That’s it! Now have a lot of fun making flying logos!
An updated version of this tutorial can be found here: Simple Floating Logo
The original tutorial can be found here.
Что такое GIMP? Бесплатный графический редактор
Бесплатная программа, незаменимая для всех, кто работает с растровой и векторной графикой, пользуется базовой коррекцией файлов и создает собственные изображения.
Другими словами, это своеобразный аналог фотошопа изначально проектировался, как комфортный в применении инструмент, с помощью которого можно создавать графику и логотипы, ретушировать фотографии, раскрашивать рисунки, комбинировать многослойные изображения, преобразовывать картинки в любой формат.
Теперь эта многофункциональная программа имеет версии для всех операционных систем, обладая при этом максимальными возможностями и дополнениями.

GIMP for macOS
Download GIMP 2.10.28
via BitTorrent
Download GIMP 2.10.28
directly
The download links above will attempt to download GIMP from one of our trusted mirror servers.
If the mirrors do not work or you would rather download directly from our server, you can get the direct download here.
Supported OS: macOS 10.9 Mavericks or over
Since the 2.8.2 version, GIMP runs on OSX natively. No X11 environment is required.
Native build
The official GIMP 2.10 DMG installer (linked above) is a stock GIMP build without any add-ons. Just open the downloaded DMG and drag and drop GIMP into your «Applications» folder.
The SHA256 hash sum for is:
8cf0db374dcaba6fb0e1184ff8c6a3c585aa1814189ed4b97ba51780469f0805
Check it on
VirusTotal:
Macports
An easy way to compile and install GIMP and other great Free software on your Mac is by using Macports. The installer allows you to choose from a large directory of packages. To install gimp using Macports, you simply do once you have Macports installed.
Last we checked, the GIMP
port file pointed to the current stable release
and we have reports from people who’ve built GIMP
successfully this way.
Download Macports
Homebrew
Homebrew is similar to Macports and provides packages (aka formulas) to install, either by compiling them from source or by using pre-made binaries. There are indications that there is now a formula for GIMP, installable with: .
Download Homebrew
NOTE! Please be aware that it was announced recently that Homebrew is using analytics.
To turn this off in homebrew then run:
You can read more about this on Brew Analytics.
Fink
Fink is a package repository that offer mostly precompiled binaries. It provides the apt-get command known to e.g. Debian and Ubuntu users, and installing GIMP is as easy as once you have installed the Fink installer.
If there’s no binary package, then will compile GIMP from source.
Disclaimer: we haven’t been able to determine if it is
possible to install or build recent GIMP from Fink.
Last we checked, GIMP 2.6.12 appears to be the most recent GIMP package that is offered there.
babl minimum requirement in GEGL and GIMP
Meanwhile babl minimum requirement in GEGL has been downgraded to 0.1.78
(same as in GIMP) because newer versions require too recent
build tool, which is unfortunately still not available on some
distributions. In order not to prevent people from benefiting from a
newer version of GEGL and GIMP, we refrain on purpose to bump the
minimum requirement for a bit even though we highly encourage every
packager to use the last version of babl when possible. Many fixes and
improvements were also made available in recent versions.
Downloading GIMP 2.10.24
As usual GIMP 2.10.24 is available on GIMP official website
(gimp.org):
The Linux flatpak has already been published so that anyone who
installed it previously should have an update proposed by their
software manager (or from terminal: flatpak update org.gimp.GIMP).
Note: our flatpak now supports only and (i.e. the
64-bit variants of the x86 and ARM architectures). In particular
(32-bit x86) had been dropped quite some time ago by the Freedesktop
runtime we depend on. This is now the (32-bit) support which has
been dropped (even though 32-bit hardware is still being released or
often 64-bit board computers are sold with a 32-bit OS). We tried to
hold back a bit, for more than 6 months even, but now that the older
runtime we used is unsupported, updating is the only sane choice.
For the record, our i386 flatpak is therefore stuck at GIMP 2.10.14
and our ARM flatpak is stuck at GIMP 2.10.22 with a few thousands
downloads for this last version of GIMP i386 and a bit more than 400
for the last version of GIMP ARM.
-
The Windows installer is already available. Most mirrors have picked
it up, but some still haven’t. So if the download fails, just try to
click the button again. -
The macOS DMG package will be published in the next few days once our
packager can make the time.
What’s next
The development continues very strong on the development branch and we
can clearly see the shift towards more work on GIMP 3 as 2.10.x release
become more about robustness and less about new features (though we
still continue to backport features when it can be done without too much
additional work).
We will give more details on this side of development when we will
release the upcoming 2.99.6 development version.
Finally, please don’t forget you can donate to the project and personally
fund several GIMP developers, as a way to
give back and accelerate the development of GIMP.
Plug-ins
GIMP now ships with over 80 GEGL-based filters. A lot of those are former GIMP effects. Here is why GEGL-based implementations
are better:
- You can apply them on images in 32-bit per color channel precision mode.
- You can preview them right on the canvas, and if an image is larger than the
viewport, GIMP will render the viewport first for immediate feedback. - You can use split preview to compare original image with its processed version
and swap before/after sides both horizontally and vertically. - In a future non-destructive GIMP, you will be able to adjust settings of those
filters without undoing a ton of steps.

Some of the GEGL-based filters have OpenCL version for hardware acceleration.
This will come in handy, if OpenCL drivers work well for you.
Furthermore many operations can come multi-threaded to use your processor at
their full power.
Slider widget
We fixed several discoverability issues in the new (more compact) slider
widget. This was mostly the result of usability tests by Aryeom after
extensive use in production.
Before, if you tried to edit the scale value numerically (i.e. by inputting numbers on keyboard), you’d also trigger a value change by using the main
mouse button click. You could avoid that by using the middle mouse button
click, but is was hardly discoverable.
So now you can pinpoint-click the displayed numbers. This action will only focus the text input (by default entirely selecting the existing value as
is common when focusing text entries). You can still click-edit the value
from everywhere in the widget, except exactly on the numbers.
The second issue was related to changing the cursor depending on the context:
- The top-arrow cursor came from a time where this widget had 2 areas, a
top and bottom. It didn’t really mean anything anymore with the
new interaction. We replaced it by a common “grab” cursor as
defined in the CSS specification. This becomes a “grabbing” cursor
when a click’n’drag is in progress. - When the pointer is hovering the text area, it becomes a “text”
cursor instead, hence advertizing the fact that a click here would
start editing the number. - Finally, when holding the modifier key, the cursor will become
a horizontal resize cursor (“col-resize” in the CSS specification),
hence advertizing the ability for smaller relative resizing (an action
also available with the third button, usually ).
 GIMP 2.99.4: from left to right, new cursors on the slider to grab, when grabbing, do small updates or text-edit
Linear color space workflow
Another benefit of using GEGL is being able to work on images in a linear RGB
color space as opposed to gamma-corrected (perceptual) RGB color space.
Here is what it boils down to:
- You now have both linear and perceptual versions of most blending modes.
- There is now a linear version of the Color Invert command.
- You can freely switch between the two at any time via Image > Precision submenu.
- You can choose which mode is displayed in the Histogram docker.
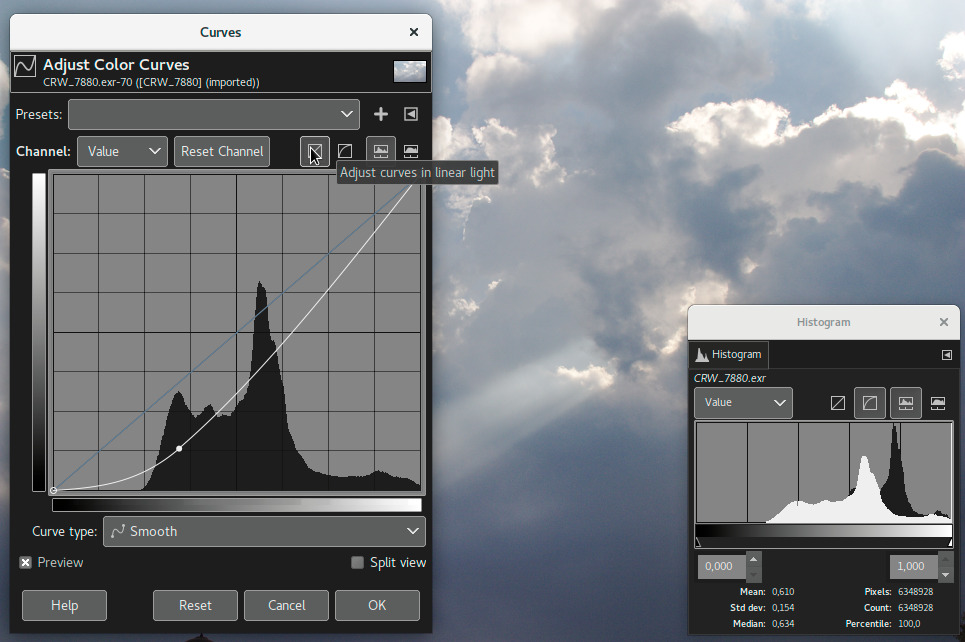
- You can apply Levels and Curves filters in either perceptual or linear mode
- When higher than 8-bit per channel precision is used, all channels data is linear.
- You can choose whether the gradient tool should work in perceptual RGB, linear
RGB, or CIE LAB color space
Contributors: Michael Natterer, Øyvind Kolås, Ell…
Работа с программой
Интерфейс программы несколько непривычен и может быть сложным для новичков. По умолчанию он состоит из трёх отдельных окон: главного окна с рабочей зоной, в которой вы можете обрабатывать изображение или создавать новые рисунки, а также двух окон, в которых можно выбирать необходимые для работы инструменты.
Именно такое расположение и вызывает больше всего дискомфорта. Чтобы переключаться в более привычный однооконный режим, особенно если раньше вы хоть немного работали в Photoshop, в главном окне программы перейдите в меню «Окна», после чего активируйте функцию «Однооконный режим».
После этого два окна инструментами, которые располагались по бокам экрана, примкнут к основному окну и станут его элементами.
Теперь давайте посмотрим, какую структуру имеет рабочий экран редактора Gimp.
- В самом верху окна располагается главное меню с такими вкладками: Файл, Правка, Выделение, Вид, Изображение, Слой, Цвет, Инструменты, Фильтры, Окна и Справка. В каждой из этих вкладок располагаются другие функции, которые можно использовать для работы.
- В левой стороне экрана, в его верхней части, располагается панель инструментов, в которой можно выбрать все необходимые для обработки графического файла инструменты: перемещение, поворот, вырезание, дублирование, карандаш, кисть, ластик, заливка, штамп, текст, а также многие другие.
- Ниже панели инструментов располагается панель настройки инструмента. Она предоставляет возможность настройки отдельного инструмента и активируется при его выборе в панели выше. Здесь же можно создать несколько профилей настройки каждого инструмента.
- В правой части экрана вверху располагается панель управления слоями, контурами, каналами и историей ваших изменений.
- Чуть ниже можно выбирать различные кисти, градиенты, а также текстуры.
- В самом низу предоставлены инструменты управления профилями кисти. Можно также создать несколько профилей с настройками для различной ситуации.
Чтобы отредактировать готовое изображение, нажмите «Файл» — «Открыть».
Для создания нового нажмите Ctrl + N либо же «Файл» — «Создать».
После окончания изменений сохраните файл в желаемом формате.
Font thumbnail adapted for Korean and Japanese
Our font list will now display fonts targeted at Korean and Japanese
writing systems with “한” and “あ” respectively. This will allow to more
quickly detect fonts useful for your language of choice in a long list.
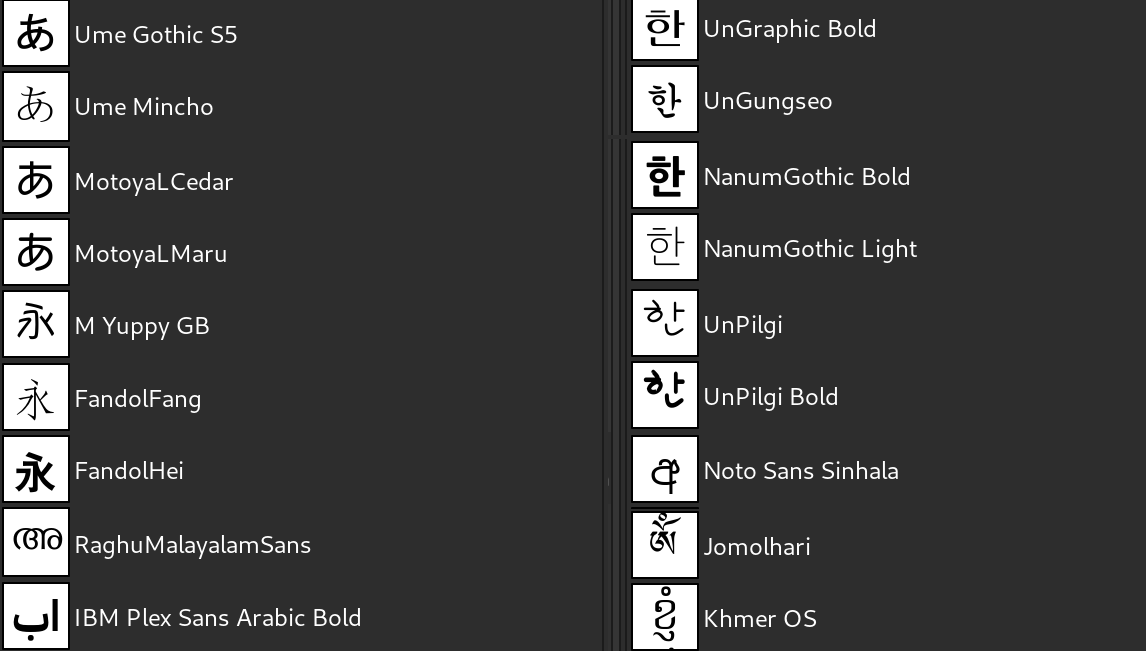 Thumbnails in GIMP 2.99.4 of fonts targeting various writing systems
For Korean “한” (han) was chosen (apart from being the first syllable in
“Hangeul”, the name of the Korean writing system) firstly because it is a
syllable with two consonants, which gives good indications on stylistic
choices, and secondly because the circle shape in ‘ㅎ’ (hieut) but also
its small hat have many stylistic variants and are therefore also
quite good hints of stylistic choices made by a font designer.
As for “あ”, it is the first kana in the hiragana syllabary, which is
one of the main components of the Japanese writing system.
The code logics is based on approximation of probable target language
depending on supported characters found in the fonts. It may not always
show the ideal sample characters, especially for fonts that try to
support many different scripts, but it remains very useful overall.
This is based on existing code, which already had detection for other
writing systems, yet not for Korean and Japanese until now.
New experimental Paint Select tool
Our long-term contributor Thomas Manni is working on a new paint-based
selection tool. It will offer a new way to progressively make a
selection by roughly painting with a brush over the region of interest.
This new tool is based on a targeted segmentation algorithm (graphcut):
its goal is to quickly isolate a specific region in the image. The tool
provides a binary result (fully selected for the area of interest, fully
non-selected for all other pixels).
It’s at a very early stage of development, so if you test it right now,
you will probably be disappointed by its lack of precision and poor
performance. Fear not, there’s just way more work to be done, you’ll
like it once it’s complete.
 Canvas interaction of the new Paint Select tool: quick selection of Wilber in one stroke
But what about the Foreground Select tool?
Some people might be wondering about the existing Foreground Select tool
which might look very similar to the new experimental Paint Select tool.
This quote from Thomas might explain the difference:
Moreover, it is true that part of this new development comes from
recognition of some limitations of the current Foreground Select tool
which unfortunately does not work so well for actually segmenting global
shapes, often takes a lot of time on big images, and has memory and
stability issues.
We are not aiming to replace the Foreground Select tool though. The idea
is to offer a new way to do selections. We might be able to improve the
Foreground Select tool to work better in more situations. Discussions
have also been happening on reworking the interaction interface as a better
way to retarget the tool’s usage.
More experiments are still in progress or planned by Thomas, in particular,
to give new ways to refine edges of existing selection (since the
Paint Select tool creates binary selections which are less appropriate
for edge selection).
This is all to be considered as open development and experiments in free
software. We shall see how things evolve!