Вышла joomla 4
Содержание:
Настройка Joomla
Настройка шаблона и модулей
Настройка Joomla начинается с настройки компонентов.
Главное в настройке джумлы – это настройка компонентов. Для активации плагинов и модулей переходим по адресу «Расширения – Менеджер плагинов/модулей». Контролируем, чтобы рядом с каждым нужным пунктом была установлена галочка.
Далее следует задействовать установленный шаблон сайта. Переходим в «Расширения – Менеджер шаблонов» и выбираем имеющийся (в нашем случае «ZT_News_III_template») – устанавливаем по умолчанию. Преобладающее количество качественных шаблонов обладает собственными настройками, в частности, различными цветовыми гаммами (у нас зелёная, серая и красная).
Что касается прилагаемых модулей, то имеется следующий ассортимент:
- JV_G-Weather_module – модуль, позволяющий отображать на сайте погоду от Google. В настройках присутствует выбор интересуемого региона.
- JV_Headline_module – собирает новости всех категорий для отображения в заголовке страницы.
- JV_News_module – отображает превью статьи на первой страничке.
- JV_Tabs_Module – представляет лучший контент для пользователей в виде выпадающего содержания.

Что касается прилагаемых модулей, то они представляют собой следующее:
- JV_G-Weather_module – это модуль, который позволяет отображать на сайте погоду от Google. В модуле можно задать регион, для которого будет отображаться информация о погоде.
- JV_Headline_module – позволяет собирать новости всех категорий для отображения в заголовке страницы.
- JV_News_module – дает возможность отображать превью статьи на первой страничке.
- JV_Tabs_Module – представляет лучшее содержание для пользователей в виде выпадающего содержания.
Любой из вышеперечисленных модулей свободно редактируется в разделе «Расширения – Менеджер модулей». Переходим на сайт «выбранное название сайта» и наслаждаемся полученным результатом! Вы уже убедились, что сделать сайт самому бесплатно – легко и быстро?

Настройка сайта
Крепкий фундамент – залог удивительной долговечности дома. Следует покопаться в глобальных настройках сайта сразу же — позднее что-либо менять на глобальном уровне будет крайне хлопотно! Находятся они в разделе «Сайт – Глобальная конфигурация», разбиваясь на три подраздела: «Сайт», «Система», «Сервер».
Сайт. Именно в данных параметрах задаётся текст, когда сайт отключен. Имеется возможность указать «Название», заполнить «Мета описание» и ключевые слова, имеющиеся на сайте (рекомендуется максимальное соответствие тематики материалов).
Чуть правее располагаются настройки SEO:
- Включить SEO – отображает URL в виде человекопонятного адреса, например, ссылка вида «index.php?option=com_content&view=article&id=5&Itemid=10» будет заменена на что-то вроде «pervaja-statja».
- Использовать mod_rewrite – используется только на серверах Apache, однако перед включением опции необходимо изменить «htaccess.txt» на «.htaccess».
- Добавить суффикс к URL – добавляет расширение html. Например, было «pervaja-statja», станет — «pervaja-statja.html».
Система и Сервер — отвечают за настройки более глубокого уровня, поэтому при отсутствии опыта рекомендуется ничего не трогать, лишь просмотреть для справки. Меняются они на более поздних этапах по мере получения опыта работы.
Joomla’s Core Features
Here are some of the Joomla! features you will love.
- Multilingual: Offering over 70 languages.
- Search Engine Optimisation: Out of the box SEO & SEF.
- Flexible: Make a blog, business website, intranet, community website… From the simplest to the most complex website.
- Free forever: Joomla! is free to use under GPL.
- Extendable: Over 8,000 extensions are available to extend your website and broaden its functionality.
- User Management (ACL): ACL stands for Access Control List, it allows you to manage the users of your site, and different groups.
- Menu management: Create as many menus and menu items as you need.
- Cache management: Speed up your website with caching.
- Template override: Achieve superior custom designs.
- Jlayouts: Allows you to render HTML from objects/arrays of data.
- : Assign specific templates to specific pages.
- Responsive : Joomla! uses Bootstrap for perfect responsive designs.
- Do more with Less: Joomla! features LESS CSS.
- Template frameworks: Use external template frameworks or template clubs.
- Create your own: You’re able to create your own template. The only limit is your imagination.
- Publishing tools: Choose when articles are published.
- WYSIWYG editor: Edit content without any knowledge of code.
- Content versioning: You will never again lose a previous important version of your article and other changes on your site.
- Article management: Add, manage and organize your articles.
- Frontend editing: Edit your content while browsing your site.
- : Add extra functions to your content in 1 click.
- Drag & Drop image: Adding an image is as easy as dragging and dropping it from your computer directly into the content. This works anywhere that you are using the default TinyMCE WYSIWYG editor.
- Media manager: A tool to upload and maintain images and other files.
- Categories: Be able to create categories with nesting and no limits on depth.
- Redirect: Easily redirect URLs when needed.
- Banners: Monetise your website by adding banners or ads.
- Contacts: Add several contacts, departments and contact forms.
- Tags: When categorisation is not enough to structure your content.
- Syndication: Create a RSS feed from your content.
- News feed: Show an external news feed on your website.
- Custom fields : 15 different field types to add to articles, users, and contacts.
- Search: Visitors will be able to quickly and easily find the appropriate information.
- Messaging: Sent messages in between administrators.
- Easy core update: Keep your Joomla! up to date with 1 click.
- Easy extensions update: Keep your extensions up to date easy and fast.
- Install from web: Install extensions without leaving your backend.
- User registration: Allow visitors to register and gain access to additional resources.
- Extended documentation: A complete wiki about Joomla!
- Integrated help system: Joomla! has an in-app contextual help system.
- Helpful forum: Our worldwide community of world class developers and business consultants actively help at no cost.
- Professional service providers: Who can help build & maintain your Joomla! project.
- Extended developer documentation: All you need to know to start extending Joomla!
- Microdata library implementation : Incorporate microdata more easily into your extensions and sites.
- PHP 7 support : We prefer PHP 7 to run on.
- Secure Coding guidelines : Best practice for coding in Joomla!
- MVC : Joomla makes extensive use of the Model-View-Controller design pattern.
- Extend further with the Framework : Create both web and command line applications.
- Routing system: New and more flexible interface to handle creating and processing URLs.
Included External Libraries
A Joomla! installation contain external libraries which are included with Joomla! CMS version releases. These external libraries are not part of the core code. Please read the Notes section as they may contain more information, such as a external library version change released with a maintenance release.
Joomla!
3.10.3
Stable Version
External Libraries by Joomla Release
| CMS Version | CMS Version Supported | Mootools | Mootools More | jQuery | jQuery UI(Core, Widget, Mouse, Position, and Sortable) | Bootstrap | Simple Pie | PHP Mailer | PHP UTF-8 | IDNA Convert | Rapid Application Development (RAD) FrameworkAkeeba’s Framework on Framework(FOF) | password _compat | lessphp | random _compat |
| 3.9 | 1.4.5 | 1.4.0.1 | 1.12.4 | 1.9.2 | 2.3.2 | 1.3.1 | 5.2.26 | 0.5 | 0.8.0 | 2.4.3 | 1.0.4 | 0.5.0 | 1.4.1 | |
| 3.8 | 1.4.5 | 1.4.0.1 | 1.12.4 | 1.9.2 | 2.3.2 | 1.3.1 | 5.2.24 | 0.5 | 0.8.0 | 2.4.3 | 1.0.4 | 0.5.0 | 1.4.1 | |
| 3.7 | 1.4.5 | 1.4.0.1 | 1.12.4 | 1.9.2 | 2.3.2 | 1.3.1 | 5.2.22 | 0.5 | 0.8.0 | 2.4.3 | 1.0.4 | 0.5.0 | 1.4.1 | |
| 3.6 | 1.4.5 | 1.4.0.1 | 1.12.4 | 1.9.2 | 2.3.2 | 1.3.1 | 5.2.14 | 0.5 | 0.8.0 | 2.4.3 | 1.0.4 | 0.5.0 | 1.4.1 | |
| 3.5 | 1.4.5 | 1.4.0.1 | 1.11.3 | 1.9.2 | 2.3.2 | 1.2 | 5.2.14 | 0.5 | 0.8.0 | 2.4.3 | 1.0.4 | 0.5.0 | 1.0.10 | |
| 3.4 | 1.4.5 | 1.4.0.1 | 1.11.3 | 1.9.2 | 2.3.2 | 1.2 | 5.2.9 | 0.5 | 0.8.0 | 2.4.3 | 1.0.4 | 0.3.9 | N/A | |
| 3.3 | 1.4.5 | 1.4.0.1 | 1.11.1 | 1.9.2 | 2.3.2 | 1.2 | 5.2.8 | 0.5 | 0.8.0 | 2.1 | 1.0.3 | N/A | N/A | |
| 3.2 | 1.4.5 | 1.4.0.1 | 1.10.2 | 1.9.2 | 2.3.2 | 1.2 | 5.2.6 | 0.5 | 0.8.0 | 2.1 | 1.0.3 | N/A | N/A | |
| 3.1.2 | 1.4.5 | 1.4.0.1 | 1.8.3 | 1.8.23 | 2.3.2 | 1.2 | 5.2.6 | 0.5 | 0.8.0 | N/A | N/A | N/A | N/A | |
| 3.1 | 1.4.5 | 1.4.0.1 | 1.8.3 | 1.8.23 | 2.1.0 | 1.2 | 5.2.3 | 0.5 | N/A | N/A | N/A | N/A | N/A | |
| 3.0 | 1.4.5 | 1.4.0.1 | 1.8.1 | 1.8.23 | 2.1.0 | 1.2 | 5.2.1 | 0.5 | N/A | N/A | N/A | N/A | N/A | |
| 2.5 | 1.4.5 | 1.4.0.1 | N/A | N/A | N/A | 1.2 | 5.2.1 | 0.5 | N/A | N/A | N/A | N/A | N/A |
Что такое Джумла
Изначально Джумла была частью проекта Mambo, но после отделения группы разработчиков, что произошло в результате их несогласия с экономической политикой, она стала самостоятельной.
За три года существования Joomla сумела стать настолько популярной, что по числу скачиваний уступала только явному лидеру WordPress.
За все время было выпущено 13 версий продукта, текущая 3.6.4 поддерживается с 21 октября 2016 года, также действуют Joomla 3.5 и 3.6.
Отличается система тем, что изначально включает минимальный набор инструментов, но этот список может дополняться в дальнейшем другими необходимыми опциями.
В результате получается более мобильная и удобная админка, экономия на хостинге и снижение нагрузки на сервер.
Нельзя не отметить возможности отображения рабочего интерфейса на любом языке, что доступно благодаря встроенным функциям администрирования.
Даже если вы не обладаете знаниями в области программирования, с Джумла вы получаете полный контроль над управлением сайтом без обязательных дополнительных вливаний в систему.
Устанавливаем Joomla на хостинг
Существует 3 способа установки CMS-системы на сервер хостинг-провайдера: через встроенный каталог CMS, через файловый менеджер и с помощью FTP-клиента.
Рассмотрим последовательно каждый из методов на примере хостинга Timeweb. Зарегистрировать аккаунт на нем можно бесплатно. Кроме того, на первые 10 дней предоставляется полный доступ к сервису. Последующие дни платные – стоимость зависит от выбранного тарифа.
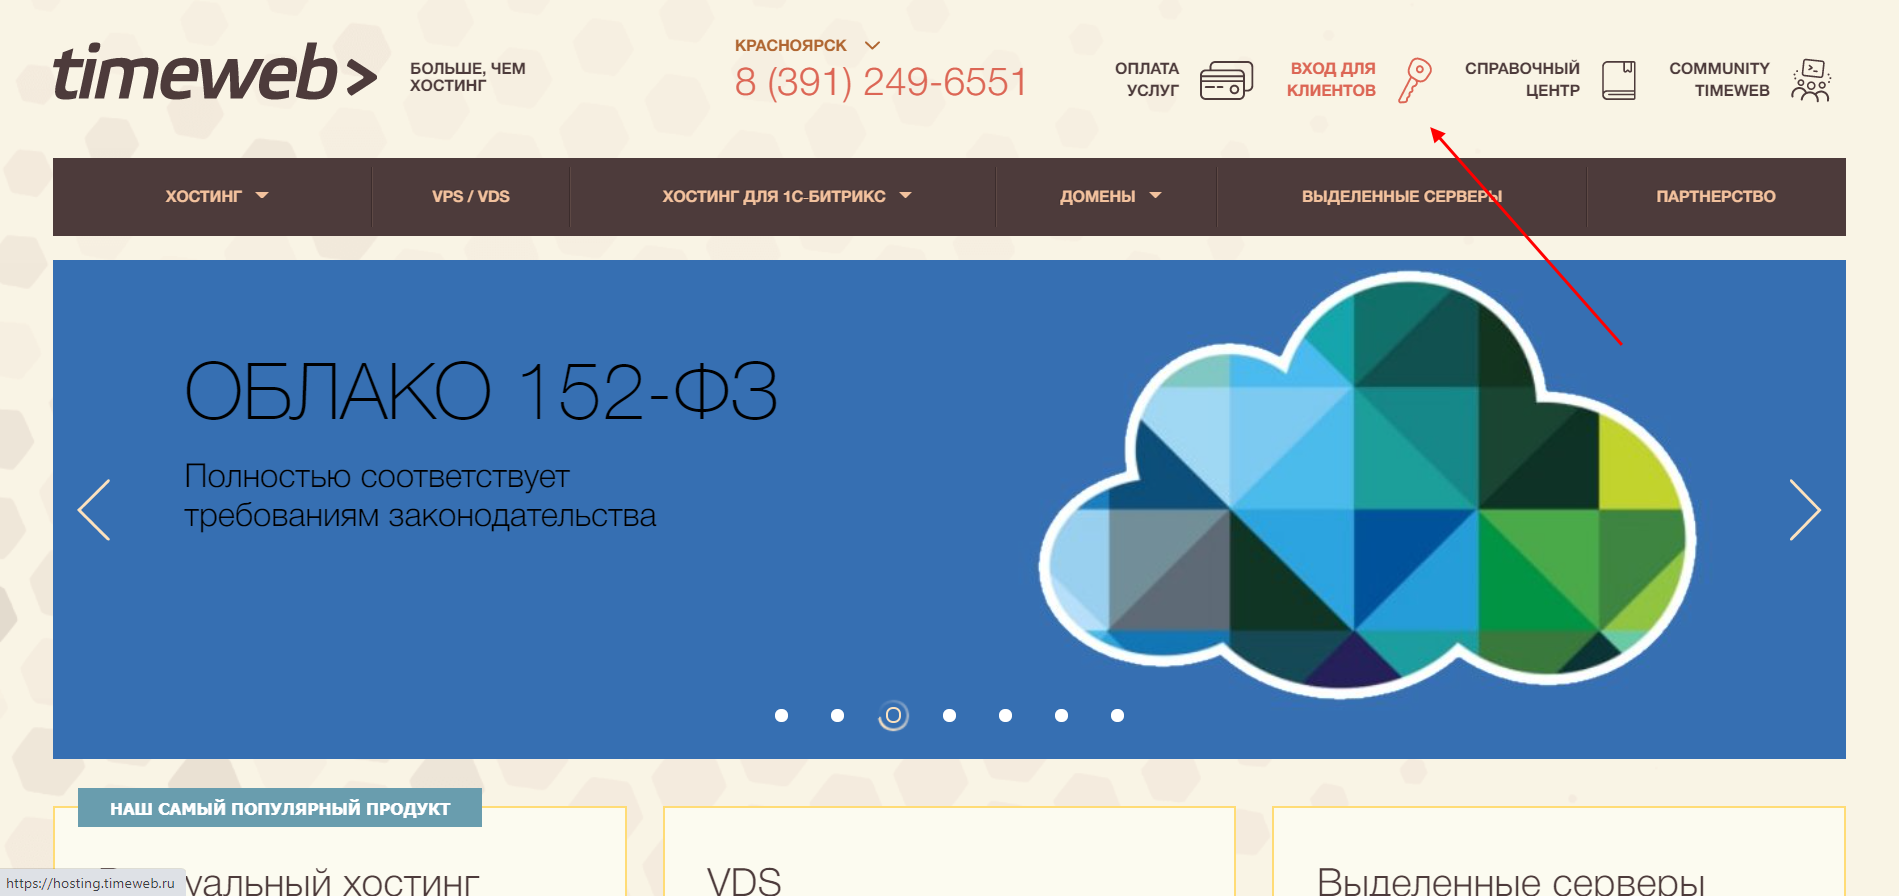
Первым делом пройдем небольшую регистрацию на Таймвэб. Открываем главную страницу и выбираем «Вход для клиентов».
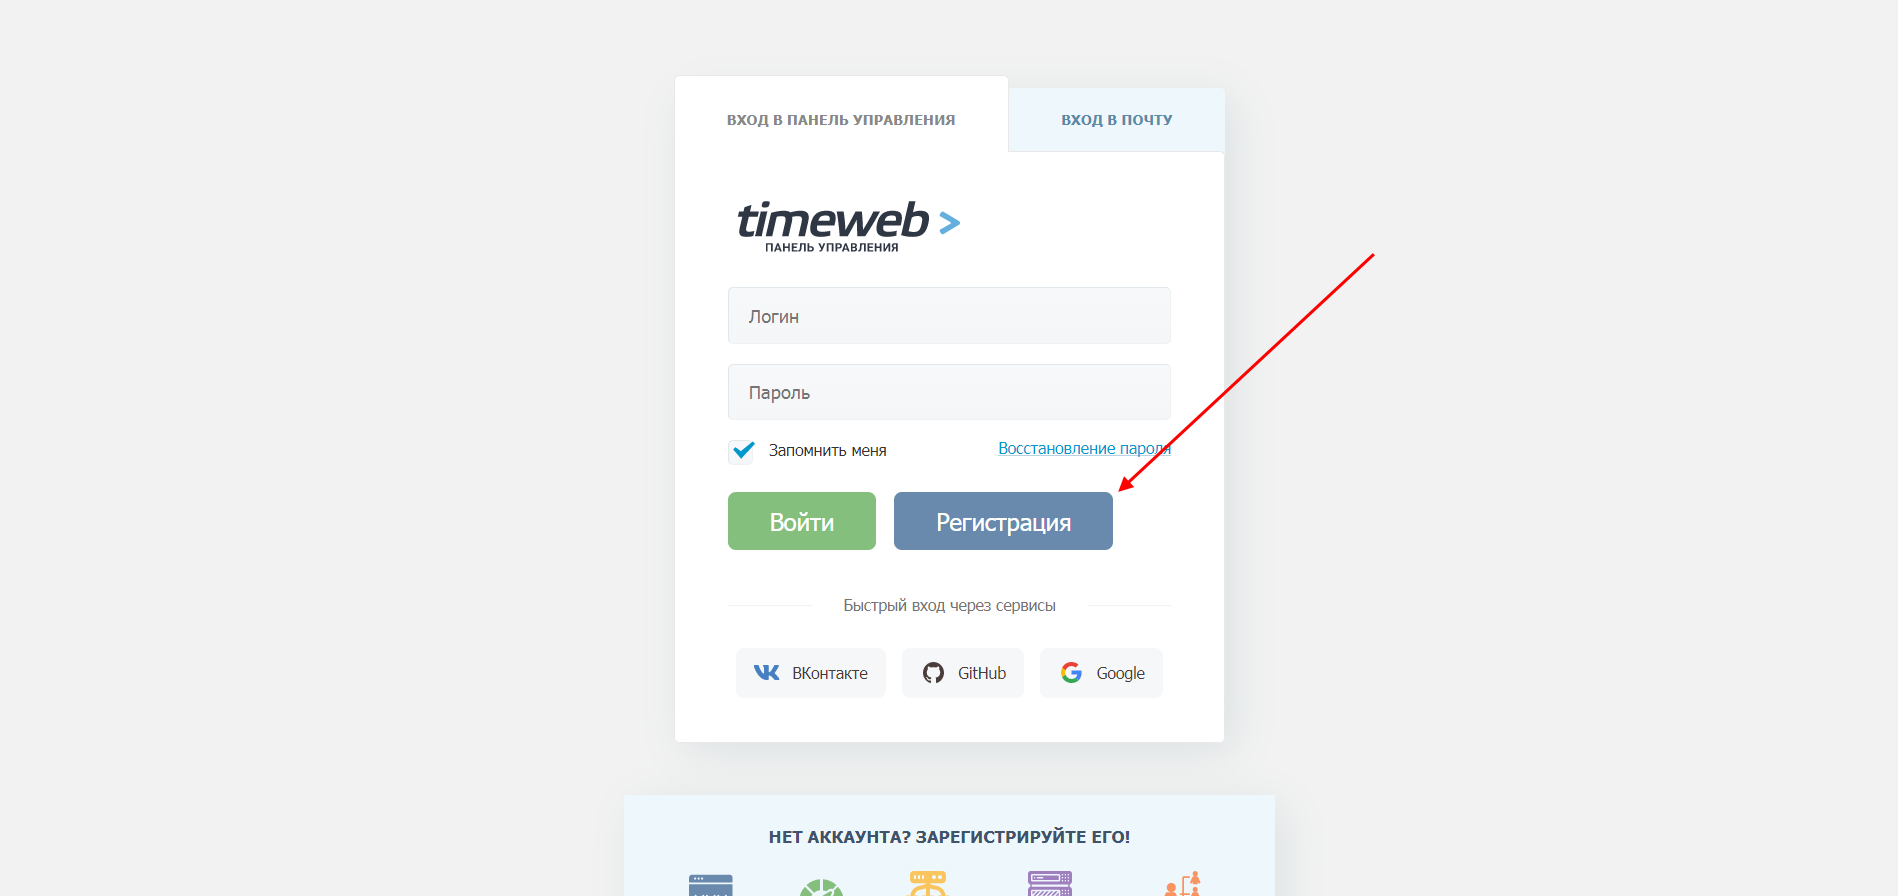
Выбираем «Регистрация».
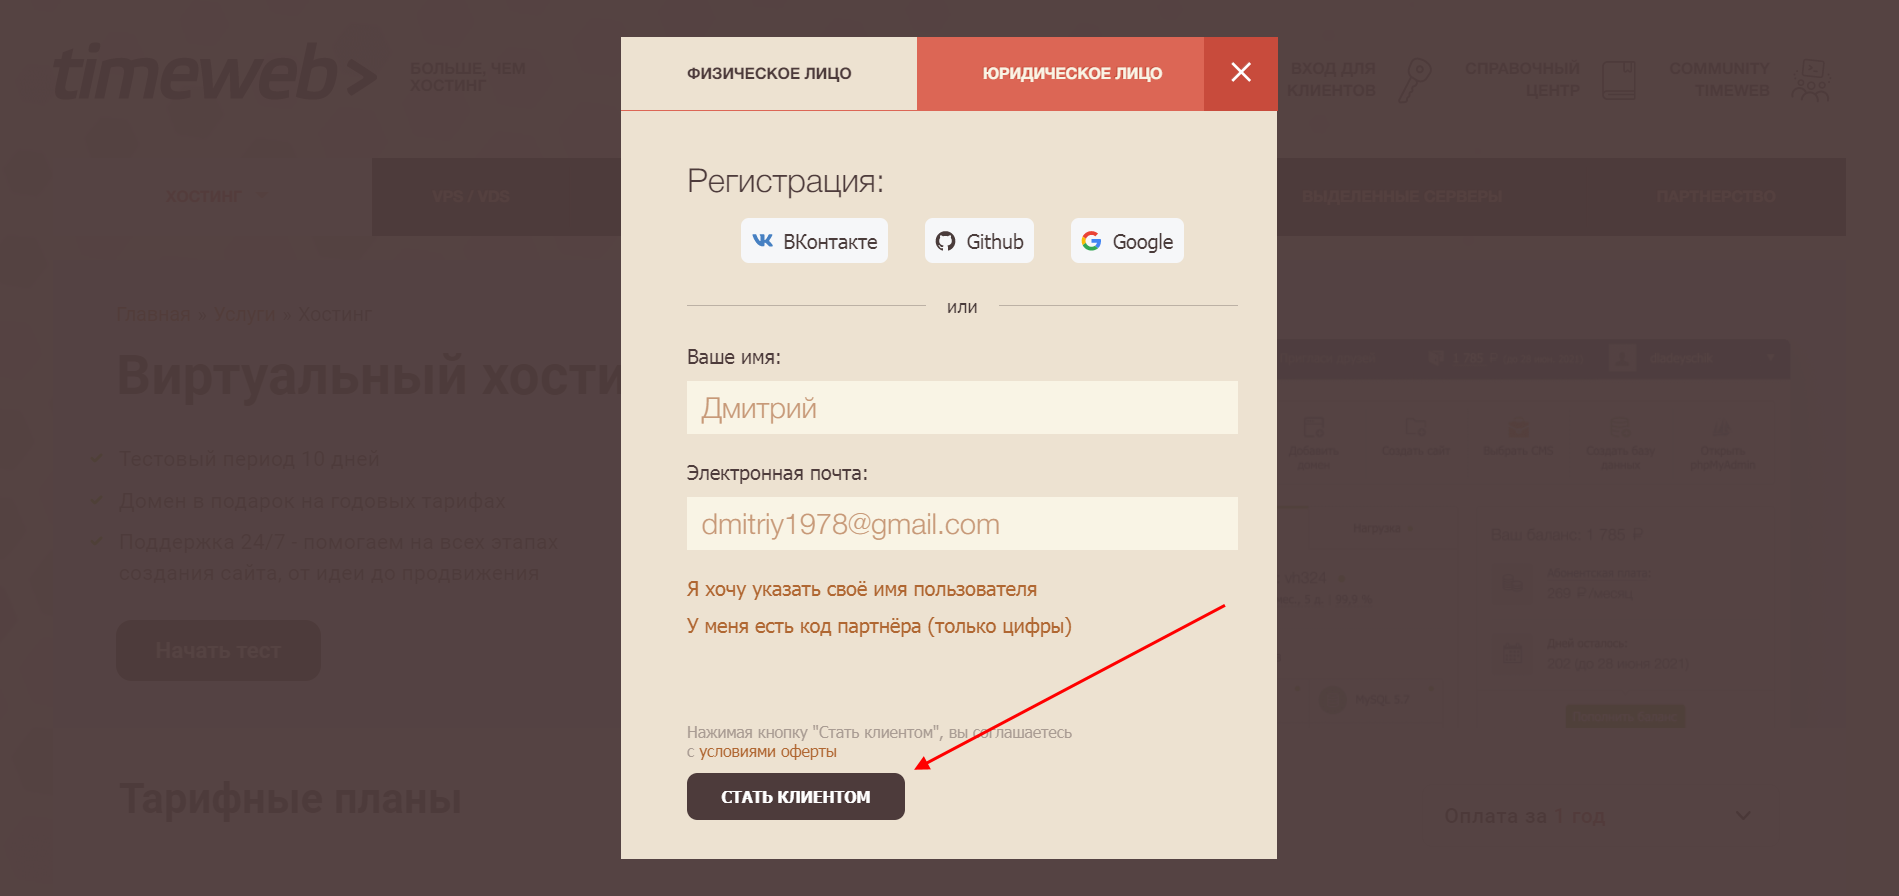
Вводим имя, почту и нажимаем «Стать клиентом».
В результате мы попадаем в личный кабинет Timeweb – здесь-то и будут происходить все манипуляции.

Теперь мы можем переходить к установке Joomla на хостинг. Для этого последовательно выполняем следующие действия:
- В личном кабинете Timeweb переходим в раздел «Каталог CMS».
- Выбираем «Joomla» – она находится вторым по списку в разделе «CMS».
- В отобразившемся окне жмем «Установить приложение».
- Следующим шагом нужно указать доменное имя – здесь можно оставить тестовое, для изучения CMS оно вполне подойдет. Также выбираем создание новой базы данных, в завершение кликаем на «Начать установку».
- Готово! Теперь мы можем переходить к приложению.
- Вводим выданный нам логин и пароль, авторизуемся в личном кабинете Joomla.
На этом установка завершена. Как видите, данный способ довольно простой и быстрый, однако подойти он может не для каждого хостинга
В некоторых случаях подобной опции попросту нет, поэтому важно знать о ручной установке CMS – о ней поговорим далее
Способ 2: Установка через файловый менеджер
Чтобы воспользоваться данным способом, нам потребуется скачать пакет Joomla с официального сайта. После этого будет необходимо создать новый сайт и привязать к нему домен.
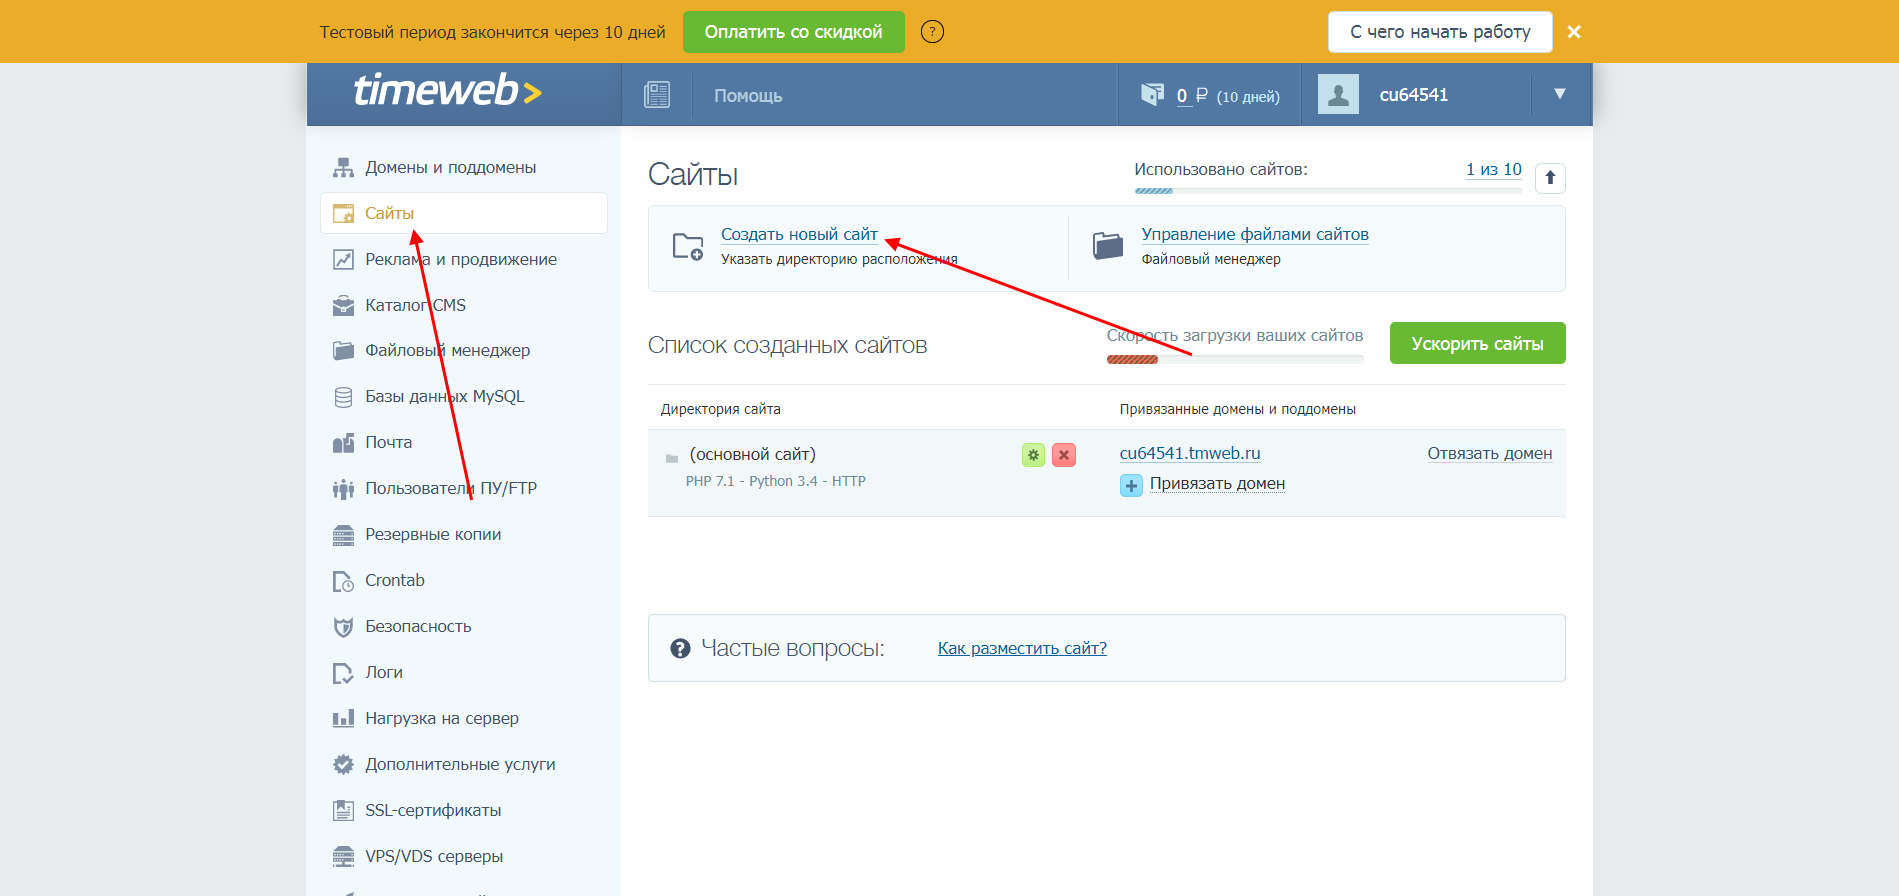
Открываем на Timeweb личный кабинет и переходим в раздел «Сайты». Выбираем «Создать новый сайт».
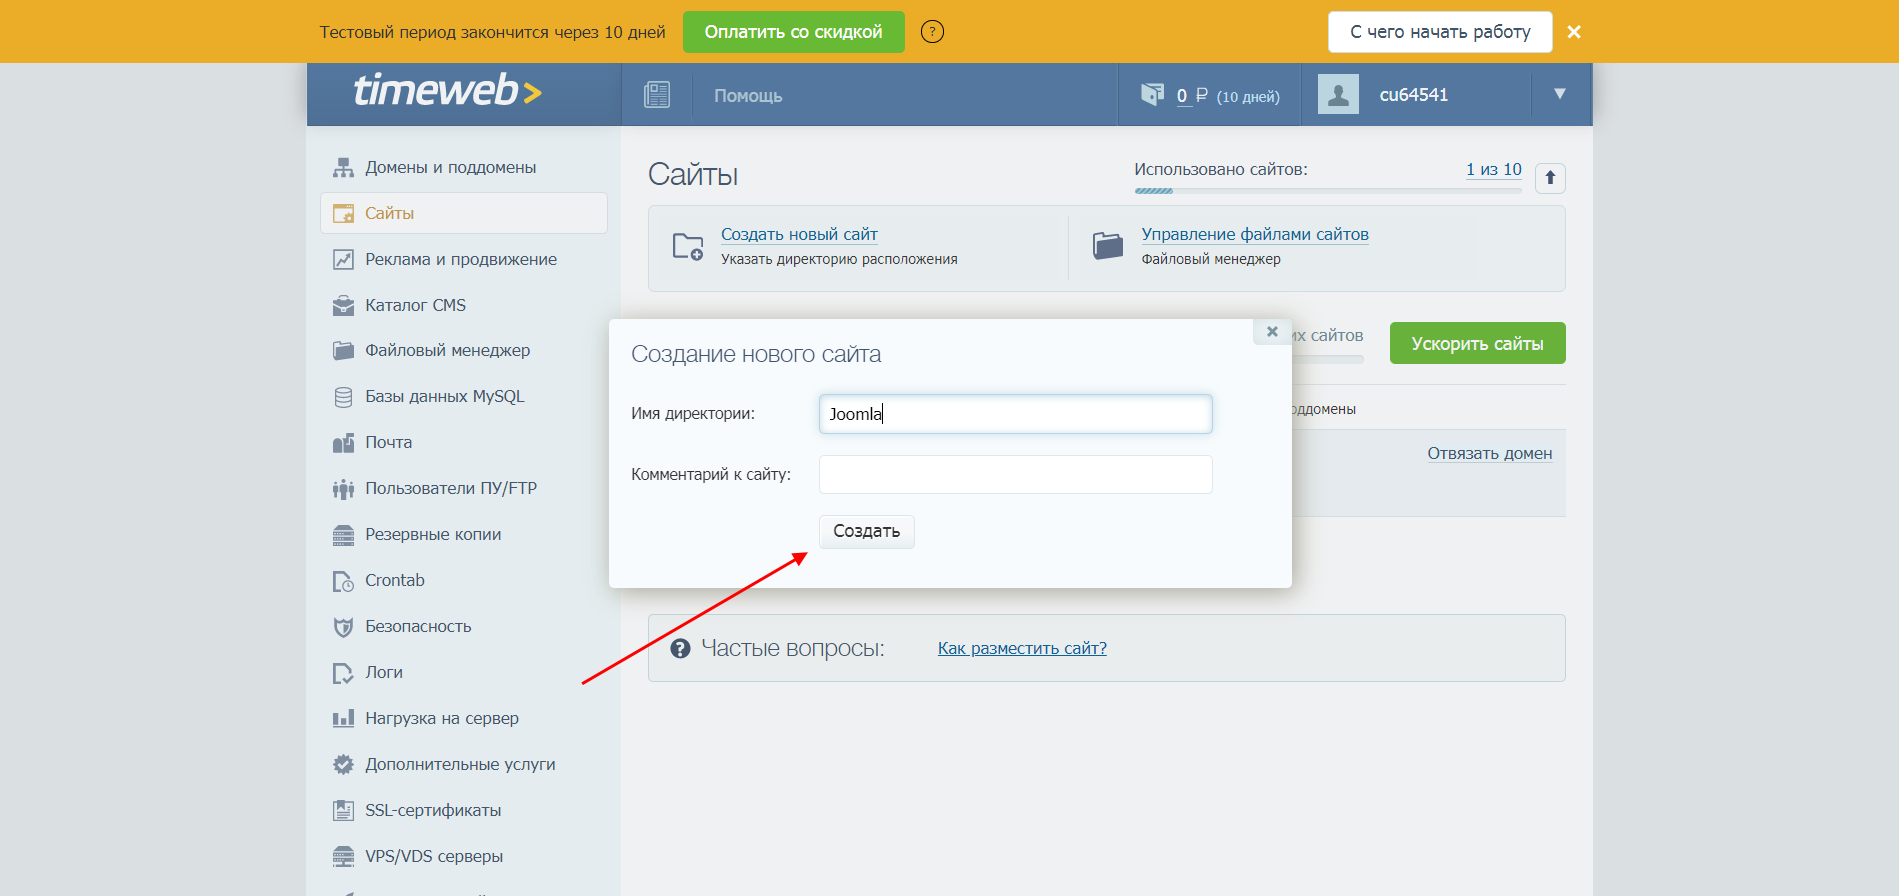
В отобразившемся окне указываем название будущего сайта. Затем жмем на кнопку «Создать».
Теперь привяжем к нему домен – для этого справа от созданного сайта жмем на кнопку «Привязать домен». В отобразившемся окне выбираем нужный домен, в нашем случае это тестовое доменное имя.

Сайт создан, теперь на него можно установить Joomla:
- Переходим в раздел «Файловый менеджер» и открываем папку с сайтом, который мы создали в предыдущей инструкции. Затем заходим в подпапку «public_html» и поочередно нажимаем на два файла с зажатой клавишей «Shift». Затем выбираем «Файл» -> «Удалить» – в результате папка окажется пустой.
- Следующим шагом переносим скачанный ранее архив с Joomla. Он автоматически распакуется, а мы увидим заполненную папку:
- Осталось создать базу данных, которая в последующем будет использоваться CMS-системой. Переходим в раздел «База данных MySQL» и выбираем «Создание новой базы данных».
- В отобразившемся окне указываем название базы данных и придумываем пароль. После этого кликаем по кнопке «Создать». Обязательно сохраните пароль на видном месте – он потребуется в дальнейшем.
- После этого можем переходить к установке CMS. Заходим на привязанный к сайту домен – должно отобразится установочное окно. В нем мы уже работали, поэтому рассмотрим лишь один раздел, который отличается – «Конфигурация базы данных». Здесь нужно указать в качестве «Имя пользователя» имя созданной базы данных, а также прописать к ней пароль. В строке «Имя базы данных» указывается БД хостинга.
На этом установка завершена. Подробнее о том, какие действия выполнять далее, мы уже рассмотрели в разделе «Установка Joomla на локальный сервер».
Способ 3: Через FTP-клиент
Для установки Joomla на хостинге можно воспользоваться и FTP-клиентом. В нем передача данных осуществляется примерно так же, только для этого нужна дополнительная программа, например FileZilla. Давайте рассмотрим, как ей пользоваться:
Осталось загрузить файлы Joomla в нужную директорию и провести предварительные настройки. Подробнее о том, как все это сделать, мы уже говорили в предыдущем разделе: для начала нужно создать сайт и привязать к нему домен, затем из папки сайта удалить все файлы – это действие выполняется уже не в браузере, а через FTP-клиент. Затем там же добавляем все файлы и возвращаемся в браузер: создаем на хостинге новую базу данных, заходим к себе на сайт и там продолжаем установку.
Вот такими простыми действиями на хостинге будет установлена новая CMS.
Описание CMS Joomla
Джумла, как и все подобные системы по контент-менеджменту, представляет собой базовый набор инструментов при первоначальной установке. Этот минимальный пакет по мере необходимости может быть расширен и дополнен.
Таким образом решается проблема излишнего загромождения административного интерфейса функциями, которые не являются востребованными у всех без исключения пользователей.
Помимо этого, снижается нагрузка на хостинг, экономится место на HDD/SSD.
Джумла — мультиязычная CMS, а значит сайт и админка могут быть на любом языке. В каталоге расширений вы найдете языковой пакет «на любой вкус». Установка нового языка штатными средствами простая — для пользователей стран СНГ доступны русский, белорусский, украинские и другие языки стран бывшего СССР.
Требования
Требования для хостинга
Прежде чем мы начнем установку Joomla!, существует пара предварительных требований, которые необходимо удовлетворить для успешной установки Joomla! 3.x. Они действуют ли Вы на выделенном сервере, сервере, который Вы разделяете с другими или устанавливаете на своем собственном компьютере для тестирования или разработки.
- Для установки и использования Joomla! Вы должны удовлетворить ниже следующие требования.
Recommended PHP.ini Settings
There are some PHP settings that need to be sufficient for Joomla to install. The settings are usually in a «php.ini» or «user.ini». Talk to your host about how to change theses settings if it is possible to do so. If working on a localhost e.g. with XAMPP, you should not be restricted by these settings and VPS or dedicated hosting should also not be as restrictive.
The values for PHP.ini below are suggested values only.
- memory_limit — Минимум: 64M Рекомендовано: 128M или больше
- upload_max_filesize — Минимум: 20M
- post_max_size — Минимум: 20M
- max_execution_time: По крайней мере 120 Рекомендовано: 300
Getting the current URL
To get the URL of the current webpage do:
use Joomla\CMS\Uri\Uri;
$uri = Uri::getInstance();
$url = $uri->toString();
The advantage of using this method is that it handles any peculiarities of the webserver (eg Apache or IIS) and also performs some cleaning of the URL to avoid some types of injection attacks.
What gets returned from Uri::getInstance() isn’t a PHP string of the URL, but rather a Joomla Uri object, which also holds internally the various parts of the URL, and provides getter and setter methods to read or write these URL parts as shown below.
     \__/   \________/ \________/ \_____________/ \__/\_______________________/ \_____________/ \________/
      |          |         |              |        |              |                    |            |
   scheme      user       pass          host      port          path                 query       fragment
The example column in the following table illustrates the result of each of the get methods on the URI above, all of which are strings.
| Get method | Set method | Description | Example |
|---|---|---|---|
| getFragment | setFragment | Fragment (everything after the ‘#’). This is often referred to as an anchor. | anchorthis |
| getHost | setHost | Hostname or IP address. For example, ‘www.joomla.org’ or ‘192.168.2.45’. | www.example.com |
| getPass | setPass | Password part of the authority. Don’t use this! | itsasecret |
| getPath | setPath | Path string. Note that the path always includes the leading «/» character. | /path/to/Joomla/index.php |
| getPort | setPort | Port number. Specific schemes (protocols) have their own defaults (for example, ‘http’ is port 80, ‘ftp’ is port 21). | 8080 |
| getQuery | setQuery | Query in string format. For example, «foo=bar&x=y». | task=view&id=32 |
| getScheme | setScheme | Scheme (protocol). For example, ‘http’, ‘https’, ‘ftp’. | http |
| getUser | setUser | Username part of the authority. Don’t use this! | fredbloggs |
| getVar | setVar | An individual query item value from within the query part. A query parameter may be removed using delVar. | 32 |
(Note that passing the user/password in the URL in this fashion is generally deprecated and not recommended, and won’t work on some browsers. In this guide below it’s not considered.)
Конфигурационные настройки
Проверка своих настроек
Если все в порядке, то наверху Вы увидете кнопку «Установка». Если нет, то в этом месте необходимо проверить и посмотреть, что вызывает какую-либо проблему.

Этот раздел разбит на четыре группы:
- Конфигурация сайта: все относящиеся к этому веб-сайту данные, такие как его название, описание, имя пользователя администратора и так далее.
- Конфигурация базы данных: содержит данные по базе данных, которую Joomla будет использовать.
- Начальная проверка: всех требований должно быть показано «Да», иначе Вы не сможете установить Joomla! За исключением версии PHP, все остальное обычно настраивается в файле php.ini. Чтобы проверить, можно ли эти настройки подстраивать, Вам, возможно, придется запросить помощь у своего хостера. Для более подробной информации смотрите конфигурационный файл PHP.
- Рекомендуемые установки: это настройки, которые рекомендуются для Вашей конфигурации PHP, но Вашей установке Joomla! не восприпятствует. Для указаний о том, как их можно изменить, обратитесь к выше приведенным инструкциям.
Если все в порядке и все проверки пройдены, то Вы можете теперь щелкнуть на находящуюся в верхней правой части Обзор кнопку Установка. Это запустит сам процесс установки.
После того, как Вы щелкните на кнопку Установить, Вы должны увидеть планку прогресса с дополнительной информацией по установке. Как только эта установка заверешена, Вы должны увидеть страницу все успешно!
Joomla’s Benefits
7 reasons why Joomla! is the perfect platform for your online projects.
- Joomla has thousands of verified third party extensions which can be easily found on the Joomla Extensions Directory — extensions.joomla.org.
- There are also thousands of high quality templates available, a great number of which are free. Paid templates are also available and come with world class support. Many templates provide a graphical user interface (GUI) which allow you to change colours, fonts, layouts and features without touching a line of code!
- The layout and overrides system and built in extendable functions make it easy to create customised solutions including:
- Custom Layouts
- Language overrides
- Template overrides
- Custom CSS
- … and much more.
- A wealth of free documentation and video training make learning Joomla a breeze make sure to visit:
- docs.joomla.org — our official wiki
- training.joomla.org — a repository of video tutorials created by OSTraining
- forum.joomla.org — the official Joomla community forum — it’s manned by hundreds of thousands of users, all who are happy to share their knowledge and expertise with you!
- Joomla has powerful SEO tools built and ready right out of the box
- Metadata and Keywords
- Mod_rewrite support for SEF URLs
- Menu creation built with the thought of creating clear and consistent sitemaps
- Every time you create an article or a menu item, it automatically creates an alias for its default PHP string so that the links to particular pages are both user and search engine friendly.
- Each menu item can have its own meta description, keywords and robots settings, allowing you to customize the SEO settings for your content to give optimal availability and searchability. These features allow you to make the most important parts of your content shine out among other similar websites, giving you the technical edge.
- Joomla is created, maintained and supported by a unique volunteer community who believe that it should be freely available to everyone, always.
- Joomla is also surrounded by an extensive ecosystem of extension developers, designers, integrators, copywriters, support personnel, system/server administrators, people from all walks of IT life, who believe passionately in Free Forever Open Source Solutions.
- You get the benefit of thousands of hours of development time and expertise from programmers around the world free for you to use. Being free and open source also means that if you need to change webmasters, many others are available without having to rebuild your site!
With a codebase designed to be robust, Joomla also features built in two-factor authentication and extensive access control levels out of the box. Joomla‘s dedicated Security Strike Team always strives to be ahead of the curve and has a reputation for releasing patches before exploits are widely known in the wild.
Multilingual made easy. With over 70 translation packs available for the core and out of the box support for multilingual content management and language associations, creating multilingual websites with Joomla is a simple and straightforward process.
Joomla‘s stable core and extensibility allows your website or application to keep pace as your business unfolds from a budding idea to a fully fledged Fortune 500. Scale and add new features with fast turnarounds and without headaches.Joomla is the go to CMS if you need a good platform to adapt to complex needs. With the integrated ACL (Access Control List), you can define granular access rights for different types of user. Your site can be multilingual out of the box thanks to translation packs. Through the documented API and strong code base, you can produce quality solutions, that last and are extendible in the future. Through modern techniques and minimum requirements like PHP 7.x (required as of Joomla 4) you can expect a stable development environment. Through Overrides, it’s possible to manipulate the output easily without core hacks meaning your updates will go smoothly.
Joomla is not only a CMS, but also a stable and lightweight PHP framework which allows you to write web and command line applications in PHP. The Joomla Framework is easy to adapt and extend according to your needs. The CMS and framework are independent from each other, no need to install the CMS to use the framework! A great example of what you can achieve with the Joomla Framework is our issue tracker.
Administrator Modules
Action Logs — Latest
This module shows a list of the most recent actions performed by your users on the Control Panel.

The Module Type name for this Module is «mod_latestactions». The Help Screen for this Module.
Administrator Menu
This Module shows the main admin navigation menu. An example of this module is shown below:

The Module Type name for this Module is «mod_menu». The Help Screen for this Module.
Administrator Sub-Menu
This Module shows the submenu navigation Module. The Module Type name for this Module is «mod_submenu». The Help Screen for this Module.
Articles — Latest
This Module is used to display the «Recent added Articles» in the Control Panel. An example is shown below:

The Module Type name for this Module is «mod_latest». The Help Screen for this Module.
Custom
This module allows you to create your own module, using a WYSIWYG editor. The Module Type name for this Module is «mod_custom». The Help Screen for this Module.
Feed Display
This Module allows you to show a news feed from an external web site. An example is shown below:

The Module Type name for this Module is «mod_feed». The Help Screen for this Module.
Joomla! Version Information
This Module shows the Joomla version used on the site. The Module Type name for this Module is «mod_version». The Help Screen for this Module.
Logged-In Users
This Module shows a list of users who are currently logged into the site. This is displayed in the Control Panel. An example is shown below:

The Module Type name for this Module is «mod_logged». The Help Screen for this Module.
Login Form
This Module displays a Username and Password Login form. It should not be unpublished. The Module Type name for this Module is «mod_login». The Help Screen for this Module.
Multilingual Status
This Module displays the multilingual status parameters of a site. Clicking on the ‘multilingual status’ link will display a modal like on this example:
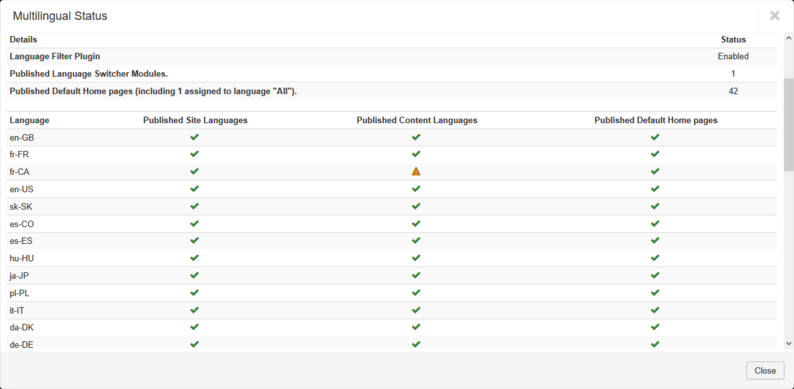
The Module Type name for this Module is «mod_multilangstatus».
The module doesn’t have specific settings. The Help Screen for this Module.
Popular Articles
This Module shows a list of the most popular articles, based on the number of hits. An example is shown below:
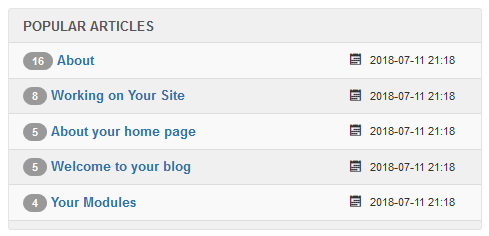
The Module Type name for this Module is «mod_popular». The Help Screen for this Module.
Privacy Dashboard
This Module shows information about privacy requests.

The Module Type name for this Module is «mod_privacy_dashboard».
The module doesn’t have specific settings. The Help Screen for this Module.
Quick Icons
This module shows the Quick Icons on the Control Panel. An example is shown below:
The Module Type name for this Module is «mod_quickicon».
The module doesn’t have specific settings. The Help Screen for this Module.
Sample Data
This Module allows you to install the sample data. The Module Type name for this Module is «mod_sampledata». The module doesn’t have specific settings.
Statistics
This Module shows information about your server and site information like the PHP and Database versions, OS used, number of articles, users, hits… An example is shown below:
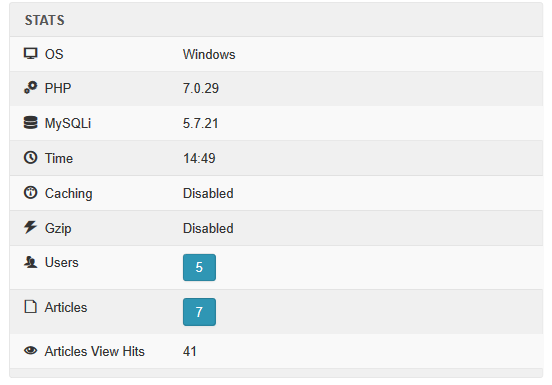
The Module Type name for this Module is «mod_stats». The Help Screen for this Module.
Title
This Module shows the Titles for each backend screen. An example is shown below:

The Module Type name for this Module is «mod_title». The Help Screen for this Module.
Toolbar
This Module shows the toolbars used in the Joomla backend. An example is shown below:

The Module Type name for this Module is «mod_toolbar». The Help Screen for this Module.
User Status
This Module shows the User Status icons. This includes a Preview button, a link to open a new admin window, a Logout button, counts of Private Messages and current Logged-in Users and Logged-in Backend Users. An example is shown below.

The Module Type name for this Module is «mod_status». The Help Screen for this Module.